Fwd: Passport 40 chainplate
280 views
Skip to first unread message

Marty McOmber
Apr 29, 2015, 12:26:05 PM4/29/15
to Passport Owners
Hi all,
Thought I'd share a pic of my port cap shroud chainplate from our 1985 Passport 40. Discovered some severe crevice corrosion and pitting. Not surprising given that these are probably original and appear to be 304 stainless. And 30 years is good long life for a chainplate. In this case the worst of the corrosion was where the plate touched the side of the deck cutout. Obviously, water was trapped there and caused the problem. I noticed it as I was preparing to rebed all the chainplate covers in preparation for restepping our mast. Lucky I noticed -- this thing could have gone at any time.
I pulled the other chainplates on the port side and will do the starboard side later this week. So far, the other plates looked pretty good. And no problems with any of the fasteners either. Hope that holds for the starboard plates as well.
Given that we have the mast out still, the job was pretty easy -- took about 30 minutes to pull all of them on the port side. Just a little furniture modifications required on our v-birth passport.
I am going to be replacing all the chainplates at this time -- regardless of their current condition. This is something most riggers would recommend. To that end, I'm going to be getting quotes for both 316L stainless and titanium. I'll let you know the price differential.
My favorite rigger, Brion Toss, is very much a fan of titanium given its many wonderful properties as boat hardware.
For the titanium quote, I'll be using Allied Titanium, which just on-shored production for their boat parts to Sequim, Washington (just a few hours from where I live). They claim to be very competitive on price with 316L. And there is a lot of reasons to considering paying more for titanium as it won't corrode not mater if water penetrates the chainplate covers. Allied also produces titanium clevis pins, fasteners, tangs, turnbuckels, etc.
I don't want this to keep anyone up at night, but it is a good example worth sharing of why inspecting your chainplates every few years is important.
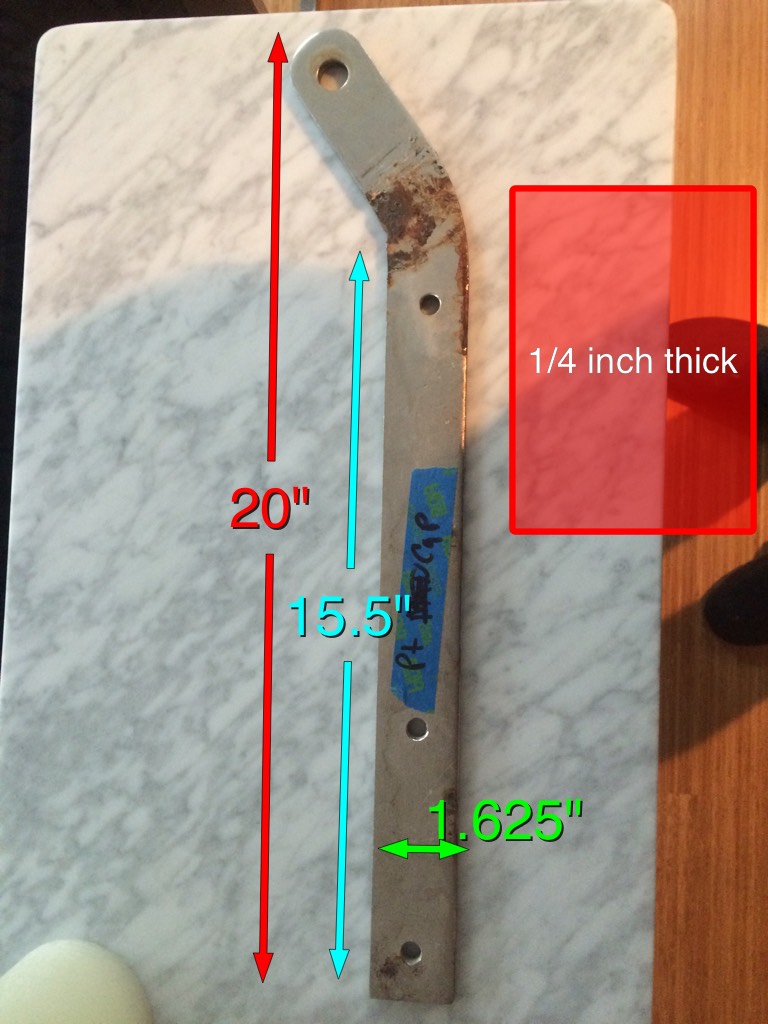
Picture attached (measurements are for the folks giving me quotes).
--
Marty McOmber
Editor
Local boating news, community and resources for the Pacific Northwest
Follow us @

Matthew Davidson
Apr 30, 2015, 9:21:11 AM4/30/15
to Passpor...@googlegroups.com
Marty
Have you considered Monel-400 as an alternative material? Excellent seawater corrosion resistance and will not produce galvanic corrosion reaction when in contact with stainless steel. I my work we produce WWTP outfall diffusers into ocean outfalls and Monel 400 was used at the Brookings oregon outfall back in 1990... still pristine condition today. Don't know how it stacks up to titanium cost... but is an excellent marine service alternative.
Matthew

CAZ
Apr 30, 2015, 8:08:58 PM4/30/15
to Passpor...@googlegroups.com
Marty,

I too have replaced my chain plates using 316LSS. Titanium was way too expensive. I am attaching a photo of some of the new plates. I have much confidence in the new plates especially with them being cut to the dog leg shape. The old plates were heated and bent (weakened) to create the dog leg - compromised from day one.

Kenyon Stewart
May 1, 2015, 3:30:03 PM5/1/15
to CAZ, Passport Owners
I'm having new chainplates made from Titanium as well. Allied wanted about $6k for everything, so I ended up buying the same grade Titanium plate for about $1300 and am having a local firm that does water jet cutting make the new ones using the old as templates. They quoted $300-500 for the setup and cutting. Add $400 for Titanium bolts and it comes out just over $2k.

I am also working on redesigning the chainplate / deck joint to help get a better seal and prevent water intrusion. Here is a conceptual drawing of what I am thinking which is not at all to scale.
It looks more busy and complicated than it will be in reality. Basically, I will cut the teak decking back about 1.5" all the way around the chainplate. Then, cut pieces of 2" x 0.5" pultruded fiberglass and bond that to the deck to create a riser all the way around similar to what some later boats have. Bevel some edges for better sealing, paint, caulk...
--
--
Passport Owners Association http://passportyachts.org
To post to the group, use "reply all" or send email to Passpor...@googlegroups.com
To reply to just the author, just use "reply:
For more options, go to
http://groups.google.com/group/PassportOwners?hl=en
---
You received this message because you are subscribed to the Google Groups "Passport Owners" group.
To unsubscribe from this group and stop receiving emails from it, send an email to PassportOwner...@googlegroups.com.
For more options, visit https://groups.google.com/d/optout.

Jim Melton
May 2, 2015, 1:27:59 PM5/2/15
to Kenyon Stewart, Passport Owners
Kenyon,
I'm really impressed at your design (and the drawing you created to show the design to us). May I ask a few questions of clarification that might help me adopt or adapt your design for my P40? Others might have similar questions, so I've copied the entire POA list.
1) You cited a cost of "just over $2K". Is that cost per chainplate, or for all eight chainplates? The former seems a fantastic bargain, but the latter (adding up to $16K) would be difficult for many of us.
2) On my P40 (and probably on most boatw), the cover plates are screwed to the teak decking or to/through the deck itself. In your redesign, to what (if anything?) would the cover plates be screwed?
3) Any suggestions on how you plan to cut that 45° into the lower deck skin and the epoxy filler (to make room for the butyl)?
4) What do you plan to use as the sealant between the cover plate and the butyl...and why?
5) Finally, totally exposing my ignorance, what is "pultruded fiberglass"?
My chainplates are in great condition (I check them annually at least), but I would like to have a better solution to seal the deck openings than I currently have, so (regardless of whether or not I choose to have titanium chainplates made) I'm very interested in your sealing design. Any and all additional hints would be greatly appreciated.
Many thanks!
Jim
On 5/1/2015 1:30 PM, Kenyon Stewart wrote:
I'm having new chainplates made from Titanium as well. Allied wanted about $6k for everything, so I ended up buying the same grade Titanium plate for about $1300 and am having a local firm that does water jet cutting make the new ones using the old as templates. They quoted $300-500 for the setup and cutting. Add $400 for Titanium bolts and it comes out just over $2k.
I am also working on redesigning the chainplate / deck joint to help get a better seal and prevent water intrusion. Here is a conceptual drawing of what I am thinking which is not at all to scale.
It looks more busy and complicated than it will be in reality. Basically, I will cut the teak decking back about 1.5" all the way around the chainplate. Then, cut pieces of 2" x 0.5" pultruded fiberglass and bond that to the deck to create a riser all the way around similar to what some later boats have. Bevel some edges for better sealing, paint, caulk...
-- ================
Jim Melton & Barbara Edelberg
"Dream SeQueL"
1982 Passport 40, hull# 18
http://DreamSeQueL.com
"BOAT: Break Out Another Thousand"
Kenyon Stewart
May 2, 2015, 4:17:51 PM5/2/15
to Jim Melton, Passport Owners
Hi Jim,
Thanks for the compliments. I'man engineer by training and took drafting and CAD classes in college. I definitely find it a useful skill for boat work and keep a large format pad of graph paper in the chart table. I'll try and answer all your questions.
1). That $ amount is for 6 chainplates. I have a 47, so the layout and design is slightly different. There is one main chainplate per side for the upper and mid shrouds. Then, one smaller for each lower shroud. I'm not addressing the backstay yet, I'm treating it as a separate project for now. The 47 chainplates are actually easier to replicate than those on the 40 as they don't have that dogleg. They are just straight, flat bars with no bends or welds.
2) Not sure yet, still to be worked out
3) Reciprocating saw, Fein tool, jigsaw, grinder or some combination thereof to cut and shape. It doesn't have to be perfect, the main point is to get more room for sealant and have more surface area.
4) This is TBD as well, but this will be Polysulfide or whatever you would typically use as sealant. The Butyl is great for stuff like this and will stay pliable and sticky for decades if protected. It will do a better job of sticking to the smooth metal than the sealant will. I have more research to do on this, and may go all butyl depending on how well the cover plate protects it.
5). Pultruded fiberglass is just fiberglass made in a factory by a method called pultruding. It is more uniform in makeup and more cost effective to use in an application like this than a hand laid laminate. I can get a piece that is 2" x 96" x 0.5" from McMaster Carr for $67, and it's perfectly square with no voids or blemishes. Often it's even whitish in color, so it doesn't really need painting.
I don't think my chainplates are in very good condition at all, and given the quality of much of the other metal on these boats, the metallurgy is suspect. I know that some have just cleaned and inspected their chainplates and reinstalled them, but here's my take. It's 30 year old metal of questionable provenance that has been subjected to conditions known to cause failures that are very difficult to identify. If I'm going to the trouble to remove and inspect it, then I'd be shortsighted not to go the extra mile and replace them. Granted, using Titanium is a personal choice, but I'd still go with a good Bronze alloy over Stainless. I'll definitely sleep better knowing I've done it, and decreasing propensity to leak is top priority.
Kenyon
Sent from my iPhone
Kenyon Stewart
May 4, 2015, 1:32:40 PM5/4/15
to Sheltie Jim, Passport Owners
Jim,
Thanks for the kind words. All of this is a conceptual design, so things will have to be open to improvisation when it actually gets done. The design tries to overcome flaws in the current implementation based on the following observations and assumptions.
1) The gap between the chainplate and the deck is both too small and not a very good shape to get sealant to the bottom or to seal to the chainplate.
Fix: Increase gap between deck and chainplate by beveling the surface away from the chainplate towards the deck surface. This creates more room for a good amount of sealant and more deck surface area for the sealant to bond to.
2) The opening is at deck level which invites water ingress with just sitting water, Also, if water get's below the teak deck, then there is a second source for leak.
Fix: Raise the opening above the level of the deck and bond this riser to the deck, so that if your teak decks leak, the water can't get through as it is now part of the deck.
I'll make note of the cleanliness and prep of items before sealing. With Butyl, I've found that typically if there is a leak, then it means there wasn't enough material. When you think you have enough in there, double it. Use the wax paper that comes with the butyl to help push it into the gap without sticking to the tool you are using. Cram as much as you possible can in there, and then cram some more. Also, I believe that the quality of the butyl in question affects sealing performance. I buy this.
Cheers,
Kenyon
On Sun, May 3, 2015 at 4:57 PM, Jim Melton <Shelt...@centurylink.net> wrote:
Kenyon,
Many thanks for your extremely helpful and generous reply. With respect to item 3), I pretty much suspected that would be how you were planning to do it, but thought you might have some magic jig or tool that was purpose-built.
I recently carefully dug out every bit of "other" sealant from one of my lower chainplates and rebedded it with complete butyl. Interestingly enough, it developed a leak, which I found a bit surprising. Upon close investigation, I realized that I had failed miserably to really clean all traces of residue of the old sealant from the deck sandwich, and the butyl simply wasn't adhering to it sufficiently. One reason why I am so interested in your project is because I need to do something more drastic to have a new, clean surface to which the butyl will properly adhere, and I've been looking for at least three years for something in which I could believe. I think I've found it in your design. Now I have to decide if I want to completely pull the chainplates themselves to thoroughly (inspect and) clean them.)
Thanks again for your help!
Jim
--
---------------------------------------------------
HSUS spends 5x as much on their retirement plan as
they spend on animal rescue/shelters. FIVE TIMES!!
** Permission to repost this message is granted  **
** unless explicitly denied in THIS message.     **
---------------------------------------------------
Jim Melton     SheltieJim at xmission dot com
1930 Viscounti Drive
Sandy, UT 84093-1063
Shelties since 1969; ASSA member since 1992
Please visit Sheltie Rescue of Utah, Inc. at
  http://SheltieRescueUT.org
  Saving The World, One Sheltie At A Time
Support Sheltie Rescue and indulge yourself, too:
  http://SheltieRescueMall.com
Read and comment in our blog:
  http://SheltieTales.com

Ian Macrae
May 5, 2015, 9:08:38 AM5/5/15
to Passpor...@googlegroups.com
Great information. I blame the failure of my top and mid shroud knees on water getting into them over the years through the chain plate covers and rotting out the plywood inside the knees.
What about the fore and back stay chain plates? Has anybody found any problems with theirs, or replaced them? How about the bolts that hold them in place? Those two chain plates are so much harder to inspect.....
Ian
Freyja
P40 #49
What about the fore and back stay chain plates? Has anybody found any problems with theirs, or replaced them? How about the bolts that hold them in place? Those two chain plates are so much harder to inspect.....
Ian
Freyja
P40 #49

psherwood
May 5, 2015, 12:47:02 PM5/5/15
to Ian Macrae, Passpor...@googlegroups.com
I replaced the backstay chainplate by leaving the existing one in place
and bolting a newly fabricated one of 316L to the exterior of the
transom through the existing through-holes with new bolts. Wasn't hard
to figure the angle to which to bend the chainplate. Had to cut a little
notch in the cap rail.
Purists would probably object to the esthetics of having the chainplate
visible on the transom. Oh well.
Phil
s/v Cynosure
San Carlos / Seattle
> No virus found in this message.
> Checked by AVG - www.avg.com <http://www.avg.com>
> Version: 2015.0.5863 / Virus Database: 4339/9697 - Release Date: 05/04/15
>
and bolting a newly fabricated one of 316L to the exterior of the
transom through the existing through-holes with new bolts. Wasn't hard
to figure the angle to which to bend the chainplate. Had to cut a little
notch in the cap rail.
Purists would probably object to the esthetics of having the chainplate
visible on the transom. Oh well.
Phil
s/v Cynosure
San Carlos / Seattle
> --
> --
> Passport Owners Association http://passportyachts.org
> To post to the group, use "reply all" or send email to
> Passpor...@googlegroups.com
> To reply to just the author, just use "reply:
> For more options, go to
> http://groups.google.com/group/PassportOwners?hl=en
> ---
> You received this message because you are subscribed to the Google
> Groups "Passport Owners" group.
> To unsubscribe from this group and stop receiving emails from it, send
> an email to PassportOwner...@googlegroups.com
> <mailto:PassportOwner...@googlegroups.com>.
> --
> Passport Owners Association http://passportyachts.org
> To post to the group, use "reply all" or send email to
> Passpor...@googlegroups.com
> To reply to just the author, just use "reply:
> For more options, go to
> http://groups.google.com/group/PassportOwners?hl=en
> ---
> You received this message because you are subscribed to the Google
> Groups "Passport Owners" group.
> To unsubscribe from this group and stop receiving emails from it, send
> an email to PassportOwner...@googlegroups.com
> No virus found in this message.
> Checked by AVG - www.avg.com <http://www.avg.com>
> Version: 2015.0.5863 / Virus Database: 4339/9697 - Release Date: 05/04/15
>

Bill Schmidt
May 5, 2015, 12:48:07 PM5/5/15
to Passpor...@googlegroups.com
We replaced the stern chain plate on Wind Witch in 2000, but for
very different reasons. It was a big job. For years prior, we were
beset by a recurrent horizontal crack in the gel coat just under
the cap rail across the stern. It came to a head when it was obvious
that the stern combing and back of the cockpit were lifting away,
being pulled up by the back stay. One thing lead to another and the
solution was to take a saws all, cut out and remove the starboard
aft locker, cut out and remove the back chain plate (it has a
T-piece plate just under the cap rail) and, just for fun, tore out
and removed the "Tuna Tower" cage that supports the rudder post. The
rudder support was rotted away and partially collapsed. The chain
plate was intact, but the backing plate, made of crappy common
Taiwan steel (so Wendell Rankin). was completely dissolved and
absent as any support.For that matter, backing plates for the shitty
ladder and for the push pit were similarly rotted out and gone. The
chain plate, itself, was OK, but was just a flat plate bent at an
angle forward with the afore mentioned T plate. As the backing plate
rotted away, there was nothing to keep the prevent the cockpit from
prying away from the transom, bending the chain plate forward. Got
the picture?
We installed a new stainless steel upper rudder support and bearing, left the starboard aft locker out and put broad shelving inside (removable so that we could utilize the extra space and also get into the back end to service the autopilot, SSB antenna tuner and keep an eye on the new Transom and back stay chain plate as well as to allow us easy access to all the steering cables and the quadrant - did I forget to mention that we found the steering quadrant, made of aluminum, was also partially collapsed and needed replacement?). The new chain plate got a new stainless backing plate and we added an extra through bolt at the very top of the transom, just below the cap rail (more on this- see below). As well, the T-piece that goes under the cap rail horizontally got a new flange that goes outside the fiberglass of the transom and projects downward. It captures the upper newly added through bolt of the chainplate so that the back of the cockpit and all can never ever be preyed away from the transom again. We left that God awful ladder off, replaced all the other rotted backing plates and reglassed all the broken parts of the transom together. Then we sat back and wrote a huge check for the costs. Ain't boat ownership fun?
Billy Manana
--
--
Passport Owners Association http://passportyachts.org
To post to the group, use "reply all" or send email to Passpor...@googlegroups.com
To reply to just the author, just use "reply:
For more options, go to
http://groups.google.com/group/PassportOwners?hl=en
---
You received this message because you are subscribed to the Google Groups "Passport Owners" group.
To unsubscribe from this group and stop receiving emails from it, send an email to PassportOwner...@googlegroups.com.
Kenyon Stewart
May 5, 2015, 1:27:17 PM5/5/15
to Bill Schmidt, Passport Owners
Pulled a chainplate for one of the lowers yesterday to get some accurate measurements. This isn't the worst one, just the easiest to get to. There is definitely a good sized patch of pitting in the metal where it went through the deck. The rest looked better than I expected, but if the bottom part doesn't stay attached to the top part, it doesn't do me much good.
On the 47, the lowers are about 2.5" x 24.5" x 0.4", uppers are about 4.5" x 24.5" x 0.4".
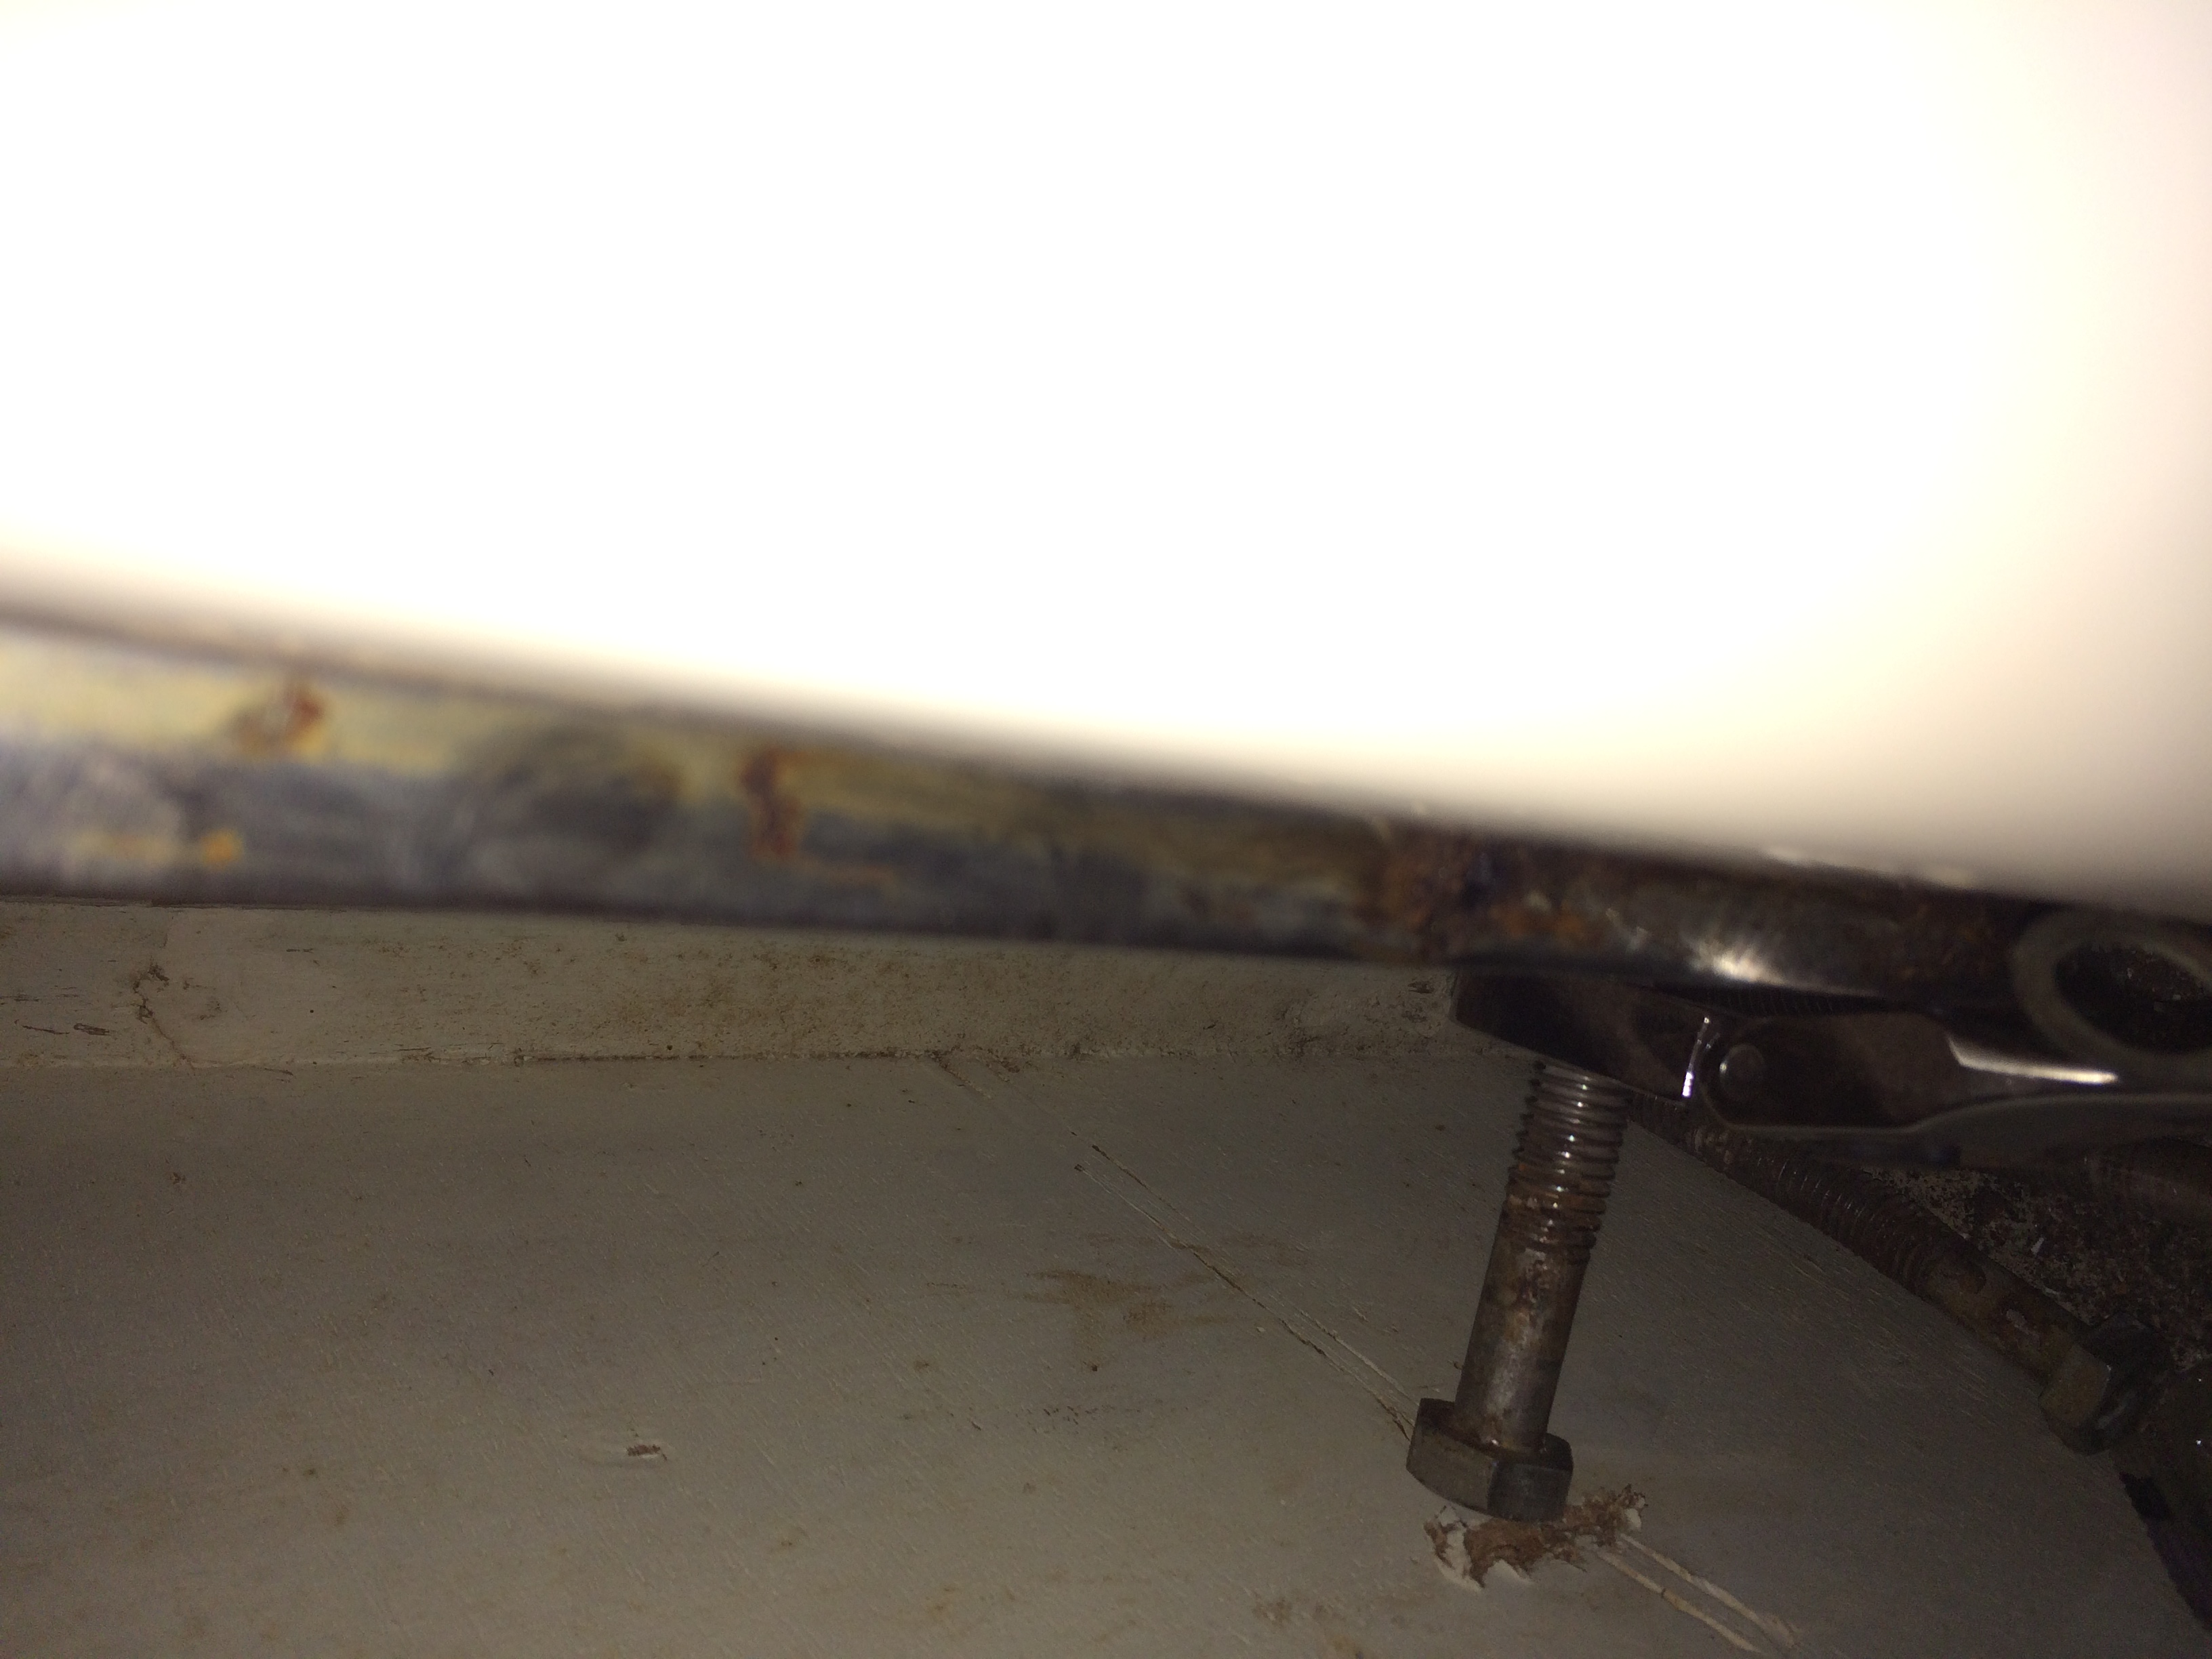
I am pretty certain that these chainplates have never been out of the boat. As you can see in the 2nd photo, I found that the cabinetry was built AFTER the chainplates were installed. We now have a nice hole in that side of that cabinet which I will have to patch or make a cover plate for. Not sure why they didn't just flip it around so that the nut was on that side, it would have been much easier to deal with. I considered cutting the bolt in place so that I didn't have to make a hole, but clearance was tight and I was more afraid of doing damage to the teak front of the cabinetry than the white plywood side.
I have found that "ease of maintenance" doesn't seem to be in the vocabulary of most boatbuilders of marine installers. I've recently been adding an oil change pump and remote oil filter to the beautiful little Yanmar that the PO had installed at great expense into Outbound. The cursing that has been coming from the boat during this process has probably somewhat alarmed the neighbors. I typically disavow violence, but I'm pretty sure there were some comments about strangulation and/or castration during the heat of the moment directed at the people who installed it . There would still be some strong words if I could get my hands on those @#$%... :-)


Kenyon Stewart
May 5, 2015, 2:45:31 PM5/5/15
to Bill Schmidt, Passport Owners
Pictures didn't seem to come through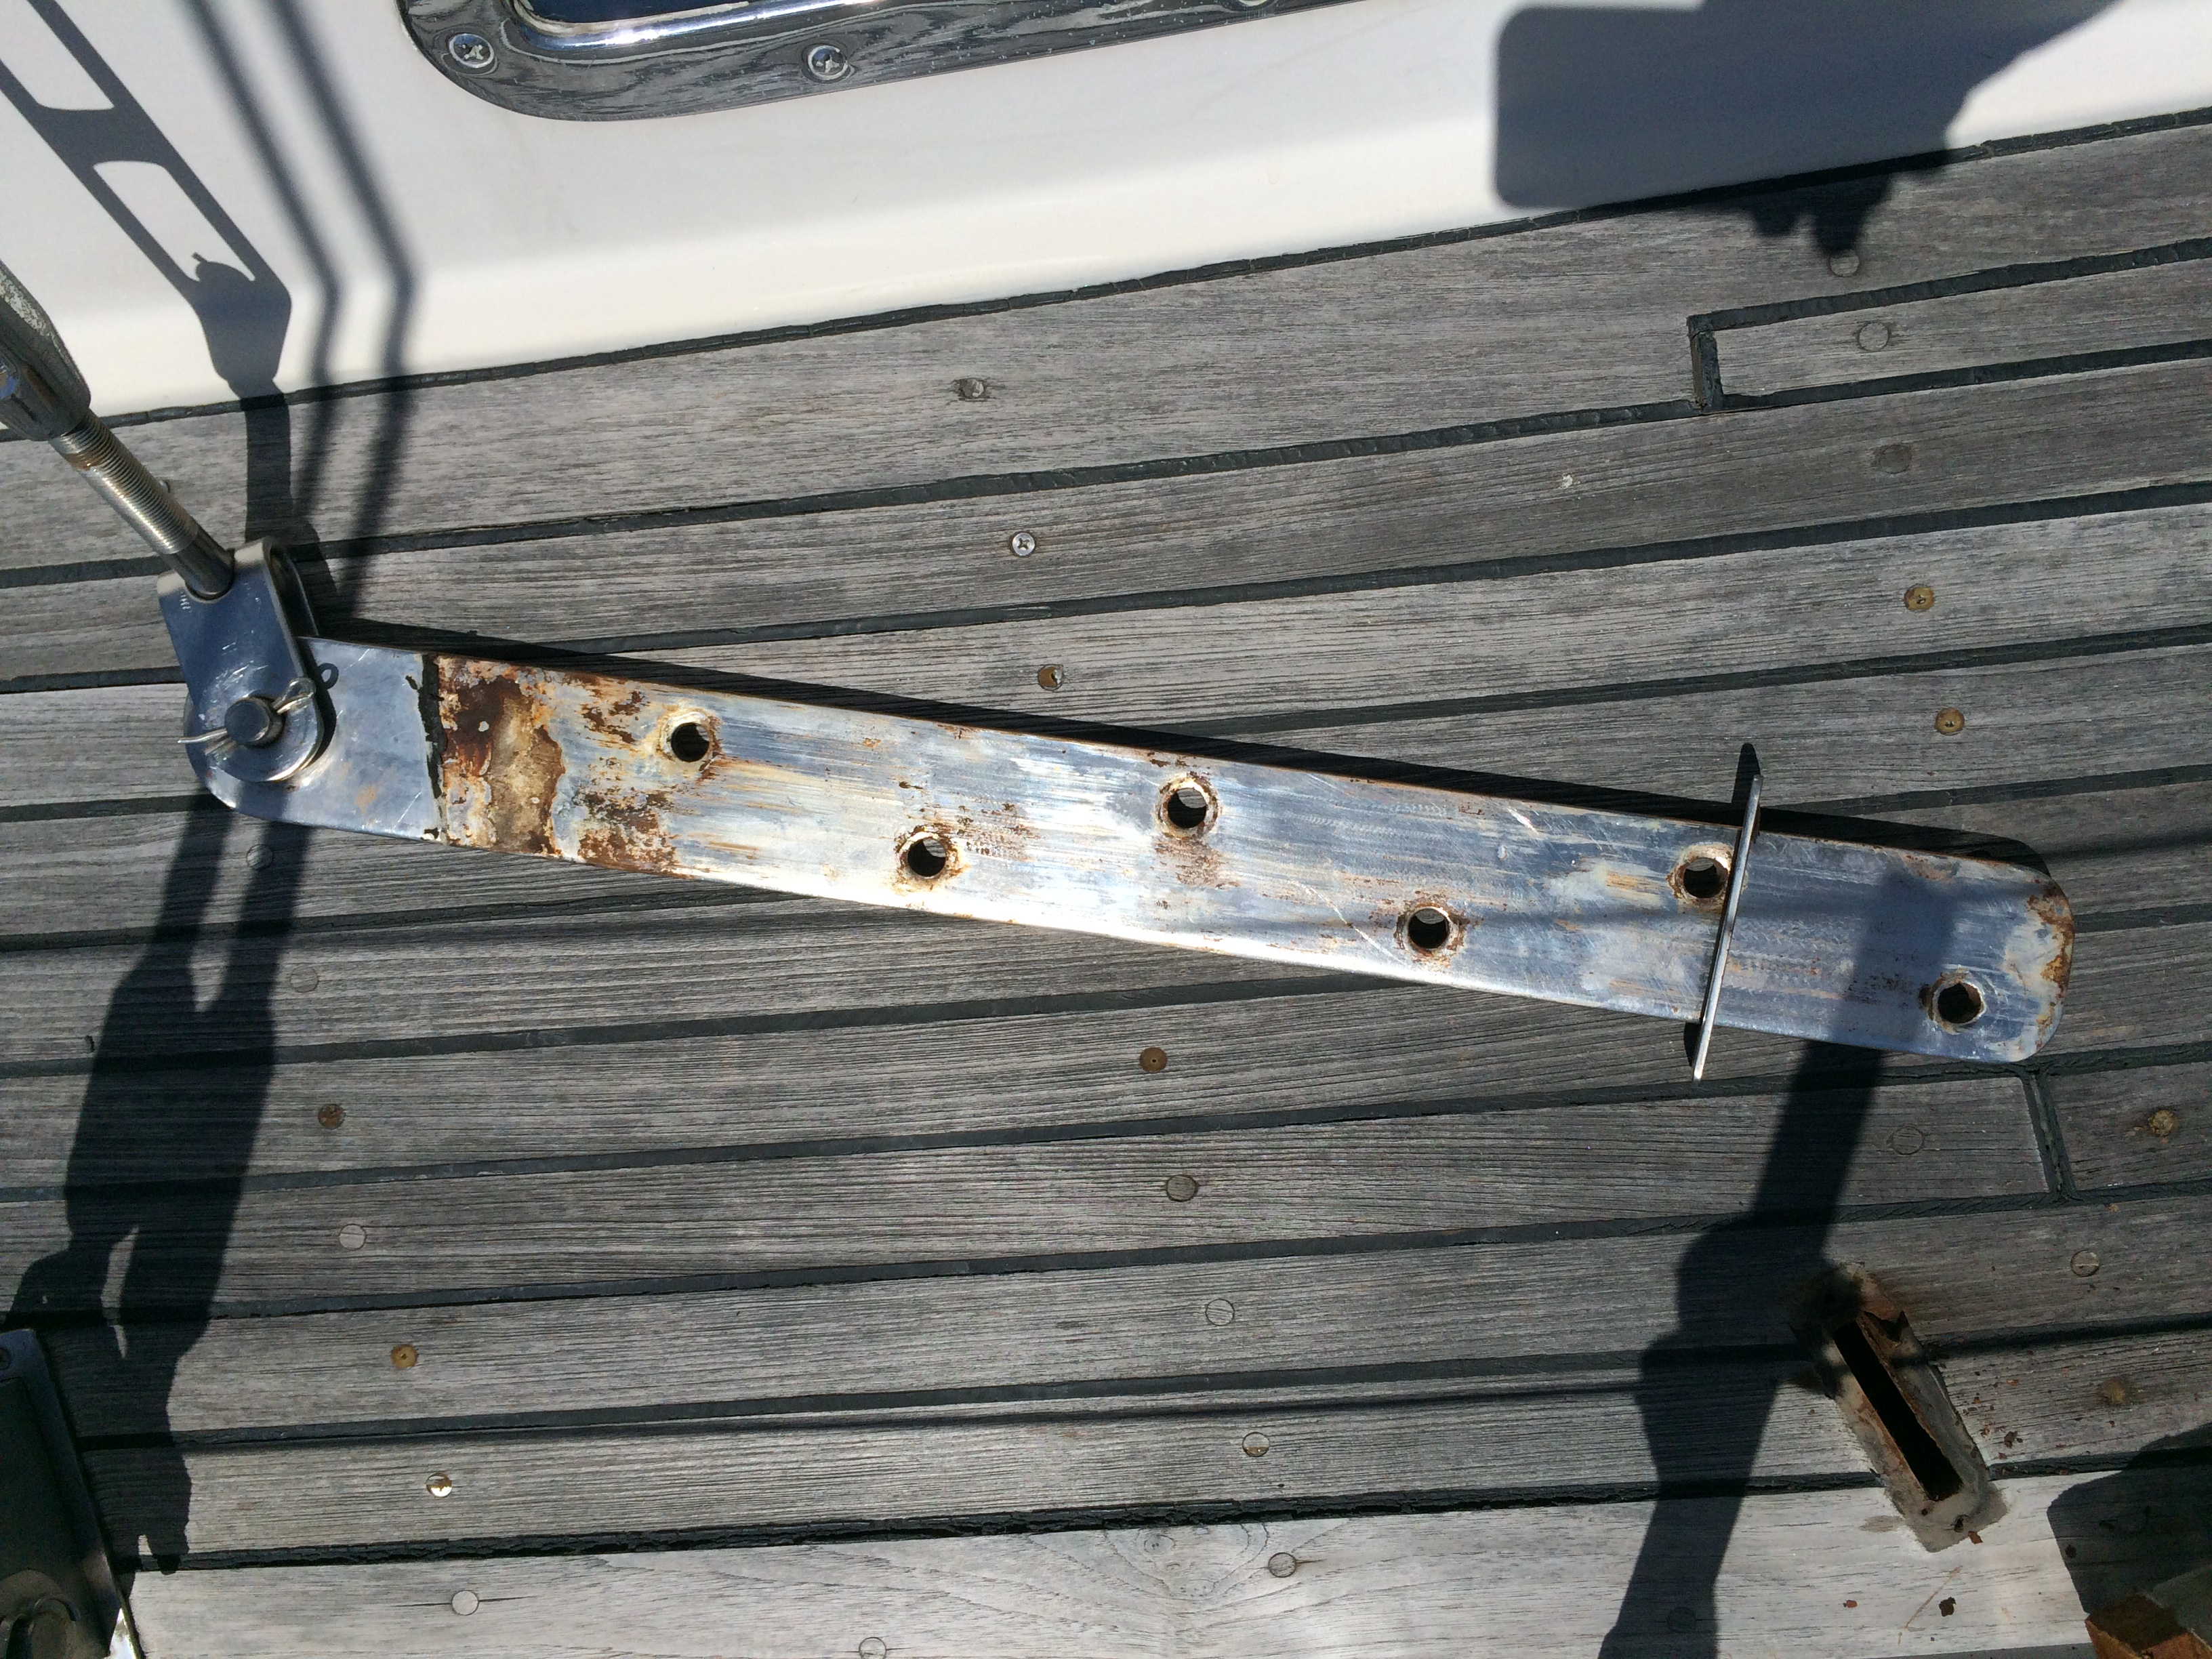

svladycybil
May 5, 2015, 3:06:00 PM5/5/15
to Passpor...@googlegroups.com, bcasn...@gmail.com
On Friday, May 1, 2015 at 3:30:03 PM UTC-4, kenyon wrote:
> I'm having new chainplates made from Titanium as well. Allied wanted about $6k for everything, so I ended up buying the same grade Titanium plate for about $1300 and am having a local firm that does water jet cutting make the new ones using the old as templates. They quoted $300-500 for the setup and cutting. Add $400 for Titanium bolts and it comes out just over $2k.
>
>
> I am also working on redesigning the chainplate / deck joint to help get a better seal and prevent water intrusion. Here is a conceptual drawing of what I am thinking which is not at all to scale.
>
>
>
>
>
>
>
>
>
> It looks more busy and complicated than it will be in reality. Basically, I will cut the teak decking back about 1.5" all the way around the chainplate. Then, cut pieces of 2" x 0.5" pultruded fiberglass and bond that to the deck to create a riser all the way around similar to what some later boats have. Bevel some edges for better sealing, paint, caulk...
>
>
> On Thu, Apr 30, 2015 at 5:08 PM, CAZ <bcasn...@gmail.com> wrote:
>
>
> Marty,
>
>
>
>
>
> On Thu, Apr 30, 2015 at 5:08 PM, CAZ <bcasn...@gmail.com> wrote:
>
>
> Marty,
>
>
>
Kenyon Stewart
May 14, 2015, 3:35:15 PM5/14/15
to svladycybil, Passport Owners, Bill Casnovsky
Oh yeah! Just received 55 inches of Grade 5 Titanium love. This piece is just for the main chainplates for the uppers and intermediates in the 47 and cost ~ $630. It's the slightly thicker and same width as the originals, just needs to be cut to length, holes cut and upper corners rounded.
Have ordered a piece 12 x 24 to cut the 4 lowers from for $877. I'm pretty sure that price was $756 just a few days ago, but I hesitated in pulling the trigger and the price went up. Not sure what's up with that. Still not bad considering how much Allied Titanium wanted. Silicon or Manganese Bronze was going to run about $1000, but was actually harder to source than the Titanium.
svladycybil
Jun 7, 2015, 8:14:34 PM6/7/15
to Passpor...@googlegroups.com
In regard to Kenyon's chainplate design. I modified my chainplate entry points in a similar but less sophisticated manner over 7 years ago.
I used the dreaded 5200 to seal them. They are still good today. Haven't had to touch them.
The 5200 was 3/8" wide and 1" or more deep.
I am sailing in the Windwards with 18-22 knots as the norm so they really have been tested.
One additional point. I opened up the deck over the knees so I could cover the top with epoxy. The top of the knees were not fiberglassed so the chainplate leakage ran directly into the plywood core of the knee.
Dick
S/V Lady Cybil
lying Grenada, West Indies

Guilherme Salgado
Jan 10, 2023, 2:50:43 PM1/10/23
to Passport Owners
Hi Billy,
Is that T-piece plate part of the chainplate itself? Was the chainplate just a rectangular bar or some other shape? I'm having a hard time picturing it
On my P41 the bolt heads and nuts were not glassed in so I thought the chainplate would be just a rectangular bar like the others and I'd be able to pull it up after removing the bolts, but unfortunately that didn't work.
Reply all
Reply to author
Forward
0 new messages