Thru-Hull Replacement Experience

jwshukis
Beneteau OEM Thru-hulls: Looking Good but Deeply Flawed
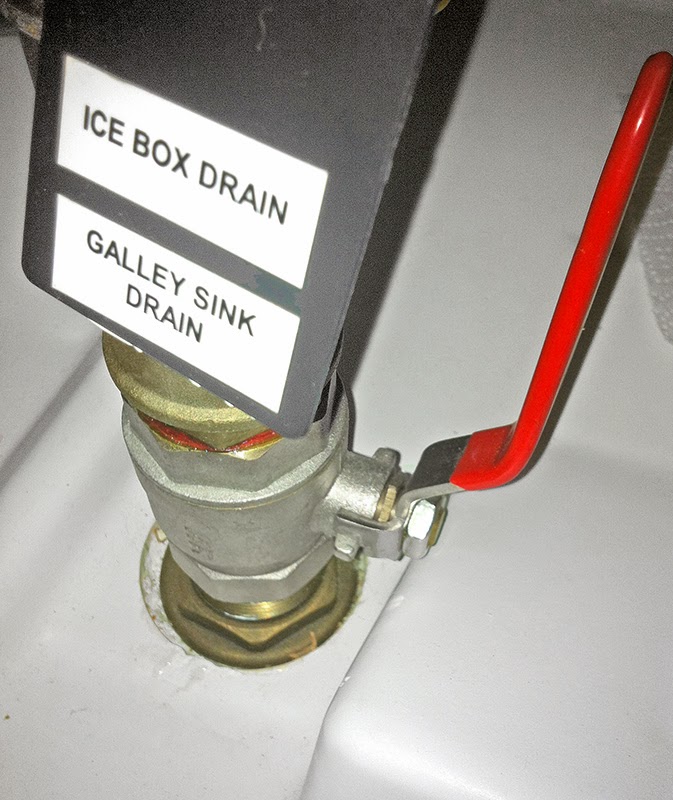
The photo shows one of my original thru-hulls. It looks pretty good, doesn't it? Unfortunately, it wasn't. Beneteau, like most if not all production boat builders, uses mushroom style thru-hulls with straight (NPS) threads. These are bolted to the hull with a threaded backing ring, and then attached to ball valves that have tapered (NPT) threads. There are, however, a number of serious problems with this installation:
- Straight-thread thru-hulls should never be mated with tapered-thread valves. You end up with surprisingly little contact between the two components, which makes for a weak connection and a great potential for leaks. Of course you can't buy tapered thru-hulls nor straight threaded ball valves, which is why the production builders get away with doing it incorrectly.
- That tiny threaded backing ring is no substitute for a real backing plate. When you grab the thru-hull and give it a good shake, it actually moves, flexing the hull. This is made worse by the round well or recess into which Beneteau installs their thru-hulls - see the photo again. The Beneteau hull consists of an outer shell plus an inner shell, both of roughly equal thickness, strongly bonded together. Where there are such recesses, however, you get only the outer hull, which is perhaps a bit more than 1/4" thick. In other words, the hull is thinnest where you'd want it to be the thickest. The diagram shows a cut-away view of the situation.
- Beneteau does not appear to use bronze thru-hulls. Some parts on my boat, such as the hose barb adapters, were almost certainly plain brass, and were tinged with pink when I removed them - a clear sign of dezincification. Others may have been DZR brass or something similar.
- The thru-hulls are surprisingly thin - far too thin. One Beneteau dealer told me that my particular generation of boats - from 2008-2010 or so - used thinner metal than usual, and that they switched to thicker materials after receiving many complaints.
- For some reason, some of the components attached to the ball valves were firmly glued or epoxied in place. In the photo, for example, this shows up as a thin red line of glue at the top of the ball valve between components. Upon inspection, I suspect that they were using some metric threaded components that didn't mate properly without the glue.
- You can't see it in the photo, but the thru-hull in the photo terminated in a 1.25" hose barb onto which was attached a 1.5" hose. Beneteau used hose clamps to crush the 1.5" hose down to 1.25". This connection never leaked, but I was really disappointed to see such sloppy work in a bit of plumbing that spent all of its life below the waterline.
Removing the Existing Thru-hulls
There are a number of different ways to remove an old thru-hull. My boatyard usually chisels or grinds off the mushroom head from outside the boat, which is easy for them to do but has the potential to gouge the hull and/or compromise the epoxy barrier coat. I chose instead to use a multi-tool from inside the boat to cut through the threads just above the backing ring, and then to use a very large socket and an impact driver to quickly "spin" off the threaded backing ring. The cutting might have been a challenge except for the very thin metal and, I suspect, its partially de-zincified and weakened condition. For me, it cut like butter in a few seconds and the impact driver spun off the threaded backing rings instantly with no drama.
New Hardware - Backing Plates This Time
Other Thoughts To Share
- Using the Groco adapter plates will make future replacement - if needed - a breeze. I can remove and replace a mushroom fitting without touching the inside of the boat, and I can replace a corroded ball valve without breaking the seal on the mushroom.
- With the hull, the backing plate, and the layer of reinforced epoxy between them, the new thru-hull openings are almost 2" thick - much better than the 1/4" original depth, and deep enough that I didn't have to trim the mushrooms for length.
- It is absolutely critical that your new backing plates are aligned properly so that your new thru-hulls seat flush against the hull - and they won't be unless you work at it. The Compass Marine article glosses over this topic somewhat. I ended up test-fitting everything dry and then using temporary wooden shims to get the alignment just right before applying epoxy. It worked perfectly.
- Because the new thru-hulls are taller than the originals, I needed to re-run quite a bit of plumbing. This was not an easy task. If you embark on the same project, allow time for this.
- Disenchanted with the Beneteau hardware, I decided to replace every metal fitting attached to any thru-hull, and to switch from the OEM hose clamps to a top quality clamp with a rolled edge. Overkill, but I like it.
- G10 board is extremely difficult to cut and drill. Your table saw will work, but the blade will dull quickly. A drill press works very well to drill the holes, but you need something quite powerful - I ended up using a friend's when my 0.75 HP press just wasn't up to the task.
jwshukis
This shows the Beneteau OEM thru-hull installation and the Compass Marine method that I used:


Captain Guy
Largest Beneteau group, over **1054** members and growing.
To post to this group, send email to Benetea...@googlegroups.com
To unsubscribe from this group, send email to Beneteau-Owne...@googlegroups.com
For more options, visit this group at http://groups.google.com/group/Beneteau-Owners
contact denny.we...@gmail.com, or ume...@comcast.net if you have a list management question
---
You received this message because you are subscribed to the Google Groups "Beneteau Owners" group.
To unsubscribe from this group and stop receiving emails from it, send an email to beneteau-owne...@googlegroups.com.
For more options, visit https://groups.google.com/d/optout.

Mohammad Bayegan

ume...@comcast.net
From: "jwshukis" <jwsh...@yahoo.com>
To: benetea...@googlegroups.com
Sent: Friday, March 7, 2014 6:34:43 PM
Subject: {Beneteau Owners} Thru-Hull Replacement Experience
jwshukis
jwshukis

dcreno
My concern with the video is that he doesn't thread the FR4 sheet; seems like a good idea to thread it.
Regards,
David Reno
B361

Bligh
Sent from Coopers' galactic communicator
--
jwshukis
jwshukis

Sailing
Joe Sircely
--

BDoyle

Howard
--
Largest Beneteau group, over **1054** members and growing.
To post to this group, send email to Beneteau-Owners@googlegroups.com
To unsubscribe from this group, send email to Beneteau-Owners-unsubscribe@googlegroups.com
For more options, visit this group at http://groups.google.com/group/Beneteau-Owners
contact denny.we...@gmail.com, or ume...@comcast.net if you have a list management question
---
You received this message because you are subscribed to the Google Groups "Beneteau Owners" group.
To unsubscribe from this group and stop receiving emails from it, send an email to beneteau-owners+unsubscribe@googlegroups.com.

Wout gmail
Largest Beneteau group, over **1121
** members and growing.
To post to this group, send email to Benetea...@googlegroups.com
To unsubscribe from this group, send email to Beneteau-Owne...@googlegroups.com
For more options, visit this group at http://groups.google.com/group/Beneteau-Owners
contact denny.we...@gmail.com, or ume...@comcast.net if you have a list management question
---
You received this message because you are subscribed to the Google Groups "Beneteau Owners" group.