Interesting 3D printed project

243 views
Skip to first unread message

Edward Simpson

unread,
Aug 8, 2016, 2:21:11 PM8/8/16
to 3D604
Hi all,
I've just finished building a Mostly Printed CNC, and thought I'd share some pictures with the group.

More pictures, video, and the full write up are on my blog: https://cobaltgriffonary.blogspot.ca/2016/08/building-mostly-printed-cnc-machine.html
and the official project website: http://www.vicious1.com/
I had lots of fun building this thing and I'm enjoying learning about CNC router work with it.
Edward Simpson

Rob Hall

unread,
Aug 8, 2016, 3:10:23 PM8/8/16
to 3d...@googlegroups.com

Looks great I have printed 2 of these one for myself and another for a friend
Awesome little machine


--
You received this message because you are subscribed to the Google Groups "3D604" group.
To unsubscribe from this group and stop receiving emails from it, send an email to 3d604+unsubscribe@googlegroups.com.
To post to this group, send email to 3d...@googlegroups.com.
To view this discussion on the web visit https://groups.google.com/d/msgid/3d604/c516b73f-56b7-4aa1-a916-14d51dbac066%40googlegroups.com.
For more options, visit https://groups.google.com/d/optout.

Edward Simpson

unread,
Aug 8, 2016, 3:34:53 PM8/8/16
to 3D604
Hi Broncosis,
Any tips on building a spoil board or clamping methods? so far I've just been using 2.5 inch screws into the benchtop, but I'd like to upgrade to another method of clamping. Also, how's your machine held up over time?
Edward

On Monday, August 8, 2016 at 12:10:23 PM UTC-7, broncosis wrote:

Looks great I have printed 2 of these one for myself and another for a friend
Awesome little machine

On Aug 8, 2016 11:21 AM, "Edward Simpson" <r2a...@gmail.com> wrote:
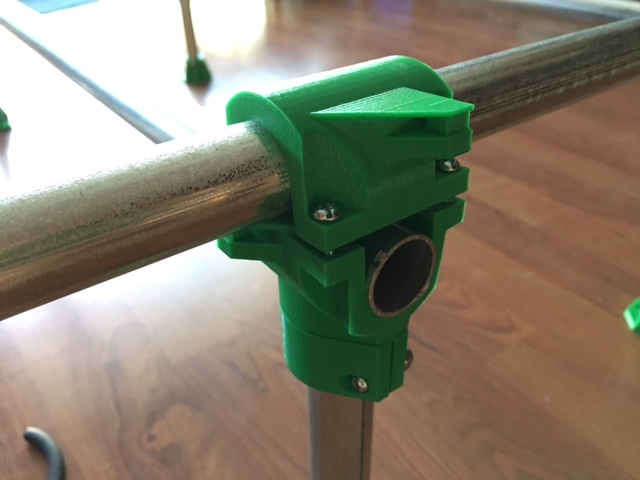
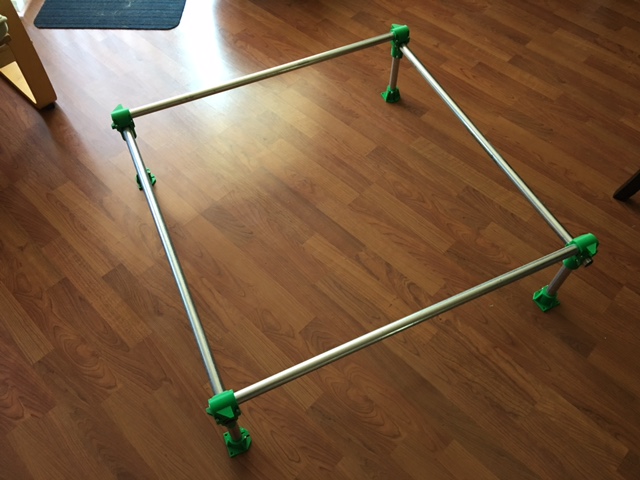
Hi all,
I've just finished building a Mostly Printed CNC, and thought I'd share some pictures with the group.

More pictures, video, and the full write up are on my blog: https://cobaltgriffonary.blogspot.ca/2016/08/building-mostly-printed-cnc-machine.html
and the official project website: http://www.vicious1.com/
I had lots of fun building this thing and I'm enjoying learning about CNC router work with it.
Edward Simpson

--
You received this message because you are subscribed to the Google Groups "3D604" group.
To unsubscribe from this group and stop receiving emails from it, send an email to 3d604+un...@googlegroups.com.

John Biehler

unread,
Aug 8, 2016, 3:47:07 PM8/8/16
to 3d...@googlegroups.com
Great job, Edward! Is yours portable enough to bring to a meetup sometime? I think it would be an interesting topic to discuss and (ideally) demo.


To unsubscribe from this group and stop receiving emails from it, send an email to 3d604+unsubscribe@googlegroups.com.

To post to this group, send email to 3d...@googlegroups.com.

Rob Hall

unread,
Aug 8, 2016, 3:47:59 PM8/8/16
to 3d...@googlegroups.com

Well mdf makes a great spoiler board as it has no grain it cuts evenly and won't cause unpredictable things also you can draw vacuum through it that's going to  be my final clamping choice but I haven't got my machine built   also you can buy mdf slot board for making displays you can use this like tslot track to clamp stuff


To unsubscribe from this group and stop receiving emails from it, send an email to 3d604+unsubscribe@googlegroups.com.

To post to this group, send email to 3d...@googlegroups.com.

Edward Simpson

unread,
Aug 8, 2016, 4:09:19 PM8/8/16
to 3D604
Not at the moment, but I haven't built the final spoilboard yet so I could add a support frame and make it mobile, it's only held down by a dozen screws, fairly simple to detach and move to a new base. I'll definitely bring it to one of the meetups in the future.
Edward 

Edward Simpson

unread,
Aug 8, 2016, 4:12:49 PM8/8/16
to 3D604
MDF slot board? hadn't heard of that before, but it sounds like a good choice for a clamping surface. I'm planning to print some clamps that work with t-slot style interfaces, so that'll definitely save some time.
Thanks for the suggestion and good luck with building your machine :)
Edward

John Biehler

unread,
Aug 10, 2016, 2:06:35 AM8/10/16
to 3d...@googlegroups.com
Well, your blog post inspired me to finally attempt this, Edward. You're about the third person I know that's built it and I finally dove in and read more about it and surprisingly I have a majority of the parts needed on hand to build it or at least a Home Depot nearby that has what I don't (for the most part). His design(s) are pretty great and unlike my first Reprap build, doesn't required ordering stuff from all over the planet. 

I'm wondering two things: what size (build area) did you build yours to? I kind of decided I want a 24"x24" build area for milling and possibly lasering so have cut my tubing for a table with that dimension (using Ryan's calculator for the various parts).

Also, where did you source your bearings? Since it needs almost 60, and I'm too impatient to wait for a slow boat from China but also there has to be a more reasonable price locally.  

Thanks!

To unsubscribe from this group and stop receiving emails from it, send an email to 3d604+unsubscribe@googlegroups.com.

To post to this group, send email to 3d...@googlegroups.com.

Rob Hall

unread,
Aug 10, 2016, 2:33:03 AM8/10/16
to 3d...@googlegroups.com

I have a spare set john if you can't find them locally. But lordco Has them
They buy from Ring Ball which is local too you could look them up and find a couple of other local dealers I am sure
They have plenty of stock


Rob Hall

unread,
Aug 10, 2016, 2:43:48 AM8/10/16
to 3d...@googlegroups.com

Ryan thin double sided tape is also popular with some guys for holding down things that you might not want to clamp or screw like glass or metal

Edward Simpson

unread,
Aug 10, 2016, 3:57:57 AM8/10/16
to 3D604
Hi John,
I built mine for a 20"x20"x9" work volume, that makes the outer dimensions roughly 30"x30" which happens to be the perfect size to fit on the bench in my workshop :)
As for the bearings, I sourced mine from Solarbotics in calgary (https://solarbotics.com/product/14480/ $1.08 each), or Lee's Electronics also caries them. 
Here is a copy of my bill of materials, couple minor changes I've made are I'm using one of those 5mm-8mm aluminum couplings for the z-axis lead screw, it holds the 5/16" threaded rod nice and firmly. If your going to add a laser tool, I'd suggest using these corner blocks (http://www.thingiverse.com/thing:1365589) to add some side panels for safetey and to stiffen the frame a bit.
Edward

John Biehler

unread,
Aug 12, 2016, 3:40:19 PM8/12/16
to 3d...@googlegroups.com
Hey Rob....what did you want for your bearings? It might be easier (faster) to just buy them off you than sourcing/ordering them.

Rob Hall

unread,
Aug 12, 2016, 3:44:39 PM8/12/16
to 3d...@googlegroups.com

I will see what they cost me.  Less than $1 each for sure
If you give me some rough conduit lengths I can hold some scrap chunks for you or pick it up at the wholesaler


John Biehler

unread,
Aug 12, 2016, 3:44:42 PM8/12/16
to 3d...@googlegroups.com
Thanks Edward. Your BOM is very helpful! 

I still have a ton more printing to do but the frame is roughly assembled. I'm still debating on leaving my rails set for a 24" build area or making it smaller...it's a pretty big setup! It's surprisingly stable considering not everything has even been tightened down yet as I consider my layout.


To unsubscribe from this group and stop receiving emails from it, send an email to 3d604+unsubscribe@googlegroups.com.

To post to this group, send email to 3d...@googlegroups.com.

John Biehler

unread,
Aug 12, 2016, 4:14:20 PM8/12/16
to 3d...@googlegroups.com
Thanks Rob. I've already got the conduit so I'm good for that...just need the 53 608 bearings. 

Let me know what you need for the bearings and I can probably come pick them up from you this weekend.

John

Edward Simpson

unread,
Aug 12, 2016, 10:12:05 PM8/12/16
to 3D604
Glad the BOM was helpful, it took me about 92-93 hours to print all of the parts that went into the frame. And it is a very stable frame, does need a perfectly flat surface to square up properly though. What colours are you using for the printed parts?
Edward

John Biehler

unread,
Aug 13, 2016, 12:29:54 AM8/13/16
to 3d...@googlegroups.com
I'm using Hatchbox green pla for the whole thing. I discovered Amazon.ca stocks it with Prime so I bought a couple of spools to ensure I had enough on hand to print everything. I'm probably about half done printing now. 

image1.JPG

image2.JPG

Laying it out on my dining room floor until I can clean up enough space in the workshop to build a stand/table for it this weekend hopefully. I think I have the top parts reversed in the above photo. I haven't glued yet. 

John

Edward Simpson

unread,
Aug 13, 2016, 3:22:03 AM8/13/16
to 3D604
Nice colour John,
     You've got the corners lined up correctly there, I'd recommend printing and mounting the lower carriages next before locking the outer frame together. As for glueing, LePage 5 minute epoxy works great with PLA, trick is to mix the two parts until it becomes slightly opaque, sort of whitish-yellow colour and then apply it to both surfaces being glued. I only used it on the joint between the upper leg cap and lower corner bracket, you'll want to leave the other joint unglued to allow for squaring the frame after it's attached to the table/waste board. For the squaring process, I just tightened the screws on the corner brackets until I got a solid lock for one corner after checking it with a square and then measured the diagonals and adjusting things until both were the same, then tightened all four corners completely.
     On another note, for the router I've gone with a slightly used RIGID Laminate Trimmer/Palm Router that I found on craigslist. Key feature to look for when choosing one is a 'speed control/stabilizer' option, it's only available on the fixed palm routers or Dremel 4000 models and the routers have a far larger range of options for bits and materials. Nice to know that Amazon is starting to stock some nice options for filament, I'm currently using some MG chemicals PLA that got from there.
Edward

John Biehler

unread,
Aug 19, 2016, 9:54:42 PM8/19/16
to 3d...@googlegroups.com
Hey Edward....did you have any trouble tracking down the right size coupling nut? Rona & Home Depot (tri-cities) just seem to have 5/16-18 x 1".

John

To unsubscribe from this group and stop receiving emails from it, send an email to 3d604+unsubscribe@googlegroups.com.

To post to this group, send email to 3d...@googlegroups.com.

Rob Hall

unread,
Aug 19, 2016, 10:00:04 PM8/19/16
to 3d...@googlegroups.com

Try bc fastener or raider hansen  or fastenal


Edward Simpson

unread,
Aug 20, 2016, 12:52:25 AM8/20/16
to 3D604
Hi John,
I'm actually just using one of those 1" coupling nuts cut down to size with a reciprocating saw with a metal blade, works just fine after filling the cut edges to remove the burs. I've also finished assembling and installing the base/wast board, I'll be posting a blog entry about it on monday or tuesday.
Edward 

John Biehler

unread,
Aug 20, 2016, 12:33:21 PM8/20/16
to 3d...@googlegroups.com
Looking forward to the post, Edward!

It looks like Fastenal has the correct coupling nut so I'll wait until Monday to pick one up.

A few more questions as I close in on finishing my build:
  • you mention modifying Marlin to disable the temperature function - did you simply change the sensor value to 0 or did you do deeper hacking of Marlin to remove the toolhead graphic and erroneous temp display?
  • It looks like we both have the A4988 drivers - what settings did you go with for Marlin and what jumpers did you set on the RAMPS board since I'm assuming that driver isn't capable of 32x stepping?
  • have you finalized your cable management? Seems like everyone has a different way of managing them.
Thanks again for your help...this has been a fun project to build! 

John

To unsubscribe from this group and stop receiving emails from it, send an email to 3d604+unsubscribe@googlegroups.com.

To post to this group, send email to 3d...@googlegroups.com.

Edward Simpson

unread,
Aug 20, 2016, 2:17:12 PM8/20/16
to 3D604
Hi John,
For the Marlin tweaks, I've attached my 'Configuration.h' file which is a slightly customized version of Ryan/Alted's fork, but I basically just used the temperature sensor disable value of -5 to bypass the temperature watchdog. 
As for the A4988 drivers, they max out at 16x microstepping, which, for Ramps, translates as installing all 3 jumpers for each driver (Relevant documentation). On the Marlin side of things, it's line 510 in the config file, with X & Y set to 100 steps/mm, and Z set to 2267.72 steps/mm. 
I've gone with some 3D printed drag chains for the X and Y, routing the wires through the conduit sections for the far side motors. For the Z motor, I added a  support mount and fixed the cable in place with some zip ties.

Hope that helps with your build, I'm looking forward to seeing pictures of how it turns out :)
Edward
Configuration.h

Rob Hall

unread,
Aug 20, 2016, 2:49:54 PM8/20/16
to 3d...@googlegroups.com

I see you found some slat board :)


To unsubscribe from this group and stop receiving emails from it, send an email to 3d604+unsubscribe@googlegroups.com.

To post to this group, send email to 3d...@googlegroups.com.

Edward Simpson

unread,
Aug 20, 2016, 2:58:52 PM8/20/16
to 3D604
Yea, I got a 4'x8' sheet of the stuff at Home Depot, had them cut it into 3 sections, stuff takes 2 people to move as a full sheet otherwise. Backed it with some 3/4" plywood and it makes a very solid and sturdy base.
Edward

John Biehler

unread,
Aug 21, 2016, 8:16:34 PM8/21/16
to 3d...@googlegroups.com
Getting pretty close to powering it up...have the MPCNC roughly assembled after deciding to downscale the build size for practicality reasons...full table is now 24"x24" with a build area of approximately 13.5"x13.5" and 6" of Z. I kept the taller legs to accommodate a plywood bottom and I'll stack spoil boards on top of that. For now at least. I'm getting good at cutting conduit with a hacksaw to adjust lengths after changing my mind.

Ordered a Dewalt 660 on Amazon since it's only $50US delivered (to my US mailbox) so will be using that for now.

roughly assembled & missing a few internal parts until tomorrow then I'll start locking things down.
Everything moves like butter and it's not even tightened down yet.

The middle section is a serious piece of engineering and quite the puzzle to assemble.
I wrote up a blog post about the project and my initial decisions...will post another update once I have it moving. I'll likely get it wired up this week and have the Dewalt and proper power supply coming next weekend (my next trip to the US) but will hopefully have it moving before I get those items.

Lots of in progress photos on my Flickr album as well.

Big thanks to Edward and Rob for their help so far!


To unsubscribe from this group and stop receiving emails from it, send an email to 3d604+unsubscribe@googlegroups.com.

To post to this group, send email to 3d...@googlegroups.com.

Edward Simpson

unread,
Aug 23, 2016, 12:23:00 AM8/23/16
to 3D604
Looking good John,
I've got my post about the finishing details up: https://cobaltgriffonary.blogspot.ca/2016/08/building-mpcnc-part-2.html
I'm going to be bringing the complete machine to RPL's meetup on the 25th, so if anyone wants to see it in person, I'll be there.
Edward

John Biehler

unread,
Aug 23, 2016, 12:51:59 AM8/23/16
to 3d...@googlegroups.com
Looks great, Edward!

Now I'm definitely going to try to make it on Thursday to see it in person.

I got mine all mechanically assembled (belts, and all) but don't have a power supply on hand to see if it all works...which is killing me while I wait for my shipment.

I saw the slot board at Home Depot....definitely not cheap and huge...any interest in selling off an extra piece?

John

To unsubscribe from this group and stop receiving emails from it, send an email to 3d604+unsubscribe@googlegroups.com.

To post to this group, send email to 3d...@googlegroups.com.

Rob Hall

unread,
Aug 23, 2016, 3:34:46 AM8/23/16
to 3d...@googlegroups.com

Oh crap John I have a bunch of arc power supplies you could have had one to test With at least


Edward Simpson

unread,
Aug 23, 2016, 3:24:50 PM8/23/16
to 3D604
Hi John,
I've got a 30"x48" section of the slotted MDF available, if that size works for you, I can bring it to the RPL meetup.
If you need it in a smaller size, I can cut it down to size.
Edward

John Biehler

unread,
Aug 23, 2016, 5:49:01 PM8/23/16
to 3d...@googlegroups.com
If you can cut it down to 24"x24" that would be fantastic. The slot holders seem too work really well. Let me know what you want for the MDF too.

Thanks!

John

--
You received this message because you are subscribed to the Google Groups "3D604" group.
To unsubscribe from this group and stop receiving emails from it, send an email to 3d604+unsubscribe@googlegroups.com.
To post to this group, send email to 3d...@googlegroups.com.

Edward Simpson

unread,
Aug 23, 2016, 7:47:56 PM8/23/16
to 3D604
Hi John,
I'll cut a section down to 24"x24" and bring it to the meetup. How's $10 for the MDF and cutting sound?
Edward


On Tuesday, August 23, 2016 at 2:49:01 PM UTC-7, John Biehler wrote:
If you can cut it down to 24"x24" that would be fantastic. The slot holders seem too work really well. Let me know what you want for the MDF too.

Thanks!

John
On Tue, Aug 23, 2016 at 12:24 PM, Edward Simpson <r2a...@gmail.com> wrote:
Hi John,
I've got a 30"x48" section of the slotted MDF available, if that size works for you, I can bring it to the RPL meetup.
If you need it in a smaller size, I can cut it down to size.
Edward

On Monday, August 22, 2016 at 9:51:59 PM UTC-7, John Biehler wrote:
Looks great, Edward!

Now I'm definitely going to try to make it on Thursday to see it in person.

I got mine all mechanically assembled (belts, and all) but don't have a power supply on hand to see if it all works...which is killing me while I wait for my shipment.

I saw the slot board at Home Depot....definitely not cheap and huge...any interest in selling off an extra piece?

John

--
You received this message because you are subscribed to the Google Groups "3D604" group.
To unsubscribe from this group and stop receiving emails from it, send an email to 3d604+un...@googlegroups.com.

To post to this group, send email to 3d...@googlegroups.com.

John Biehler

unread,
Aug 23, 2016, 7:52:25 PM8/23/16
to 3d...@googlegroups.com
That sounds like a deal, Edward! Thanks again and see you on Thursday!

To unsubscribe from this group and stop receiving emails from it, send an email to 3d604+unsubscribe@googlegroups.com.

To post to this group, send email to 3d...@googlegroups.com.

Derek P

unread,
Aug 26, 2016, 12:01:21 AM8/26/16
to 3D604
Hi Edward,

Thanks for the demo at the RPL tonight. I'm impressed that you got it together so quickly and working well.

Derek

Edward Simpson

unread,
Aug 26, 2016, 12:05:30 AM8/26/16
to 3D604
Glad you enjoyed it, I've had a lot of fun building and using it :)
Edward

Derek P

unread,
Mar 12, 2017, 3:22:43 PM3/12/17
to 3D604
Finally started to upgrade to the new version. I highly recommend this to anyone interested in CNC as a hobby. Though not highly accurate, it is certainly good enough to build real things and learn CNC at low cost.


Reply all
Reply to author
Forward
0 new messages