Is there any way to keep pixels unchangeable with Hugin?
184 views
Skip to first unread message

Álvaro Huertas
Jun 25, 2021, 10:52:48 AM6/25/21
to hugin and other free panoramic software
Hello!
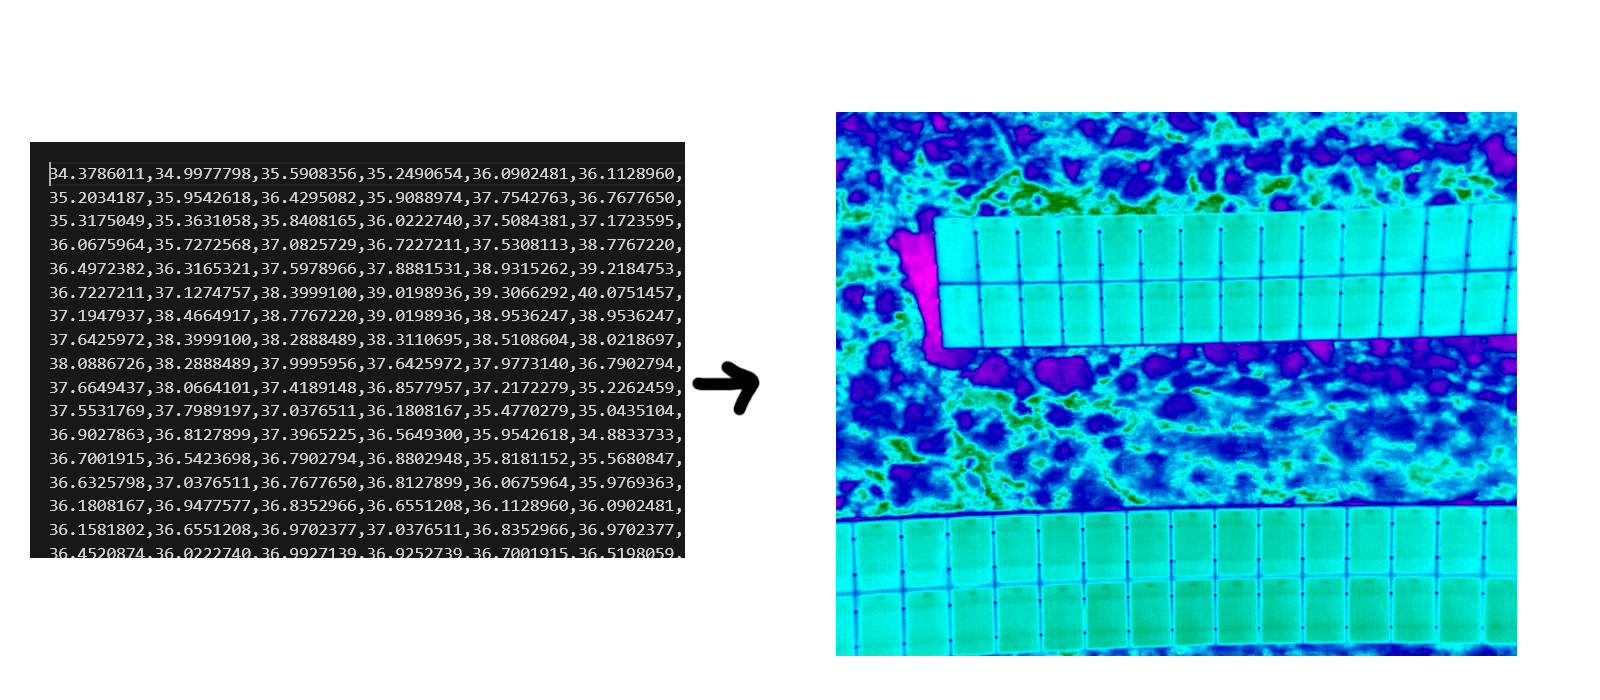
I'm trying to stitch thermal images (codified with Rainbow HC palette for false color) and once I've stitched the images bring back the thermal information of the images.
The problem is that once I stitch the images Hugin slightly change the values of some pixels then I can't bring back the thermal information. Anyone knows how to keep the values of the original image pixels unchangeable?
I hope you understand the problem!
Thanks in advance.

Bruno Postle
Jun 27, 2021, 5:10:35 AM6/27/21
to hugin and other free panoramic software
On Fri, 25 Jun 2021 at 15:52, Álvaro Huertas wrote:
>
> I'm trying to stitch thermal images (codified with Rainbow HC palette for false color) and once I've stitched the images bring back the thermal information of the images.
>
>
> I'm trying to stitch thermal images (codified with Rainbow HC palette for false color) and once I've stitched the images bring back the thermal information of the images.
>
> The problem is that once I stitch the images Hugin slightly change the values of some pixels then I can't bring back the thermal information. Anyone knows how to keep the values of the original image pixels unchangeable?
There are three things you need to do:
1. Disable any photometric optimisation. Set all the photometric
parameters of all your input photos to zero, and the EV of the output
panorama to zero. This will prevent Hugin from trying to 'fix' the
exposure for you.
2. Disable blending between photos. In the Stitcher tab, set a blender
command-line option of '-l 0', or just use the 'built-in' blender
option with 'hard-seam' set. This will prevent mixing of colours from
adjacent photos. You will now see a hard-edge between photos in the
stitched output.
3. Disable interpolated sampling. In the stitcher tab, remapper
options, set the interpolator to 'Nearest neighbour'. Hugin is usually
averaging several adjacent input pixel values to generate an output
pixel, you don't want this 'anti-aliasing' behavior. The results will
not look as smooth, and arguably you are losing data with 'Nearest
Neighbour', but each output pixel will get its value from a single
input pixel.
Let us know how you get on. When I was (briefly) surveying solar
arrays the drone was using a multi-spectral imaging camera, is your
data converted to RGB? Changing the Hugin stack to work with more than
three channels would be _very_ difficult.
--
Bruno

Monkey
Jun 27, 2021, 6:18:04 AM6/27/21
to hugin and other free panoramic software
Is there any way you can convert your false colour images to a linear greyscale first?
Álvaro Huertas
Jun 28, 2021, 7:08:13 AM6/28/21
to hugin and other free panoramic software
El domingo, 27 de junio de 2021 a las 11:10:35 UTC+2, bruno...@gmail.com escribió:
There are three things you need to do:
1. Disable any photometric optimisation. Set all the photometric
parameters of all your input photos to zero, and the EV of the output
panorama to zero. This will prevent Hugin from trying to 'fix' the
exposure for you.
2. Disable blending between photos. In the Stitcher tab, set a blender
command-line option of '-l 0', or just use the 'built-in' blender
option with 'hard-seam' set. This will prevent mixing of colours from
adjacent photos. You will now see a hard-edge between photos in the
stitched output.
3. Disable interpolated sampling. In the stitcher tab, remapper
options, set the interpolator to 'Nearest neighbour'. Hugin is usually
averaging several adjacent input pixel values to generate an output
pixel, you don't want this 'anti-aliasing' behavior. The results will
not look as smooth, and arguably you are losing data with 'Nearest
Neighbour', but each output pixel will get its value from a single
input pixel.
Hi Bruno,
thanks you so much for the response!
I tried your tips but with no results, hugin still modifying pixels in the false color panorama. Since I'm working without interface (i'm scripting in python through CLI commands) I found some issues:
- Once I import any photo Er and Eb photometric parameters are set to 1 automatically. If I try to set it up to 0 with pto_var then nona throw the following exception:

Variables will look like this in the .pto file:
#-hugin cropFactor=1
i w640 h512 f0 v17 Ra0 Rb0 Rc0 Rd0 Re0 Eev0 Er0 Eb0 r0 p-0.82153530183907 y-33.6586917800566 TrX0 TrY0 TrZ0 Tpy0 Tpp0 j0 a0 b0 c0 d0 e0 g0 t0 Va1 Vb0 Vc0 Vd0 Vx0 Vy0 Vm5 n"000_encoded.png"
There will be no problem with Er and Eb set to 1 so I think 0 is a not valid value. I'm not using any kind of automatic geometric or photometric optimization, I'm selecting the variables I want to opmitize through pto_var.
Could this be causing problems?
- I'm using the nona '--seam=hard' option in the CLI so I think tip nº2 its working fine.
- About the interpolator choice: I can't select the interpolator in CLI command of nona:
Even if I do this step in interface, pixels still beeing modified (maybe because of the issue with step 1).
Let us know how you get on. When I was (briefly) surveying solar
arrays the drone was using a multi-spectral imaging camera, is your
data converted to RGB? Changing the Hugin stack to work with more than
three channels would be _very_ difficult.
--
Bruno
Yes, I'm turning the thermal matrix from video frames of SEQ files (FLIR propietary thermal video files) into coded RGB images that i'm stitching. Once I stitch them I retrieve the thermal info back from coded pixels of the panorama. I know I'm losing thermal precision with this technique but its enough to do the job.
Thanks in advance!
Álvaro.
Álvaro Huertas
Jun 28, 2021, 7:11:19 AM6/28/21
to hugin and other free panoramic software
El domingo, 27 de junio de 2021 a las 12:18:04 UTC+2, Monkey escribió:
Is there any way you can convert your false colour images to a linear greyscale first?
No, there isn't. Losing a lot of information converting the original temperatures to just 255 value of grayscale.
Bruno Postle
Jun 28, 2021, 3:37:44 PM6/28/21
to hugin and other free panoramic software
On Mon, 28 Jun 2021 at 12:08, Álvaro Huertas <alvaroh...@gmail.com> wrote:
>
> thanks you so much for the response!
>
> I tried your tips but with no results, hugin still modifying pixels in the false color panorama. Since I'm working without interface (i'm scripting in python through CLI commands) I found some issues:
>
> - Once I import any photo Er and Eb photometric parameters are set to 1 automatically. If I try to set it up to 0 with pto_var then nona throw the following exception:
Sorry my mistake, yes the Er and Eb parameters should be set to 1. If
>
> thanks you so much for the response!
>
> I tried your tips but with no results, hugin still modifying pixels in the false color panorama. Since I'm working without interface (i'm scripting in python through CLI commands) I found some issues:
>
> - Once I import any photo Er and Eb photometric parameters are set to 1 automatically. If I try to set it up to 0 with pto_var then nona throw the following exception:
you are doing all this outside the Hugin GUI, then probably you only
need to reset the Ev photometric parameters.
> - I'm using the nona '--seam=hard' option in the CLI so I think tip nº2 its working fine.
>
> - About the interpolator choice: I can't select the interpolator in CLI command of nona:
PTO file, so you need to edit the line that looks something like this:
m g1 i0 f0 m2 p0.00784314
..and change i0 to i6
(the format is described in the nona.txt file:
https://sourceforge.net/p/hugin/hugin/ci/default/tree/doc/nona.txt )
> Even if I do this step in interface, pixels still beeing modified (maybe because of the issue with step 1).
Bruno
--
Bruno

Gunter Königsmann
Jun 28, 2021, 4:31:10 PM6/28/21
to Bruno Postle, hugin and other free panoramic software
Are you sure that working on a gray scale representation of the thernographys looses information? Normally a thermocam has an 8-bit ADC, and allows to save pictures in 256 different gray levels or alternatively using a palette that provides 256 colors that are easier to distinguish visually. It also most certainly comes with software that losslessly converts images from one of these formats to the other. Ergo the correct workflow would be: Losslessly convert the pictures to gray scale, then stitch them and then convert them to the fancy colorful palette.
--
Sent from my Android device with K-9 Mail. Please excuse my brevity.
Sent from my Android device with K-9 Mail. Please excuse my brevity.
Álvaro Huertas
Jun 29, 2021, 5:24:46 AM6/29/21
to hugin and other free panoramic software
Hi Bruno!
I made a script to modify 'm' line for setting a custom interpolator and now I'm getting better results. The stitching is now working with an acceptable precision.
I notified a odd behaviour in the treatment of the pixels by Hugin. I made a script to check if there is any modified pixel against the color palette I'm using and I've found that each stitching is modifying 1 to 5% of the total pixels of the panorama. No problem with this percentage of failure but the odd is that all of this pixels are the same hues:

All pixels with 111 green channel are being modified! The 97649 pixels correspond to the same hue. I think Hugin is modifying the following pixels of the color palette:

So pixels in the second image are being turned to pixels in the first image (RGB pixels).
I don't know what is going on since the rest of the pixels in the image are being unmodified. Even with this affordable percentage of failure I think this issue can be solved easily or maybe there is something going wrong with Hugin functionality in this particular value.
Thanks you so much Bruno!
Álvaro Huertas
Jun 29, 2021, 5:34:13 AM6/29/21
to hugin and other free panoramic software
I'm not really a professional of thermography (not even an amateur haha) so i'm not sure of anything. If you think there is a better approach for reaching a solution for the problem I would really appreciate your information.
We using the rainbow HC colour palette, stitching and then getting back thermal info and turning it to any palette or making any analysis we want. It's working fine with one decimal of precision and is being reasonably fast. But we are open to new approaches or information.
Thank you so much!
Álvaro.
Bruno Postle
Jun 29, 2021, 6:30:56 AM6/29/21
to hugi...@googlegroups.com
On 29 June 2021 10:24:46 BST, "Álvaro Huertas" <alvaroh...@gmail.com> wrote:
>
>I notified a odd behaviour in the treatment of the pixels by Hugin. I made
>a script to check if there is any modified pixel against the color palette
>I'm using and I've found that each stitching is modifying 1 to 5% of the
>total pixels of the panorama. No problem with this percentage of failure
>but the odd is that all of this pixels are the same hues:
I don't think that nona (the Hugin remapping tool) dithers output images, but enblend might to prevent banding. Are you blending using the internal Hugin blender, or with enblend?
--
Bruno
Álvaro Huertas
Jun 29, 2021, 7:11:32 AM6/29/21
to hugin and other free panoramic software
El martes, 29 de junio de 2021 a las 12:30:56 UTC+2, bruno...@gmail.com escribió:
I'm not sure, could be a bug.
I don't think that nona (the Hugin remapping tool) dithers output images, but enblend might to prevent banding. Are you blending using the internal Hugin blender, or with enblend?
--
Bruno
I'm using nona. This command in particular:
.\nona.exe -g -v -m TIFF -z NONE --ignore-exposure --seam=hard -o output_name projectName.pto
With 'm' line looking like this:
m i6

T. Modes
Jun 29, 2021, 11:13:07 AM6/29/21
to hugin and other free panoramic software
bruno...@gmail.com schrieb am Dienstag, 29. Juni 2021 um 12:30:56 UTC+2:
I don't think that nona (the Hugin remapping tool) dithers output images,
Nona does dithers the output. Also the vignetting parameters should be reset to 0.
Also the interpolator can be changed with the command line tool pano_modify. No need to fiddle manually with the pto file.
Álvaro Huertas
Jun 30, 2021, 12:07:30 PM6/30/21
to hugin and other free panoramic software
Then there is no way to keep ALL pixels without any change, isn't it?
Thanks for the tip about the interpolator!

Luís Henrique Camargo Quiroz
Jun 30, 2021, 4:02:24 PM6/30/21
to hugi...@googlegroups.com
Well, by Tomas' message I understand that if you "cancel" vignetting the input will be unmodified in the output.
In nona.txt I read:
# Vm vignetting correction mode (default 5):
# 0: no vignetting correction
# 1: radial vignetting correction (see Va, Vb, Vc, Vd options)
# 2: flatfield vignetting correction (see Vf option)
# 4: proportional correction: i_new = i / corr.
#
# default is additive correction: i_new = i + corr
# 0: no vignetting correction
# 1: radial vignetting correction (see Va, Vb, Vc, Vd options)
# 2: flatfield vignetting correction (see Vf option)
# 4: proportional correction: i_new = i / corr.
#
# default is additive correction: i_new = i + corr
so you have to put a Vm0 in a Hugin project file.
Indeed, in your email from the last 28th you tell us that the pto file has lines like:
i w640 h512 f0 v17 Ra0 Rb0 Rc0 Rd0 Re0 Eev0 Er0 Eb0 r0
p-0.82153530183907 y-33.6586917800566 TrX0 TrY0 TrZ0 Tpy0 Tpp0 j0 a0 b0
c0 d0 e0 g0 t0 Va1 Vb0 Vc0 Vd0 Vx0 Vy0 Vm5 n"000_encoded.png"
So change Vm5 to Vm0 and let's see if now the results are what you expect to be.
regards
Luís Henrique
--
A list of frequently asked questions is available at: http://wiki.panotools.org/Hugin_FAQ
---
You received this message because you are subscribed to the Google Groups "hugin and other free panoramic software" group.
To unsubscribe from this group and stop receiving emails from it, send an email to hugin-ptx+...@googlegroups.com.
To view this discussion on the web visit https://groups.google.com/d/msgid/hugin-ptx/e8a4c812-ec63-4e1f-9aa5-1dda1f1a137fn%40googlegroups.com.
--
--
Luis Henrique Camargo Quiroz
http://luishcq.br.tripod.com - http://www.christusrex.org/www2/cantgreg
http://panoramaslh.net/
Luis Henrique Camargo Quiroz
http://luishcq.br.tripod.com - http://www.christusrex.org/www2/cantgreg
http://panoramaslh.net/
Reply all
Reply to author
Forward
0 new messages