Why is part of the stitched image black?
瀏覽次數:878 次
跳到第一則未讀訊息

Peter Cooper
2016年12月22日 中午12:41:562016/12/22
收件者:hugin and other free panoramic software
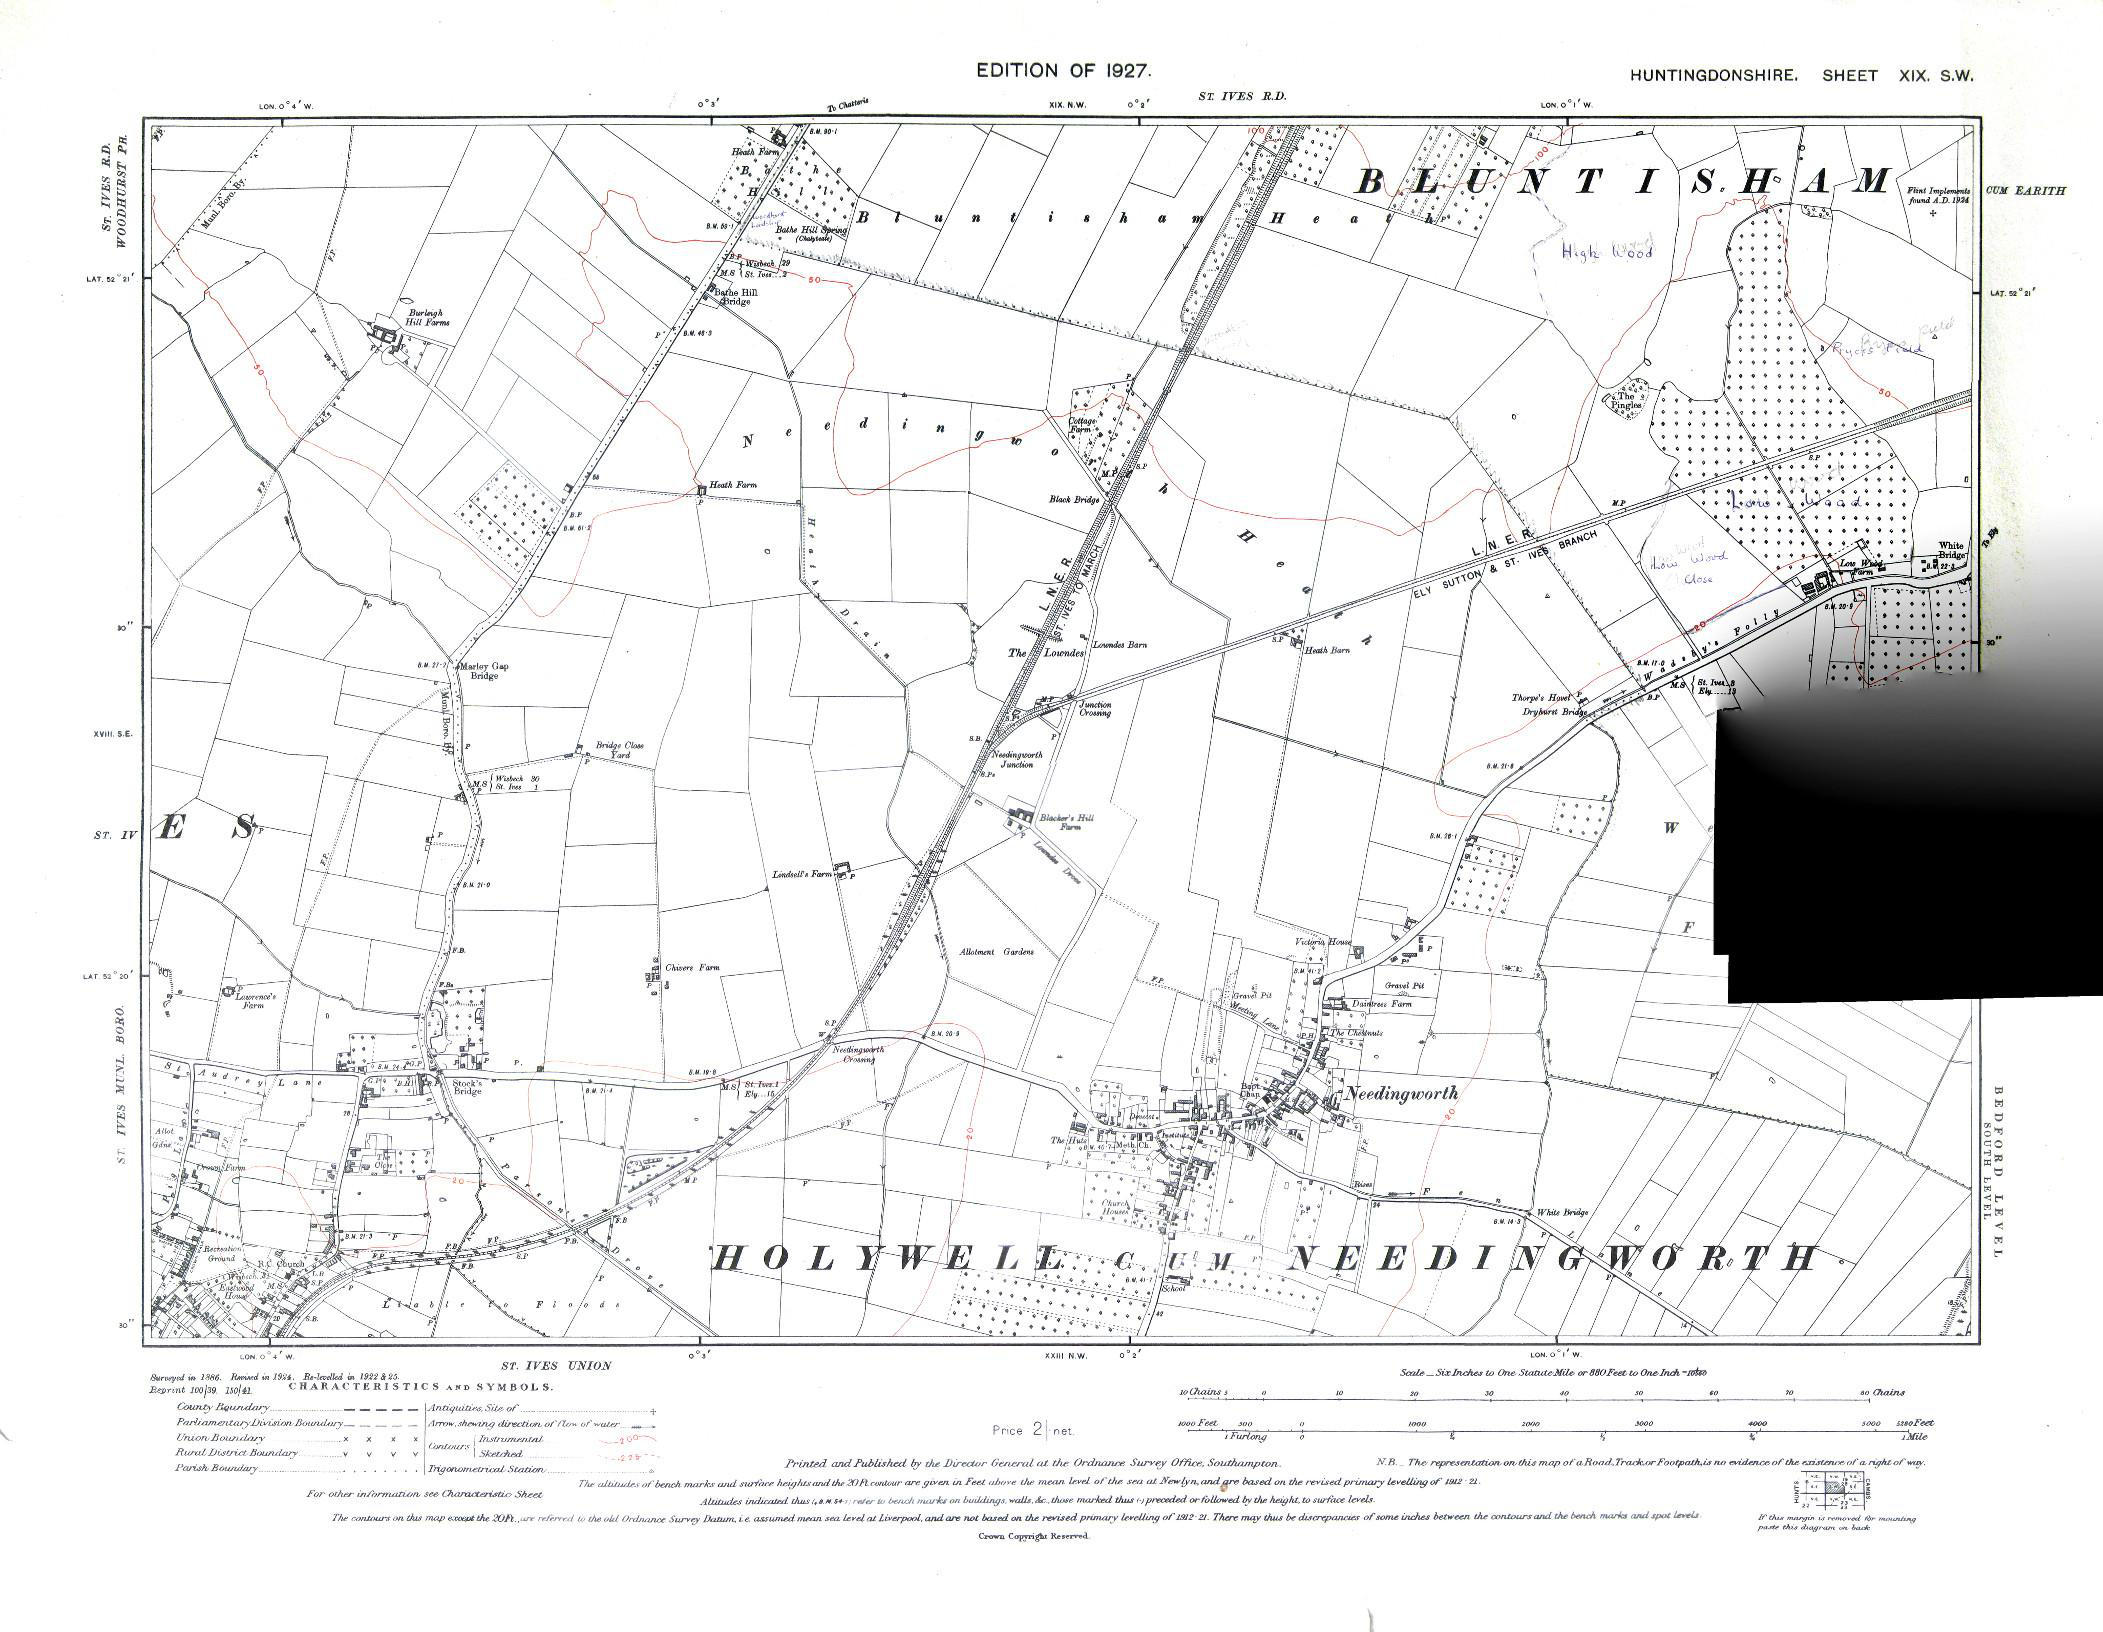
The input files, and output, project and log files are all my DropBox folder. When I preview the project within Hugin I cannot see any black area, but in the tiff the lower right section is black. This area corresponds in part to image 4. (This is a project to stitch together photos of parts of a map, so I have given each image its own lens.)
Any idea why part of the stitched image is black?

Greg 'groggy' Lehey
2016年12月22日 晚上9:21:162016/12/22
收件者:hugi...@googlegroups.com
On Thursday, 22 December 2016 at 9:41:56 -0800, Peter Cooper wrote:
> The input files, and output, project and log files are all my DropBox folde
> <https://www.dropbox.com/sh/su6axe2h76ty2om/AABkH1hGTGzAS5KSASpuY_asa?dl=0>r.
> The input files, and output, project and log files are all my DropBox folde
> When I preview the project within Hugin I cannot see any black area, but in
> the tiff the lower right section is black. This area corresponds in part to
> image 4. (This is a project to stitch together photos of parts of a map, so
> I have given each image its own lens.)
>
> Any idea why part of the stitched image is black?
I'd be interested in looking, but downloading 23 files by hand or
> the tiff the lower right section is black. This area corresponds in part to
> image 4. (This is a project to stitch together photos of parts of a map, so
> I have given each image its own lens.)
>
> Any idea why part of the stitched image is black?
mouse is a great deterrent. Can you put them in an archive of some
kind?
Greg
--
Sent from my desktop computer.
Finger gr...@FreeBSD.org for PGP public key.
See complete headers for address and phone numbers.
This message is digitally signed. If your Microsoft mail program
reports problems, please read http://lemis.com/broken-MUA

bugbear
2016年12月23日 清晨5:02:582016/12/23
收件者:hugi...@googlegroups.com
Peter Cooper wrote:
> The input files, and output, project and log files are all my DropBox folde <https://www.dropbox.com/sh/su6axe2h76ty2om/AABkH1hGTGzAS5KSASpuY_asa?dl=0>r. When I preview the project within Hugin I cannot see any black area, but in the tiff the lower right section is black. This area corresponds in part to image 4. (This is a project to stitch together photos of parts of a map, so I have given each image its own lens.)
Looking more generally at the resulting stitched map, I think
you need to change your shooting slightly.
The aperture is wide open, resulting in distinct softness at the edges
of the images; experiment with small apertures to see where the
sweet spot for sharpness is. Since you're using a tripod
and timer-release, long exposure times aren't a problem.
And the images are quite under exposed; the whites are showing as
56% in Gimp!
I'm guessing you shot on a table, near a window; the folds and creases
in the map have been made quite visible by a *very* low raking light; try
(somehow) to arrange diffuse and/or multiple light sources for your next shoot.
BugBear
> The input files, and output, project and log files are all my DropBox folde <https://www.dropbox.com/sh/su6axe2h76ty2om/AABkH1hGTGzAS5KSASpuY_asa?dl=0>r. When I preview the project within Hugin I cannot see any black area, but in the tiff the lower right section is black. This area corresponds in part to image 4. (This is a project to stitch together photos of parts of a map, so I have given each image its own lens.)
>
> Any idea why part of the stitched image is black?
I've downloaded and reworked the project (no major changes).
> Any idea why part of the stitched image is black?
Looking more generally at the resulting stitched map, I think
you need to change your shooting slightly.
The aperture is wide open, resulting in distinct softness at the edges
of the images; experiment with small apertures to see where the
sweet spot for sharpness is. Since you're using a tripod
and timer-release, long exposure times aren't a problem.
And the images are quite under exposed; the whites are showing as
56% in Gimp!
I'm guessing you shot on a table, near a window; the folds and creases
in the map have been made quite visible by a *very* low raking light; try
(somehow) to arrange diffuse and/or multiple light sources for your next shoot.
BugBear
Peter Cooper
2016年12月23日 清晨7:50:372016/12/23
收件者:hugin and other free panoramic software
Looking more generally at the resulting stitched map, I think
you need to change your shooting slightly.
The aperture is wide open, resulting in distinct softness at the edges
of the images; experiment with small apertures to see where the
sweet spot for sharpness is. Since you're using a tripod
and timer-release, long exposure times aren't a problem.
Thanks for the advice. I am no photographer so I just used the point and click automatic feature. You are right to suggest that I need to get more technical in order to get better quality images. I will experiment.
And the images are quite under exposed; the whites are showing as
56% in Gimp!
I am not sure what this means, and what I should do about it?
I'm guessing you shot on a table, near a window; the folds and creases
in the map have been made quite visible by a *very* low raking light; try
(somehow) to arrange diffuse and/or multiple light sources for your next shoot.
Nearly right! I was shooting in a conservatory on the floor but although the light was diffuse the sun is very low here at this time of year. I shall bear that in mind.
BugBear
Thanks again.
Peter Cooper
2016年12月23日 上午11:41:232016/12/23
收件者:hugin and other free panoramic software
Greg, thanks for the offer. One or two others have had a go at replicating my issue and cannot. So I have tried here by just adding 2 control points then re-optimising and re-stitching. There is no black part on that image, so I am happy it is not a permanent issue.
I think I shall just put this down to some glitch, and close the issue. Having said that I have put the files into a zip file on DropBox, in case you want to explore further.
Thanks again.

Sean Greenslade
2016年12月24日 凌晨3:11:102016/12/24
收件者:hugi...@googlegroups.com
On Fri, Dec 23, 2016 at 04:50:37AM -0800, Peter Cooper wrote:
> > Looking more generally at the resulting stitched map, I think
> > you need to change your shooting slightly.
> >
> > The aperture is wide open, resulting in distinct softness at the edges
> > of the images; experiment with small apertures to see where the
> > sweet spot for sharpness is. Since you're using a tripod
> > and timer-release, long exposure times aren't a problem.
> >
> Thanks for the advice. I am no photographer so I just used the point and
> click automatic feature. You are right to suggest that I need to get more
> technical in order to get better quality images. I will experiment.
>
> > And the images are quite under exposed; the whites are showing as
> > 56% in Gimp!
> >
> I am not sure what this means, and what I should do about it?
A camera sensor has a specific range of brightness values that it can
> > Looking more generally at the resulting stitched map, I think
> > you need to change your shooting slightly.
> >
> > The aperture is wide open, resulting in distinct softness at the edges
> > of the images; experiment with small apertures to see where the
> > sweet spot for sharpness is. Since you're using a tripod
> > and timer-release, long exposure times aren't a problem.
> >
> Thanks for the advice. I am no photographer so I just used the point and
> click automatic feature. You are right to suggest that I need to get more
> technical in order to get better quality images. I will experiment.
>
> > And the images are quite under exposed; the whites are showing as
> > 56% in Gimp!
> >
> I am not sure what this means, and what I should do about it?
record. Think about it like a 0%-100% scale (ignoring color for the
moment). Pure black is 0%, pure white is 100%. Based on the settings of
the camera (ISO, aperture, shutter speed), real world brightnesses will
be translated to these sensor percentages. Ideally, you want the
brightest part of your scene to hit the 100% brightness sensor value (or
something very close, like 95%). In your images, the brightest part of
the scene only hits ~55% brightness, so the other 45% of the sensor's
range is not used.
To remedy this, you can either switch to manual mode and play with the
settings (longer exposure, wider aperture, higher ISO) to get a brighter
image, or if you want to stick to automatic, you can set the exposure
value (EV) target higher.
--Sean
Peter Cooper
2016年12月24日 清晨7:05:372016/12/24
收件者:hugin and other free panoramic software
In your images, the brightest part of
the scene only hits ~55% brightness, so the other 45% of the sensor's
range is not used.
To remedy this, you can either switch to manual mode and play with the
settings (longer exposure, wider aperture, higher ISO) to get a brighter
image, or if you want to stick to automatic, you can set the exposure
value (EV) target higher.
Thanks Sean,
I suspect one of the issues is that the map I was using (and many others) has quite an off-white background, so there is no real white in the image.
I am reading up about this sort of thing, and will experiment to see how much difference it makes. However I cannot make it too complicated because I want to do quite a few maps, and I would like to enable other lay people to do the same - so the maps can be used in my prototype mapping system.
Peter

Frederic Da Vitoria
2016年12月24日 中午12:25:432016/12/24
收件者:hugin-ptx
I tested your project with my Hugin 2016.2.0. Just regenerating the output file gave the same result. I then reset the photometric parameters and re-optimized photometric parameters and got a similar glitch, but in the upper-right corner ! What I don't understand is that just by looking at the pictures, I don't see any big lighting difference, definitely nothing which should cause these results. Actually, just resetting the photometric parameters without reoptimizing them gives pretty good results.
--
Frederic Da Vitoria
(davitof)
Membre de l'April - « promouvoir et défendre le logiciel libre » - http://www.april.org
(davitof)
Membre de l'April - « promouvoir et défendre le logiciel libre » - http://www.april.org

John Muccigrosso
2016年12月24日 下午1:56:092016/12/24
收件者:hugin and other free panoramic software
As Sean mentioned, it isn't really about "white", it's about brightness. Whatever colors there are, the brightest parts of the image should be close to the maximum brightness your camera can record. Basically you want your camera's capabilities to e used to the fullest. So if it can record, say, 256 levels of brightness, you're using all 256 of those levels.
Wirz
2016年12月25日 晚上7:18:392016/12/25
收件者:hugi...@googlegroups.com
Maybe this old bug is resurfacing?
https://bugs.launchpad.net/enblend/+bug/721136
I also still get that once in a while, but haven't mentioned it recently
because I haven't learned anything new in the last three years.
cheers, lukas
On 22/12/16 18:41, Peter Cooper wrote:
> The input files, and output, project and log files are all my DropBox folde
> <https://www.dropbox.com/sh/su6axe2h76ty2om/AABkH1hGTGzAS5KSASpuY_asa?dl=0>r.
Do not believe the naysayers who say it cannot be done.
https://bugs.launchpad.net/enblend/+bug/721136
I also still get that once in a while, but haven't mentioned it recently
because I haven't learned anything new in the last three years.
cheers, lukas
On 22/12/16 18:41, Peter Cooper wrote:
> The input files, and output, project and log files are all my DropBox folde
> When I preview the project within Hugin I cannot see any black area, but in
> the tiff the lower right section is black. This area corresponds in part to
> image 4. (This is a project to stitch together photos of parts of a map, so
> I have given each image its own lens.)
>
> Any idea why part of the stitched image is black?
>
--
> the tiff the lower right section is black. This area corresponds in part to
> image 4. (This is a project to stitch together photos of parts of a map, so
> I have given each image its own lens.)
>
> Any idea why part of the stitched image is black?
>
Do not believe the naysayers who say it cannot be done.
Peter Cooper
2017年1月3日 清晨6:24:422017/1/3
收件者:hugin and other free panoramic software
On Monday, 26 December 2016 00:18:39 UTC, lukas wrote:
Maybe this old bug is resurfacing?
https://bugs.launchpad.net/enblend/+bug/721136
I also still get that once in a while, but haven't mentioned it recently
because I haven't learned anything new in the last three years.
cheers, lukas
Thanks for pointing this out, lukas. I am still getting the problem so have added a comment to the above bug report.
Part of my comment is:
If anyone wants to explore, I have put 2 zip files in a folder on my DropBox (see below) - one was stitched using enblend (resulting in black areas) and one with the hugin inbuilt stitcher. They both contain 25 image files stitched into one tif. I made no changes other than stitch them with a different stitcher.
The other way I have got round the black area problem has been to make a minor change in hugin and re-stitch using enblend. Sometimes this is succesful in that there are no black areas, other times I have to repeat the process.
2 zip files: https://www.dropbox.com/sh/8z0zf64gupchgj8/AAC6Ckwwv3k6m6vy8-f6Ho7Fa?dl=0
(By the way I know the images are rather pink because of the light when I took them - I plan to process the tif. Based on my experiences I am documenting my photography process and my stitching process for future reference, and will continue to develop these documents as I learn more.)
bugbear
2017年1月3日 清晨6:50:082017/1/3
收件者:hugi...@googlegroups.com
Peter Cooper wrote:
> Based on my experiences I am documenting my photography process <http://mapping4ops.org/raster-map-technicalities/photographing-maps/> and my stitching process <http://mapping4ops.org/raster-map-technicalities/stitching-images-into-a-map/> for future reference, and will continue to develop these documents as I learn more.)
http://mapping4ops.org/m4ops-for-those-responsible-for-an-ops/using-photography-to-get-a-good-enough-quality-image-of-a-map/
The camera doesn't need to be dead square to the map - Hugin can easily correct that, given straight line control points
on a rectangle (as in te example PTO I sent you)
BugBear
Peter Cooper
2017年1月3日 上午9:17:432017/1/3
收件者:hugin and other free panoramic software
The camera doesn't need to be dead square to the map - Hugin can easily correct that, given straight line control points
on a rectangle (as in te example PTO I sent you)
BugBear
Thanks. I am learning all the time. I put it like this as I find it easier when photographing to have a nice regular array so I don't miss anywhere, and when stitching so I easily know which images are which.
Incidentally I have found the vertical/horizontal lines on the two maps I have been testing are actually not very true. So I have stopped using vertical/horizontal control points. This is proving a bit of a problem now I am trying to stitch the two maps together edge to edge.- using QGIS rather than hugin.
Peter
Roger Broadie
2017年1月8日 下午4:25:292017/1/8
收件者:hugi...@googlegroups.com
I'm now meeting the black-patch problem Peter Cooper has identified. For anyone who is interested but is not already familiar with this effect, it occurs in stitches like
the attached reduced-size version of Peter's map including the village of Holywel (see his message of 22 Dec 2016 at 17:41:56).
I never met the problem while I stitched with earlier versions of Hugin, but it seems a regular occurrence when stitching with the 2016.2.0 version, to which I have just
upgraded. Previously I used the 2015.0.0 version. The problem can be precipitated (or, apparently, sometimes avoided) by small changes to the stitching set-up.
Which image(s) is/are affected seems unpredictable.
From the correspondence on Launchpad pointed to by lukas, it is fairly clear there has been a long-standing bug in Enblend. But apparently nobody is quite sure what
is causing it, and therefore how to cure it. However, as a non-expert, I am far from sure the bug dealt with at the start of the bug correspondence must be the one we
are facing, because that bug was apparently already long-standing when Bruno Postle wrote in 2011, whereas ours did not surface in Hugin, as far as I know, before
the 2016 version.
So, what can be done? If the bug could be cured as it affects Hugin that would be ideal, but seems rather unlikely. The 2016 version of Hugin does seem to do a good
job and I would be disappointed to have to revert to the 2015 version. But, for me, if the problem does resurface it can be dealt with by simply opening the pto file in the
2015 version and stitching without making any changes. That may not be a helpful suggestion for those members of Peter's target audience who do not have the 2015
version already installed. Nor can making random changes in the hope the problem will disappear of its own accord be very attractive. The best immediate solution
seems to me that already suggested by Peter, namely, in the Stitcher tab and the Processing section, to switch the blender from Enblend to Built-in. I then take the
Hard-seam option. There have, I think, been suggestions in the past that the blender concerned, Verdandi, leaves visible seams, but I noticed no such effects with the
sort of stitches we are concerned with here, and the black areas had also disappered.
However, can anyone describe how to try replacing the version of Enblend used in Hugin 2016 (4.2.0) with earlier versions, to see if that helps? Or, alternatively, point
to any description of how to do so?
Roger Broadie
========================================
Message Received: Jan 03 2017, 11:24 AM
From: "Peter Cooper"
To: "hugin and other free panoramic software"
Cc:
Subject: Re: [hugin-ptx] Why is part of the stitched image black?
On Monday, 26 December 2016 00:18:39 UTC, lukas wrote:
>
> Maybe this old bug is resurfacing?
> https://bugs.launchpad.net/enblend/+bug/721136
>
> I also still get that once in a while, but haven't mentioned it recently
> because I haven't learned anything new in the last three years.
>
> cheers, lukas
>
Thanks for pointing this out, lukas. I am still getting the problem so have
added a comment to the above bug report.
Part of my comment is:
> If anyone wants to explore, I have put 2 zip files in a folder on my
> DropBox (see below) - one was stitched using enblend (resulting in black
> areas) and one with the hugin inbuilt stitcher. They both contain 25 image
> files stitched into one tif. I made no changes other than stitch them with
> a different stitcher.
> The other way I have got round the black area problem has been to make a
> minor change in hugin and re-stitch using enblend. Sometimes this is
> succesful in that there are no black areas, other times I have to repeat
> the process.
> 2 zip files:
> https://www.dropbox.com/sh/8z0zf64gupchgj8/AAC6Ckwwv3k6m6vy8-f6Ho7Fa?dl=0
(By the way I know the images are rather pink because of the light when I
took them - I plan to process the tif. Based on my experiences I am
documenting my photography process
and my
stitching process
for future reference, and will continue to develop these documents as I
learn more.)
--
A list of frequently asked questions is available at: http://wiki.panotools.org/Hugin_FAQ
---
You received this message because you are subscribed to the Google Groups "hugin and other free panoramic software" group.
To unsubscribe from this group and stop receiving emails from it, send an email to hugin-ptx+...@googlegroups.com.
To view this discussion on the web visit https://groups.google.com/d/msgid/hugin-ptx/6b69670d-3a7b-486b-8f96-411d0557301b%40googlegroups.com.
For more options, visit https://groups.google.com/d/optout.
the attached reduced-size version of Peter's map including the village of Holywel (see his message of 22 Dec 2016 at 17:41:56).
I never met the problem while I stitched with earlier versions of Hugin, but it seems a regular occurrence when stitching with the 2016.2.0 version, to which I have just
upgraded. Previously I used the 2015.0.0 version. The problem can be precipitated (or, apparently, sometimes avoided) by small changes to the stitching set-up.
Which image(s) is/are affected seems unpredictable.
From the correspondence on Launchpad pointed to by lukas, it is fairly clear there has been a long-standing bug in Enblend. But apparently nobody is quite sure what
is causing it, and therefore how to cure it. However, as a non-expert, I am far from sure the bug dealt with at the start of the bug correspondence must be the one we
are facing, because that bug was apparently already long-standing when Bruno Postle wrote in 2011, whereas ours did not surface in Hugin, as far as I know, before
the 2016 version.
So, what can be done? If the bug could be cured as it affects Hugin that would be ideal, but seems rather unlikely. The 2016 version of Hugin does seem to do a good
job and I would be disappointed to have to revert to the 2015 version. But, for me, if the problem does resurface it can be dealt with by simply opening the pto file in the
2015 version and stitching without making any changes. That may not be a helpful suggestion for those members of Peter's target audience who do not have the 2015
version already installed. Nor can making random changes in the hope the problem will disappear of its own accord be very attractive. The best immediate solution
seems to me that already suggested by Peter, namely, in the Stitcher tab and the Processing section, to switch the blender from Enblend to Built-in. I then take the
Hard-seam option. There have, I think, been suggestions in the past that the blender concerned, Verdandi, leaves visible seams, but I noticed no such effects with the
sort of stitches we are concerned with here, and the black areas had also disappered.
However, can anyone describe how to try replacing the version of Enblend used in Hugin 2016 (4.2.0) with earlier versions, to see if that helps? Or, alternatively, point
to any description of how to do so?
Roger Broadie
========================================
Message Received: Jan 03 2017, 11:24 AM
From: "Peter Cooper"
To: "hugin and other free panoramic software"
Cc:
Subject: Re: [hugin-ptx] Why is part of the stitched image black?
On Monday, 26 December 2016 00:18:39 UTC, lukas wrote:
>
> Maybe this old bug is resurfacing?
> https://bugs.launchpad.net/enblend/+bug/721136
>
> I also still get that once in a while, but haven't mentioned it recently
> because I haven't learned anything new in the last three years.
>
> cheers, lukas
>
Thanks for pointing this out, lukas. I am still getting the problem so have
added a comment to the above bug report.
Part of my comment is:
> If anyone wants to explore, I have put 2 zip files in a folder on my
> DropBox (see below) - one was stitched using enblend (resulting in black
> areas) and one with the hugin inbuilt stitcher. They both contain 25 image
> files stitched into one tif. I made no changes other than stitch them with
> a different stitcher.
> The other way I have got round the black area problem has been to make a
> minor change in hugin and re-stitch using enblend. Sometimes this is
> succesful in that there are no black areas, other times I have to repeat
> the process.
> 2 zip files:
> https://www.dropbox.com/sh/8z0zf64gupchgj8/AAC6Ckwwv3k6m6vy8-f6Ho7Fa?dl=0
(By the way I know the images are rather pink because of the light when I
documenting my photography process
and my
stitching process
for future reference, and will continue to develop these documents as I
learn more.)
A list of frequently asked questions is available at: http://wiki.panotools.org/Hugin_FAQ
---
You received this message because you are subscribed to the Google Groups "hugin and other free panoramic software" group.
To unsubscribe from this group and stop receiving emails from it, send an email to hugin-ptx+...@googlegroups.com.
To view this discussion on the web visit https://groups.google.com/d/msgid/hugin-ptx/6b69670d-3a7b-486b-8f96-411d0557301b%40googlegroups.com.
For more options, visit https://groups.google.com/d/optout.

panostar
2017年1月9日 凌晨2:31:552017/1/9
收件者:hugin and other free panoramic software、mem...@ogea.freeserve.co.uk
On Sunday, January 8, 2017 at 9:25:29 PM UTC, Roger Broadie wrote:
However, can anyone describe how to try replacing the version of Enblend used in Hugin 2016 (4.2.0) with earlier versions, to see if that helps?
Go to File->Preferences>Stitching and specify the alternative version of enblend.exe
John
Roger Broadie
2017年1月9日 清晨5:25:232017/1/9
收件者:hugi...@googlegroups.com
Thanks, John, but the Preferences only offer the choice of Enblend and the built-in blender. My question was how to roll back the version of Enblend that is used.
I had already changed the Preferences to make the inbuilt blender the default choice, but that does not affect existing projects. That is why it seemed simplest to
suggest just changing the settings in the Stitcher tab on a case-by-case basis, so that the dark patches could be cured if they arose or had already arisen.
Nonetheless it is useful to have been redirected to my preferences. I see that I had chosen the soft-edge option. Actually, having subsequently tried both options,
I concluded that much of the benefit of the hard-edge option was speed, with no observable stitching disadvantage in the cases I tried. I think it will be very useful
for at least trial stitches.
Roger
========================================
Message Received: Jan 09 2017, 07:31 AM
From: "panostar"
--
I had already changed the Preferences to make the inbuilt blender the default choice, but that does not affect existing projects. That is why it seemed simplest to
suggest just changing the settings in the Stitcher tab on a case-by-case basis, so that the dark patches could be cured if they arose or had already arisen.
Nonetheless it is useful to have been redirected to my preferences. I see that I had chosen the soft-edge option. Actually, having subsequently tried both options,
I concluded that much of the benefit of the hard-edge option was speed, with no observable stitching disadvantage in the cases I tried. I think it will be very useful
for at least trial stitches.
Roger
========================================
Message Received: Jan 09 2017, 07:31 AM
From: "panostar"
To: "hugin and other free panoramic software"
Cc: mem...@ogea.freeserve.co.uk
Subject: Re: [hugin-ptx] Why is part of the stitched image black?
panostar
2017年1月9日 清晨7:47:252017/1/9
收件者:hugin and other free panoramic software、mem...@ogea.freeserve.co.uk
On Monday, January 9, 2017 at 10:25:23 AM UTC, Roger Broadie wrote:
Thanks, John, but the Preferences only offer the choice of Enblend and the built-in blender. My question was how to roll back the version of Enblend that is used.
Sorry, my installed Hugin was slightly out-of-date. The selection of the alternative enblend.exe file is made on the Programs tab (after visiting the Stitching tab).
John
Roger Broadie
2017年1月9日 下午4:04:232017/1/9
收件者:hugi...@googlegroups.com
John, thanks. I set a copy of the enblend.exe that came with Hugin 2015 as the alternative Enblend program and it worked fine, as long as it was selected for
use, of course. So what with that and the ability to switch to the built-in blender, there seems quite a lot of choice for ways too avoid the black areas.
Roger
========================================
Message Received: Jan 09 2017, 12:47 PM
--
use, of course. So what with that and the ability to switch to the built-in blender, there seems quite a lot of choice for ways too avoid the black areas.
Roger
========================================
Message Received: Jan 09 2017, 12:47 PM
From: "panostar"
To: "hugin and other free panoramic software"
Cc: mem...@ogea.freeserve.co.uk
Subject: Re: [hugin-ptx] Why is part of the stitched image black?
To: "hugin and other free panoramic software"
Cc: mem...@ogea.freeserve.co.uk
Subject: Re: [hugin-ptx] Why is part of the stitched image black?

Hans Bull
2017年1月13日 上午8:11:352017/1/13
收件者:hugin and other free panoramic software、mem...@ogea.freeserve.co.uk
Have you tried the enblend command line option
--primary-seam-generator=nearest-feature-transform
For me this normally solves the problem. Methinks the bug is sitting in the graph-cut (now default) seam finder algorithm.
Cheers
HB
Roger Broadie
2017年1月14日 下午6:02:322017/1/14
收件者:hugi...@googlegroups.com
That's helpful. I tried the option you recommended on several panoramas that had the black area or areas showing in different places and it solved them all. The
only comment I would make is that in the most difficult of those stitches, on which I concentrated the most, it left a vestigial stitching flaw in a straight line that did not
appear when I used the built-in stitcher. But that had its own similar small flaw elsewhere, so you have to take your pick as to which you prefer.
Roger Broadie
========================================
Message Received: Jan 13 2017, 01:11 PM
From: "Hans Bull"
To: "hugin and other free panoramic software"
Cc: mem...@ogea.freeserve.co.uk
Subject: Re: [hugin-ptx] Why is part of the stitched image black?
Cc: mem...@ogea.freeserve.co.uk
Subject: Re: [hugin-ptx] Why is part of the stitched image black?
Hans Bull
2017年1月17日 上午11:19:432017/1/17
收件者:hugin and other free panoramic software、mem...@ogea.freeserve.co.uk
The new default graph-cut algorithm in most cases seems to produce better seams, but sometimes has the black areas as a show stopper. In some cases it helped me splitting the panorama in two partial ones and doing a final enblend on the two intermediate files. But things should no be like this.
HB
Roger Broadie:

Monkey
2017年1月18日 中午12:58:462017/1/18
收件者:hugin and other free panoramic software、mem...@ogea.freeserve.co.uk
Rather splitting the panorama in two, have you tried reordering the images? Enblend produces different results depending on the input order.

Luís Henrique Camargo Quiroz
2017年1月18日 下午1:06:042017/1/18
收件者:hugi...@googlegroups.com
--
A list of frequently asked questions is available at: http://wiki.panotools.org/Hugin_FAQ
---
You received this message because you are subscribed to the Google Groups "hugin and other free panoramic software" group.
To unsubscribe from this group and stop receiving emails from it, send an email to hugin-ptx+unsubscribe@googlegroups.com.
To view this discussion on the web visit https://groups.google.com/d/msgid/hugin-ptx/50175d3e-d0f3-480e-bff0-287b1efcb9fa%40googlegroups.com.
--
--
Luis Henrique Camargo Quiroz
http://luishcq.br.tripod.com - http://www.christusrex.org/www2/cantgreg
http://panoramaslh.net/
Luis Henrique Camargo Quiroz
http://luishcq.br.tripod.com - http://www.christusrex.org/www2/cantgreg
http://panoramaslh.net/

Isaac Qiao
2017年7月20日 晚上11:30:432017/7/20
收件者:hugin and other free panoramic software
check on this:
I solved the holes in my case by using
enblend --pre-assemble --fine-mask --primary-seam-generator=nearest-feature-transform -o result.jpg *.tif
you could also use
enblend --pre-assemble --coarse-mask=12 -o result.jpg *.tif
or other number after coarse-mask larger than 8.(because by default, enblend use 8 here. and by increasing it, enblend will look for a less accurate seam between images)
Hans Bull
2017年7月22日 清晨5:21:472017/7/22
收件者:hugin and other free panoramic software
The --coarse-mask=12 thing does not really work for me
It even seems that the enblend bug got worse in the recent daily builds. Anyone have the same impression?

jojaeger...@gmail.com
2017年11月3日 上午8:23:572017/11/3
收件者:hugin and other free panoramic software
Have you get a success with this? How can I "reorder" the images for enblend in Hugin?
Best Regards.
回覆所有人
回覆作者
轉寄
0 則新訊息