Cloudy water from brew boiler

Andrey Sychev
On Nov 3, 2021, at 11:03 AM, triplereef <tripl...@gmail.com> wrote:
For what it's worth:I removed my steam boiler completely and secured it to a rig (so thst i wouldn't crush the side walls) and tried to remove it with my pneumatic impact wrench which is a small 250ft-lb IR using a 1 7/16" socket. It didn't budge the sealant that WLL had used during the rebuild.I didn't want to buy new air tools so i took it to a car shop around the corner; their high-torque wrench got it off in a couple seconds.When i reassembled with the new element i used "T plus 2" sealant which is an NSF rated non-hardening pipe sealant rated to withstand 10,000 psi. I have had that sealant on for about a year with no leaks, no pressure loss. I think the hardening epoxy sealant just isn't necessary and modern products are much more practical.--On Tue, Nov 2, 2021, 10:06 PM Dave B <bla...@gmail.com> wrote:happily NO MORE EXPOS FOR SALE !!!--On Sat, Oct 23, 2021 at 6:33 PM 'Andrey Sychev' via Brewtus <bre...@googlegroups.com> wrote:Thanks for the tip. Aside of driving to Rochester, is taking brew boiler off the machine and shipping it an option on early B2? Any tips on reaching Todd S.?--Sent from my iPhoneOn Oct 23, 2021, at 12:41 PM, Richard <richard...@gmail.com> wrote:
Some older Brewtus II were manufactured with epoxy thread sealers. Allow boiler to heat up and the bolt will be easy to remove by hand.I had a 2006 Brewtus II and upgraded to PID kit. I could not remove the brew boiler temp probe.I had to travel to WLL in Rochester who told me about the the thread sealer. Exopobar did that for about a year.WLL were able to heat up the brew boiler and then easily removed the bolt.Hint: look at the 2 connectors under the water tank. There are 3 plugs. Swap one of the connectors to the empty plug, turn on the Brewtus II and the boilers will heat up even if water tank is removed.--On Friday, October 22, 2021 at 1:41:58 PM UTC-4 KJM wrote:On 22/10/21 3:49 am, Ira wrote:
Hello 'Andrey,
Thursday, October 21, 2021, 8:25:12 AM, you wrote:
Also impact driver or impact wrench? And would a cordless version handle the glue?
You need a big socket and a 1/2" drive impact, the kind you'd use to remove lug nuts to take it off in place. I've not had to do it yet so I don't know what it entails. Like all things with an impact, be gentle replacing it, hand tighten all the way before trying to tighten it. And then another some amount, 1/4 turn, 1/2 turn or something like that. Maybe someone who knows will pop up with an answer.
Sorry - living 0.5 planets away from the conversation means a 12 hour delay :)
I bought an 18V ebay sourced cheap 1/2" impact driver. It takes Makita batteries, and claims 520Nm of torque. It might not do that much, but it does a LOT. I bought it for use on my ute (truck). It has not failed to undo anything as yet! It is mildly amusing to see large tools (a 38mm socket on an impact wrench is not svelte!) being used on what is a kitchen appliance...
I should have said I also used a pick tool - like a dental pick - to chase out the threads in the boiler. The threadseal they used kind of balled up into little blobs and removing it seemed wise.
The boilers are not strongly attached to anything - there is no requirement that they be so, and hence the use of an impact tool. I used it to put the new element in too - these tools just spin the socket till it becomes 'tight' and then start the impact-er-ation. I'd not usually do the re-assembly with one, but I couldn't see how to manage to hold the boiler while conventionally nipping up the new element.. I did pretty much as Ira says above: run it home till it is fully screwed in and then about a 1/8th of a turn in impact mode. Didn't leak. I kind-of thought it might but it has not leaked a drop.
The only complication I had is the new boiler elements have flying leads, the old ones just 2 spade connectors. But a 38mm socket has tons of space so the wires were just smooshed into the spare space and the thing screwed into place.
There is a small hazard though as anyone who has worked inside an Expobar machine would know: the metal parts are sheared and the edges bite the unwary. The circular holes in the frame with the black plastic covers are a case in point....
Happy repairing!
Cheers
/Kevin
You received this message because you are subscribed to the Google Groups "Brewtus" group.
To unsubscribe from this group and stop receiving emails from it, send an email to brewtus+u...@googlegroups.com.
To view this discussion on the web visit https://groups.google.com/d/msgid/brewtus/9fef0ba6-65ef-4033-9f3e-2ddd5a13223cn%40googlegroups.com.
You received this message because you are subscribed to the Google Groups "Brewtus" group.
To unsubscribe from this group and stop receiving emails from it, send an email to brewtus+u...@googlegroups.com.
To view this discussion on the web visit https://groups.google.com/d/msgid/brewtus/0D66F010-8E1A-419E-9F9C-4BDC4058940E%40aol.com.
You received this message because you are subscribed to the Google Groups "Brewtus" group.
To unsubscribe from this group and stop receiving emails from it, send an email to brewtus+u...@googlegroups.com.
To view this discussion on the web visit https://groups.google.com/d/msgid/brewtus/CAO0oNMJcqO_5owK2LpFY1jHr0NvvAVy95LozcMaaux50yLkkCQ%40mail.gmail.com.
You received this message because you are subscribed to the Google Groups "Brewtus" group.
To unsubscribe from this group and stop receiving emails from it, send an email to brewtus+u...@googlegroups.com.
To view this discussion on the web visit https://groups.google.com/d/msgid/brewtus/CAA-TRKofYqTJEP%2BGOauMPsvXLonKn7OGuoPNNSf%2BAT1VhPHyyg%40mail.gmail.com.

Kevin Maciunas
> I finally got around to perform electrical test on my B2. According to
> WLL tech support, I needed to perform Continuity and Resistance test
> with a digital multimeter on the contacts under the covers on the
> bottom of the machine or unplug the wires and when powered on the fuse
> would trip.Somehow my multimeter shows 1 whether or not I touch the
> contacts, so I unplugged the wires one boiler at a time and neither
> time the fuse tripped. Any idea what that means? Thanks
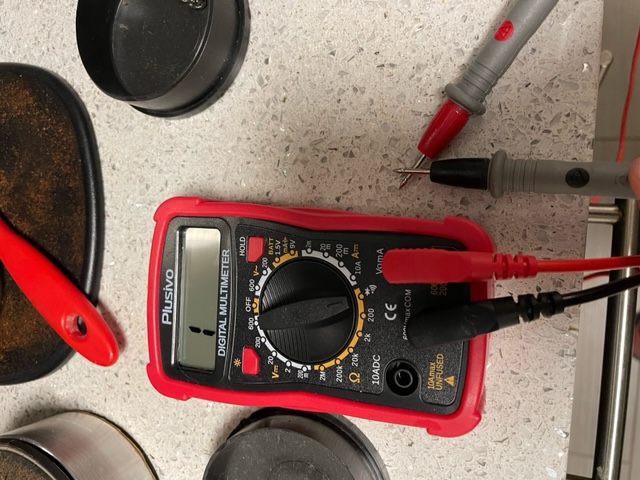
OK - so take the multimeter; switch to ohms (Greek capital
Omega/R/depends-on-the-maker...). Put the two test leads together and
the reading should fall to zero and it might also beep at you. That's a
short circuit/low-resistance. If the meter does not do that there is a
problem with the meter!
I assume you're 110V, mine is 240V. Both will kill you and it'll be
very unpleasant while it happens - make sure you have the plug visible
on the bench at all times!
If you disconnect the leads to the heaters, and put one meter probe on
one contact and the other meter probe on the BOILER - you should see no
continuity whatsoever. If you see a resistance that the meter measures
at less than say 1 megOhm then there is a fault with that heater - the
electrical circuit is shorting to the boiler and it will trip a domestic
residual current/ground fault circuit breaker. Assuming that's OK, then
move on to putting the leads on the two terminals. You are now
measuring the resistance of the heating element. It should be low
ohms. I don't know what the 'wattage' of your element is, but it'll say
it someplace on the the machine. The (approx) formula is the resistance
is volts-squared/power. In my case I ought to see 32 ohms for my
heater. Your number will be small... If you see a high value or a zero
value the element is toast. Zero means it is dead short and high means
the element is broken internally and is just passing current via the
corrosion present in the assembly!
Now, for your testing scenario. You say the breaker was tripping -
there are over current (too much power) breakers and ground fault
breakers (and ones that combine both functions). You need to use the
meter to determine which defect you have (short to the boiler or
internal short) but it does NOT MATTER. The element is toast if:
1. You get zero ohms between the two contacts (short internal)
2. You get any ohms between the contact and the boiler (short to case)
3. You get high ohms between the contacts
4. Removing one wire stops the breaker tripping...
The two heaters (steam and water) are wired so that ONLY the steam
boiler is active initially. So if you remove wires from the brew boiler
and power it up you're only actually testing the steam boiler. I'd
guess your steam boiler has a failed element. The steam works harder
than the brew, so that one will fail first (assuming usual things
apply....).
Hope this helps. Fault finding just needs to be methodical. And going
back to your original issue - cloudy water. I'd put money on fine scale
or the brew boiler element having failed and let go the white insulating
material from within. That fault will show up clearly with a meter -
you'll see continuity to the boiler.
Cheers
/Kevin
Andrey Sychev
7) Turn on the machine, and wait to see if the GFCI trips. If it DOES NOT trip, then the element which you unplugged is the bad element.
On Dec 6, 2021, at 6:11 PM, Kevin Maciunas <kevin.m...@gmail.com> wrote:
--
You received this message because you are subscribed to the Google Groups "Brewtus" group.
To unsubscribe from this group and stop receiving emails from it, send an email to brewtus+u...@googlegroups.com.
To view this discussion on the web visit https://groups.google.com/d/msgid/brewtus/d8e9783f-5dbe-fc91-0b20-8b738a1a184a%40gmail.com.
Andrey Sychev
On Dec 7, 2021, at 7:58 PM, Andrey Sychev <andr...@aol.com> wrote:
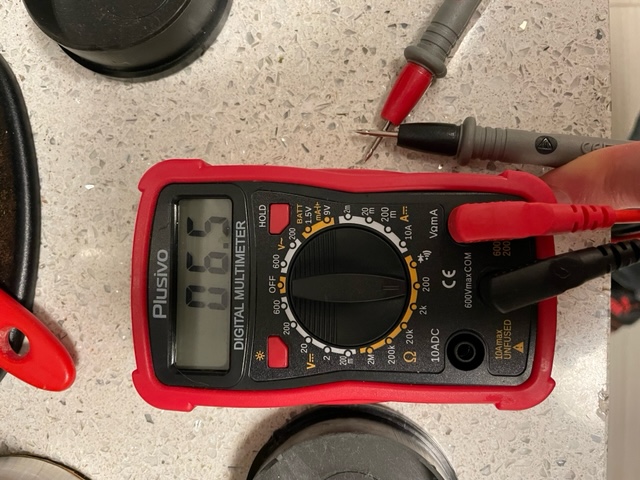
My meter is a $10 brand new one from Amazon. Does anyone know if unplugging boiler wires and turning on the machine with breaker not tripping indicates a bad heating element?Sent from my iPhoneOn Dec 7, 2021, at 7:33 PM, Eric Christoffersen <zak...@gmail.com> wrote:Wow I also think your meter is broke. Sorry. I remember how frustrated I was when I discovered that all my grandpas old meters were giving false readings.
I now have some auto ranging extechs I got on amazon that's been great. They were $25 but just checked and prices are way up. Auto ranging is nice.
To view this discussion on the web visit https://groups.google.com/d/msgid/brewtus/6bca22d1-47a2-449f-ab50-9209e837442dn%40googlegroups.com.
Andrey Sychev
On Dec 12, 2021, at 4:53 PM, 'Andrey Sychev' via Brewtus <bre...@googlegroups.com> wrote:
I received a self ranging $30 multimeter from Amazon and that shows 15v resistance and green continuity on one boiler and zero resistance and zero continuity on the one closer to the head group. I assume this is the failed brew boiler - is that right? Hopefully I can order the replacement heating element from WLL and impact driver and socket from Amazon. Any tips on getting to the heating element through the hole would be appreciated.
Andrey Sychev
Kevin Maciunas
> I received a self ranging $30 multimeter from Amazon and that shows
> 15v resistance and green continuity on one boiler and zero resistance
> and zero continuity on the one closer to the head group. I assume this
> is the failed brew boiler - is that right? Hopefully I can order the
> replacement heating element from WLL and impact driver and socket from
> Amazon. Any tips on getting to the heating element through the hole
> would be appreciated.
15 sounds plausible. Zero resistance should mean perfect continuity, so
that is a tiny bit confusing. If there is zero ohms, it's short.
That's the duff one.
The heating element should just unscrew and come out the hole (the giant
ones blanked off with the black plastic covers). Easy fit.
> Also, with respect to the impact wrench - will cordless 18v or so will
> do it? Socket is 1 7/16” and the depth doesn’t matter, is that right?
> Thanks.
bought is. Remarkably useful. I didn't use an impact socket, BTW. I
used the 38mm socket I had in the toolbox. The glue like threadseal
held on sufficiently hard that I had to use the impact tool to get the
thing undone. Normally I'd expect it to loosen and then be able to use
fingers on the socket to unscrew the last bit but it resisted all the
way... Just check that the drive on the impact tool fits the socket
though! Here 36mm is the break point in the size range at which it goes
from 1/2" drive to 3/4"! So my 38mm socket is 3/4" and I needed to hunt
high and low for a 1/2 to 3/4 adaptor! Something I had, but had
actually never used before and so it was stashed "in a safe place" :)
Socket depth just needs to be sufficient to accommodate the spade
connectors or the wires (if flying lead). Any large socket will have a
ton of space, don't sweat it.
The threadseal I used on re-assembly was pink plumbing tape (PTFE).
Here in Oz you get white, yellow and pink. The pink is thick. I use it
all the time for rural irrigation threads. The boiler pressure is under
2bar, so there is absolutely no need to go crazy. Domestic water supply
runs at a much higher pressure! The nice thing with PTFE is that it is
so slippery the doing-up of the fitting is both smooth and easy. I
can't say how many wraps I did, probably 6 because I didn't want to take
it apart again and add another wrap or two....
I did use the impact tool to spin it home (because it was there, and I
didn't want to go grab a handle from the shed!). The final tighten I
did with the impact by eyeballing about 1/3rd to 1/4 a turn after the
thing hit home. Nil leakage (although I did leave the black plastic
cover off till after I had done a couple of shots and checked!).
Very serviceable machine is the Expobar. I have a friend with a blown
element and a couple of other things that need attention. He has an
Isomac Mondiale, and it is a pain....
Cheers (and merry Xmas!)
/Kevin
Andrey Sychev
Kevin Maciunas
> Thanks for the details. I did mean 15 Omhs on one and zero on the other. I also did continuity test and while one was showing a bunch of values the other (one with zero ohms) was steady at zero. I am planning to use a socket looking something like this:
has a relatively thin hex profile. So it'll fit happily including the
spade connectors inside the socket. I forgot to mention you'll maybe
want a small extension bar on the socket too, depending on the actual
socket depth. Mine was fine, but something to be aware of.. Not an
issue for me since I have what my wife describes as "way too many tools"...
Beware putting your fingers through the big round hole in the sheet
metal work though... Those holes are sheared and have sharp edges. I
knew that before I did the job, but nevertheless: bandaids were required...
Cheers
/Kevin

Eric Christoffersen
Did I misread? You guys are able to remove the heating element from boiler through that little hole?
I didn't use impact to install element. Just tightened it good with the plumbers tape.
Also, I don't think there is any point buying an impact wrench for this. Buy some beers for the guys at the local service station.
Kevin Maciunas
> Um... I would be very surprised if you could remove the element
> without first removing the boiler from the machine. Its quite a bit of
> force, I had boiler wrapped in a towel and clamped in a vise at the
> gas station. No way to stabilize the boiler while its in the machine.
>
> Did I misread? You guys are able to remove the heating element from
> boiler through that little hole?
Impact stuff applies a momentary torque which applies an effectively
nett almost zero torque to the boiler. Just like a nail gun - a nail
gun will fire a little brad into piffling thin wood that you can't use a
conventional hammer to nail in.
I do admit I used a strap wrench to resist the torque on the first
boiler I did, but for the expobar I just held it in one hand and used
the impact tool to unscrew. It works a charm!
>
> I didn't use impact to install element. Just tightened it good with
> the plumbers tape.
weakness in not getting the 'right' tool from the shed in this instance,
but the impact tool just spun it in and then I gave it a tiny bit of
impact and it was done. I'd probably do the same again - only because
it is quick and simple. The risk of manually torquing and bending the
boiler stuff VS over impact-er-ation is about the same I'd reckon... I
do personally prefer to torque things manually and 'feel' it though!
> Also, I don't think there is any point buying an impact wrench for
> this. Buy some beers for the guys at the local service station.
if I didn't already have it :) Beers work too though! But the 18v
battery tool is somewhat less brutal than an air rattle gun. Assembly
with an air impact would be utterly terrifying, but it'd probably be
fine for removal - except the time the force is applied with an air
rattle gun is much longer than the battery thing. So there would be
more nett torque on the boiler (hence the vice).
So summary: it does work just fine. Done it more than once!
Cheers
/Kevin
Andrey Sychev
Sent from my iPhone
> On Dec 14, 2021, at 12:30 PM, Kevin Maciunas <kevin.m...@gmail.com> wrote:
> You received this message because you are subscribed to the Google Groups "Brewtus" group.
> To unsubscribe from this group and stop receiving emails from it, send an email to brewtus+u...@googlegroups.com.
Eric Christoffersen
Andrey Sychev
On Dec 24, 2021, at 2:14 AM, Eric Christoffersen <zak...@gmail.com> wrote:
Well color me surprised, I thought the holes were for design but didn’t look usable. Ok, just verified, my socket is too large to fit the hole…
--
You received this message because you are subscribed to the Google Groups "Brewtus" group.
To unsubscribe from this group and stop receiving emails from it, send an email to brewtus+u...@googlegroups.com.
To view this discussion on the web visit https://groups.google.com/d/msgid/brewtus/81ca77f2-3c1c-424f-ad52-46622dd85e5bn%40googlegroups.com.
Andrey Sychev
Andrey Sychev
On Dec 24, 2021, at 2:54 PM, Andrey Sychev <andr...@aol.com> wrote:
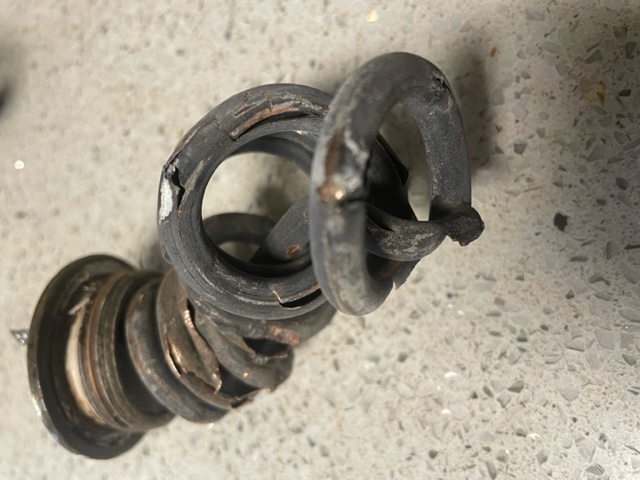
Folks, I was able to unscrew the old heating element using impact wrench and some extension with 1 7/16 socket however pulling it out the boiler is a challenge. I can see a part of the charred coils but apparently it bursted inside (hence acrylic insulation in the boiler) so wiggling with the pliers may do this trick. Obviously don’t want to destroy the boiler taking it out either. Any suggestions?
Kevin Maciunas
The boiler is brass, so it is reasonably solid (relatively speaking).
The only element I had issues with was in a NS Oscar, which has a copper
boiler and is thus really fragile.. The elements are (I think) copper.
So the tug of war will be won... I'd use a pointy set of locking pliers
through the hole in your circumstance. My elements are all spirally
configured, so "unscrewing" them out might be the go. Plus pulling
reasonably hard (support the boiler with other hand, or someone else's
hands...). The Oscar element kind of 'stretched' as I pulled and the
coils 'unscrewed' out the wee hole.
Every Espresso machine I've changed elements in for friends has had the
elements approximately the same diameter as the hole. So this is a
universal issue as far as I can see.. From my decidedly limited set of
5 data points! In the 5 different machines I've done, the darn things
have always yielded to force (carefully) applied. The boiler elements
are basically malleable, but the insulation stuff (the white stuff)
makes the element not wish to bend as easily as it might otherwise
bend... My sister's Rancilio Silvia had an element shaped roughly like
an M, and the "v" part was where it blew/bent. That one got pulled and
pulled with increasing force and concern until it came out the hole -
kind of "U" shaped... Like the Brewtus, the Silvia has a brass boiler
so it can take some applied force.
I do re-mention the caution about sharp edges in there though.
Application of heft in confined areas where there are sharp edges
results in blood sacrifice...
Cheers
/Kevin
Andrey Sychev

Herman
Kevin Maciunas
> Thanks Kevin. I was finally able to rip it out, this it how it looks out attached. There is quite a bit of white stuff that leaked out and some dirt bits in the boiler though as I look through the opening- what’s the best idea to clean it out?
>
As Herman said - Citric is your friend. I never found a neat and tidy
way of putting citric in and not making a mess. You need to sort-of
fill the boiler with it to let it do it's thing, then drain.. I never
tried this, and stupidly never thought of it till I started typing - you
could cut the element off so you have a plug (the threaded part) and
then invert the machine... Fill with water, add citric and let it
cook.. If you sit it over the kitchen sink you can drain through the
bottom element hole when it is done. I found emptying mine difficult
though - I used a drinking straw held up through the hole to let air in
and it drained in a flash (all over my hand holding the straw and over
the bottom of the case...) I remember I made a bit of a dam to stop it
going all through the machine, but can't recall what - probably a
kitchen tea towel or something stuffed in there...
Cleaning the boiler is what got me cut on the sharp edges. Just
saying.... :( The acidified water and freshly injured hand is not a
happy experience....
Again - don't specifically recall the details but: remember to put water
in the boiler before you screw in the new element. Or disconnect the
heater leads till the boiler(s) refill when you power it back on. The
little Ulka pump will take an age to fill the boiler on it's own. I
*think* I inverted it again and filled it up before putting the element
in, but I actually don't remember. It's a bit too tied up with blood
and stinging pain :)
Cheers
/Kevin
Andrey Sychev
On Dec 28, 2021, at 4:09 PM, Herman <herman...@gmail.com> wrote:
--
You received this message because you are subscribed to the Google Groups "Brewtus" group.
To unsubscribe from this group and stop receiving emails from it, send an email to brewtus+u...@googlegroups.com.
To view this discussion on the web visit https://groups.google.com/d/msgid/brewtus/511dbd68-6964-4cc0-b48d-c9d145ba5d90%40gmail.com.
Andrey Sychev
--
Andrey Sychev
Sent from my iPhone
> On Dec 28, 2021, at 5:41 PM, Kevin Maciunas <kevin.m...@gmail.com> wrote:
> You received this message because you are subscribed to the Google Groups "Brewtus" group.
> To unsubscribe from this group and stop receiving emails from it, send an email to brewtus+u...@googlegroups.com.
Herman
Kevin Maciunas
> I just use plain citric acid mixed with water and let it set for about
> 45 minutes. Then I drain it and rinse it several times like seven or
> eight full boilers maybe even more. It seems to do a really good job
> with my water quality. I did the machine I have now at 5 years when
> one of the boiler elements went out.
>
plus removes the blackened copper residues nicely. Citric is used in
food, citric is actually present in coffee... But you do need to clean
it out. I tend to just put hot water in, and spoon in the citric. Like
Herman: I'm usually paranoid about washing it out. It'll loosen flakes
of black crud too - and you DON'T want that floating about in the
machine. The little jet at the top of the e61 is 0.6mm (from memory).
I think (but do NOT know for certain..) the white stuff in the element
is just Magnesium Dioxide. You probably want to remove all that too and
flushing plus the citric rinse will achieve it.
Like I said: I don't know any neat and tidy approach to this problem.
Water everywhere... I don't have any saucepan shaped dents in my head
so the mess was clearly confined to the kitchen sink area :)
Cheers
/Kevin
Andrey Sychev
Herman
Andrey Sychev
On Dec 29, 2021, at 11:45 AM, Herman <herman...@gmail.com> wrote:
--
You received this message because you are subscribed to the Google Groups "Brewtus" group.
To unsubscribe from this group and stop receiving emails from it, send an email to brewtus+u...@googlegroups.com.
To view this discussion on the web visit https://groups.google.com/d/msgid/brewtus/cdc9d90a-8d2d-4e96-89a3-af1696406d10%40gmail.com.
Herman Dickens
To view this discussion on the web visit https://groups.google.com/d/msgid/brewtus/33F6632D-0410-442B-9A2A-814790915B70%40aol.com.
Andrey Sychev
To view this discussion on the web visit https://groups.google.com/d/msgid/brewtus/CAM9mha3MXc141AcqMxsr-SnxC6cL9o9yoJxKtUTzCJf3ws6B4Q%40mail.gmail.com.
Kevin Maciunas
> Got the citric acid, will do 45 min hot water with 1-2 tablespoons per
> liter before draining. Do I need plumbing tape to install the new
> element? I was looking for food grade but looks like silicone plumbing
> tape is the closest option. Do I even need it - a small bag of
> sealant came bundled with replacement part. Thanks.
>
You want PTFE tape (aka 'teflon' - poly-tetra-fluro-ethylene). It's
super thin and super slippery. The sealant you received might be the go
though. Since it was supplied. But I have no information about it. I
use plumbers tape. It *is* 'food safe' - the plumbing industry uses it
as a threadseal. It decomposes at stupidly high temperatures (but the
brass will melt first) so I think I, and everyone else who has it in
their house, is safe.
Cheers
/Kevin
Andrey Sychev
Sent from my iPhone
> On Jan 10, 2022, at 9:01 PM, Kevin Maciunas <kevin.m...@gmail.com> wrote:
> You received this message because you are subscribed to the Google Groups "Brewtus" group.
> To unsubscribe from this group and stop receiving emails from it, send an email to brewtus+u...@googlegroups.com.
Kevin Maciunas
> Got that. Is this Teflon tape or sealant or sealant on top of tape?
>
tape would probably prevent the sealant locking the threads too
tightly... But one or the other would be my suggestion. Both will work
- mine is tape sealed (in fact: all the boilers I've done are teflon
tape except one) and none have leaked. The pressure is pitiful - at
MOST 2bar (30psi) so there isn't a lot of potential leakage to stop! My
water pump for the household water supply is 5bar, and all the threaded
fittings are done with the same tape. Teflon is pretty immune to heat
too, so the ~100C boiler isn't much of a bother either.
Cheers
/Kevin
Andrey Sychev
Andrey Sychev
Eric Christoffersen
Kevin Maciunas
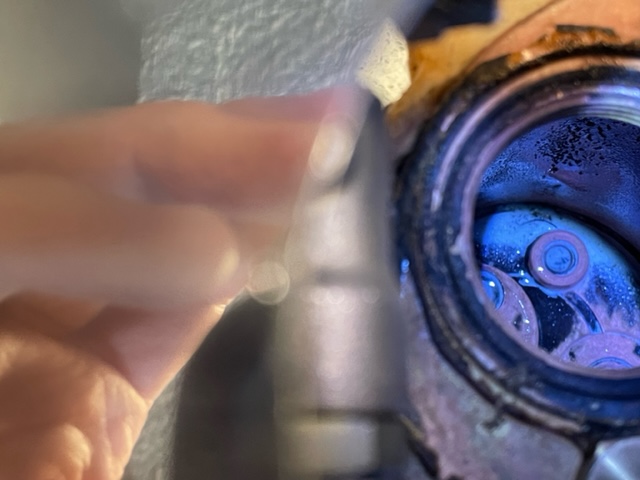
> I used up all of the citric acid but ultimately acrylic sediment on the top of my boiler persists. Some of it seems baked on and I don’t know if some particles collected in a line but with upside down machine and head group bolt removed boiler empties a drop at at time.
The white stuff inside the heating element which gets into the water is
(I believe) pretty inert. Cosmetically poor, but it won't hurt people.
The copper/brass inside is pink, so the acid has done it's job with the
stuff on the copper pretty well. I don't have any clues as to what the
white stuff is, but if it is stuck fast then it might not actually be a
problem. If it was my machine, I'd be using a metal skewer or something
pointy and stainless to harvest a sample, then put that on a white
kitchen plate and see if vinegar or citric will dissolve it. If it
does, then more citric acid *should* remove it. If it is hard and
glassy I have to say I'd be tempted to ignore it though...
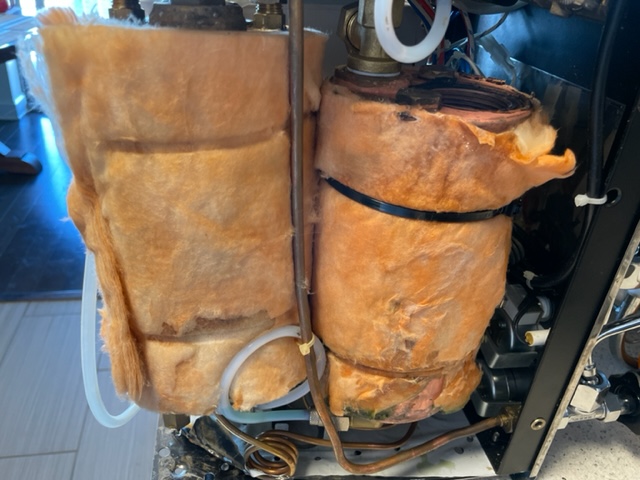
Your insulation actually looks in better shape than mine, and I also
thought about replacing it.. But to do so I can only think you need to
physically remove a boiler, wrap it and then re-install. I can't see
how you'd snake a new layer of fuzzy insulation through. It'd snag on
everything and be an exercise in frustration. So I decided I was being
a bit too precious and have ignored the poor state of the insulation.
If I do take a boiler out in the future, I WILL put some new stuff in
though!
Cheers
/Kevin
Andrey Sychev
On Jan 14, 2022, at 5:34 PM, Eric Christoffersen <zak...@gmail.com> wrote:
I ended up wrapping mine with a piece of a wool sweater.
On Friday, January 14, 2022 at 10:23:50 AM UTC-8 Andre wrote:And another off topic question for the group- has anyone been able to replace the boilers fiberglass? insulation. Mine isn’t in the best shape especially after flipping machine over with citric acid everywhere. Thanks.
--
You received this message because you are subscribed to the Google Groups "Brewtus" group.
To unsubscribe from this group and stop receiving emails from it, send an email to brewtus+u...@googlegroups.com.
To view this discussion on the web visit https://groups.google.com/d/msgid/brewtus/5c235652-768a-4074-8f62-05af5b090d87n%40googlegroups.com.
Andrey Sychev

On Jan 14, 2022, at 7:48 PM, Andrey Sychev <andr...@aol.com> wrote:
Thanks Kevin. I think I may have left the boiler sitting opened a bit too long so some of the white stuff dried. WLL said it’s acrylic insulation from inside the heating element that self destructed. I used chopsticks to get some of that stuff up and flipped machine over to drain. Majority of what’s in the photo seems dried up or baked and won’t scrape easily.
To view this discussion on the web visit https://groups.google.com/d/msgid/brewtus/7C86E020-CDD8-4BB2-96E1-3B999C8871E6%40aol.com.
Andrey Sychev
On Jan 17, 2022, at 5:16 PM, 'Andrey Sychev' via Brewtus <bre...@googlegroups.com> wrote:
So I installed the new heating element, checked resistance and continuity again (everything checked out) and turned the machine on. The pump kicked as expected but it’s been sitting on .11 reading for the past hour and doesn’t looks like it’s heating up. Any guesses what could be wrong? Did switched the contacts on one of the heating elements? I connected white/blue wire to one marked with blue paint contact- is that reversed?
Andrey Sychev
On Jan 17, 2022, at 6:33 PM, 'Andrey Sychev' via Brewtus <bre...@googlegroups.com> wrote:
Switched the wires but the the problem persists- Brewtus won’t heat up.

Aaron Skelsey
To view this discussion on the web visit https://groups.google.com/d/msgid/brewtus/EE8CE974-2A61-4432-9E20-6D56EA913AF7%40aol.com.
Andrey Sychev
On Jan 18, 2022, at 5:31 PM, Aaron Skelsey <aaron....@gmail.com> wrote:
To view this discussion on the web visit https://groups.google.com/d/msgid/brewtus/CANK1YTqJ%2Bod6Muk10KbpBvA2CE-3BiOLMdctx2ZNaoVheS%3DoJw%40mail.gmail.com.
Andrey Sychev

On Jan 18, 2022, at 7:20 PM, 'Andrey Sychev' via Brewtus <bre...@googlegroups.com> wrote:
Hm, but I did not disconnect any connectors other than heating elements in both boilers. Of course something might have disconnected while I was using impact wrench. What would break the water out of the brew group? I think white stuff made it into the system and the boilers aren’t filling up with water. There was a lot of it in the top connectors of the brew boiler.
To view this discussion on the web visit https://groups.google.com/d/msgid/brewtus/ADB73C47-10B5-4F81-B11E-E0B44313C1DE%40aol.com.
Andrey Sychev


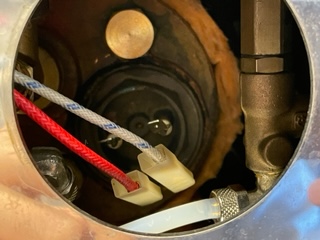
On Jan 19, 2022, at 8:03 PM, Andrey Sychev <andr...@aol.com> wrote:
Can someone please point out the line feeding brew boiler and one leading from brew boiler to the group using one of Aaron’s photos below? Also, what would be a suspect part controlling machine heat up and where is that located? Way more photos there: https://coffeesnobs.com.au/forum/equipment/brewing-equipment-pointy-end-1500-3000/836201-expobar-minore-brewtus-ii-repair-rebuild
Andrey Sychev
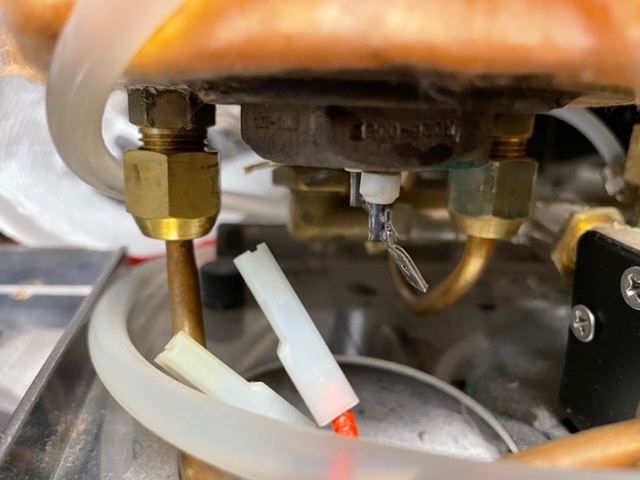
On Jan 21, 2022, at 12:06 PM, Andrey Sychev <andr...@aol.com> wrote:
I removed the water container panel and see all electronic components more clearly now. I noticed what looks like a charred contact on this switch? that fell apart as I attempted to disconnect it. Obviously that needs to be replaced, but could that be a culprit?
Andrey Sychev
On Jan 21, 2022, at 12:10 PM, Andrey Sychev <andr...@aol.com> wrote:
Also noticed that I left steam boiler heating element disconnected- how there wires need to be connected? One is red and the other is blue. Thanks.