add_tileserver_layer is not available in Arches v5
229 views
Skip to first unread message

Leonidas
Mar 29, 2020, 12:24:15 PM3/29/20
to Arches Project
I need to add a geotiff Overlay as Tileserver Layer using (instructions for v4):
python manage.py packages -o add_tileserver_layer -m "hillshade.xml" -n "hillshade"but add_tileserver_layer is not an available option anymore (manage.py packages: error: argument -o/--operation: invalid choice: 'add_tileserver_layer')
Is there any equivalent option for Arches v5?
Is there an updated Documentation for version 5?

Dennis Wuthrich
Mar 29, 2020, 4:00:41 PM3/29/20
to arches...@googlegroups.com
Hi Leonidas,
Tileserver is deprecated in Arches v5. To add a geotiff overlay, you can do the following>
1. Use Geoserver (http://geoserver.org/) or other raster tiling server of your choice to create a service for your geotiff. One reason to consider Geoserver: it has very good documentation for setting up a WMS service for your geotiff, and in my experience configuring a geotiff service can be done in just a few minutes.
2. Make sure that your service is configured to support EPSG:3857 (the web mercator projection)
3. Register your service with Arches. An easy way to do this is:
- log on to http://<Arches>/admin
- scroll down the page and click on "Map sources"
- click the "Add Map Source" button on the top right of the page
- give your map source a name
- If you use Geoserver as your geotiff service, paste in the following JSON into the source field:
{
"type": "raster",
"tileSize": 256
}
NOTE:
1. your URL will have a different slug (the "http://localhost:8080/geoserver/arches" part will be different. Just look at the url your geoserver instance is using to find the proper endpoint
2. layers-:arches:topo_example is the name of the geotiff you want to access via the service. It takes the form "Geoserver store":"name of the the geotiff" that you defined when you created the service.
4. Register the Map Layer with Arches:
- On the admin page, click on "Map Layers"
- click on the "Add map layer" button in the upper right of the form
- Give your map layer a name. IT SHOULD BE THE SAME AS THE MAP SOURCE you created in the last step
- Paste in the JSON for the layer definition. The JSON will look like:
[
{
"id": "topo_example",
"type": "raster",
"source": "geoserver_example"
}
]
NOTE:
1. the "id" field should match the layer name in your service URL
2. Be sure to click the Isoverlay checkbox to configure this service as an Arches overlay
3. Be sure to define an icon for the Arches service. Something like "fa fa-binoculars"
Assuming your geotiff service is running properly, that should be all you need to register your service.
Also: your question about updated documentation for Arches v5 is a good one. Good documentation is essential and it's a big job to keep the documentation up-to-date as Arches continues to grow. This seems like a good time to remind community members that we're happy to accept any help with improving the documentation that you might be able to provide!
Cheers,
Dennis

Adam Cox
Mar 31, 2020, 5:25:29 PM3/31/20
to Arches Project
Hi Dennis, thanks for this detailed guide. I was just able to add a layer from my existing Geoserver installation and it worked fine.
One detail I wanted to mention: 3.2 - Instead of the "Geoserver store" in the url, it's actually the name of the workspace.
So I thought I would write up my working example in case it's helpful for others. My geoserver instance is https://db.legiongis.com/geoserver. In Dennis' example, he has it running locally on the default tomcat port: http://localhost:8080/geoserver.
My layer in Geoserver looks like this:
Note the name of the workspace is fpan and the id of the layer itself is 1919-coastal-map, hence fpan:1919-coastal-map. The layer name "1919 Coastal Map" is not used at all in this process. (This is a "group layer" in Geoserver, combining multiple map sheets, each one being its own geotiff.)
In Arches, my new Map Source looks like this:
For copy/paste purposes:
{
 "type": "raster",
 "tiles": ["https://db.legiongis.com/geoserver/fpan/wms?bbox={bbox-epsg-3857}&format=image/png&service=WMS&version=1.1.1&request=GetMap&srs=EPSG:3857&width=256&height=256&layers=fpan:1919-coastal-map&transparent=true"],
 "tileSize": 256
}
I gave the Map Source a new name, and in the source configuration I did the following: 1. swapped out my Geoserver location in the beginning of the url 2. immediately following that, changed the workspace name and 3. changed the layers= value to
fpan:1919-coastal-map (<workspace>:<layer name>), just as the layer is shown in Geoserver above. Finally, because my layer (as with many historic map scans) has a transparent border, I added transparent=true to the end of the url as well. Without that directive, Geoserver served the transparent pixels in my raster as white instead of transparent.My new Map Layer Looks like this:
I've set the name to something nice and readable; this is what will show in the Arches map interface. In the layer definition, I set both id and source to match the name of my Map Source defined above. Setting the source like this is imperative--it's what connects the Map Layer to the Map Source. Setting the id with the same value is a best practice: layer definition ids must be unique across all map layers and are used elsewhere in the app.
Finally, I didn't want an icon, so I just put in "noicon". This field must be filled, but if its value is not "fa fa-<icon name>" matching the Font Awesome icon set, then no icon will appear.
Once the Map Source and Map Layer have been saved, the layer shows up perfectly well in Arches.
Hope that helps anyone else working on this. I have also created a django fixture which I will attach to this post that you can load if you want to create the Map Source and Map Layer shown above. You can load fixtures (which are json representations of an ORM object) with the following command. Please note this is a Django database format and a core django management command, i.e. not part of Arches proper:
python manage.py loaddata 1919-coastal-map.json
Adam
Dennis Wuthrich
Mar 31, 2020, 6:41:06 PM3/31/20
to Arches Project
Adam,
Thanks for providing a summary of using Geoserver to serve Geotiffs, particularly the details of creating a layer group, supporting transparency, and the extra explanation of how to structure the URL properly. Very nice! I also really like the django fixture; it's a nice way to avoid the button clicks that my approach summarized.
I very much appreciate the time you took to write this up and share it with the community!
Cheers,
Dennis

Robin Rönnlund
Apr 14, 2020, 4:34:34 AM4/14/20
to Arches Project
Dear Dennis and Adam,
I followed these instructions to the letter, all very nice, thank you! I did everything, there were no protests from geoserver, nor when I added the layers etc. The map layer turned up in Arches, I could modify it as I liked, but... The map does not actually turn up. What do I do wrong?
My geotiff is in EPSG:3857 and I did the following:
1. Uploaded the tiff to the geoserver directory.
2. Added the tiff through Add stores/GeoTiff
3. Went to /admin/ and added the tiff through "Map sources"
{"type": "raster", "tiles": ["https://pragmata2.sia.uu.se/geoserver/Pragmata/wms?bbox={bbox-epsg-3857}&format=image/png&service=WMS&version=1.1.1&request=GetMap&srs=EPSG:3857&width=256&height=256&layers=Pragmata:kalaureia-plan"], "tileSize": 256}
Saved etc.
4. Added it as a map layer
[{"id": "kalaureia-plan", "type": "raster", "source": "kalaureia-plan"}]
5. Went to Arches and it is there among the overlays, and I activated it.
Still no show.
Hope you can help me!
Robin
Dennis Wuthrich
Apr 14, 2020, 6:08:12 PM4/14/20
to Arches Project
Robin,
Set the map source name to "kalaureia-plan" (this is what you reference in the map layers json). Also, you may want to add &transparent=true to the URL in the map source (this will make your overlay transparent in areas outside of the tif). I made these small changes and can view your geoserver service in Arches:
Robin Rönnlund
Apr 15, 2020, 5:53:27 AM4/15/20
to Arches Project
Dear Dennis,
Thank you so much for this! Yes, it did work (almost), and I am very much relieved!
What is still weird, though, is that at certain zoom levels, the map partially or wholly disappears:
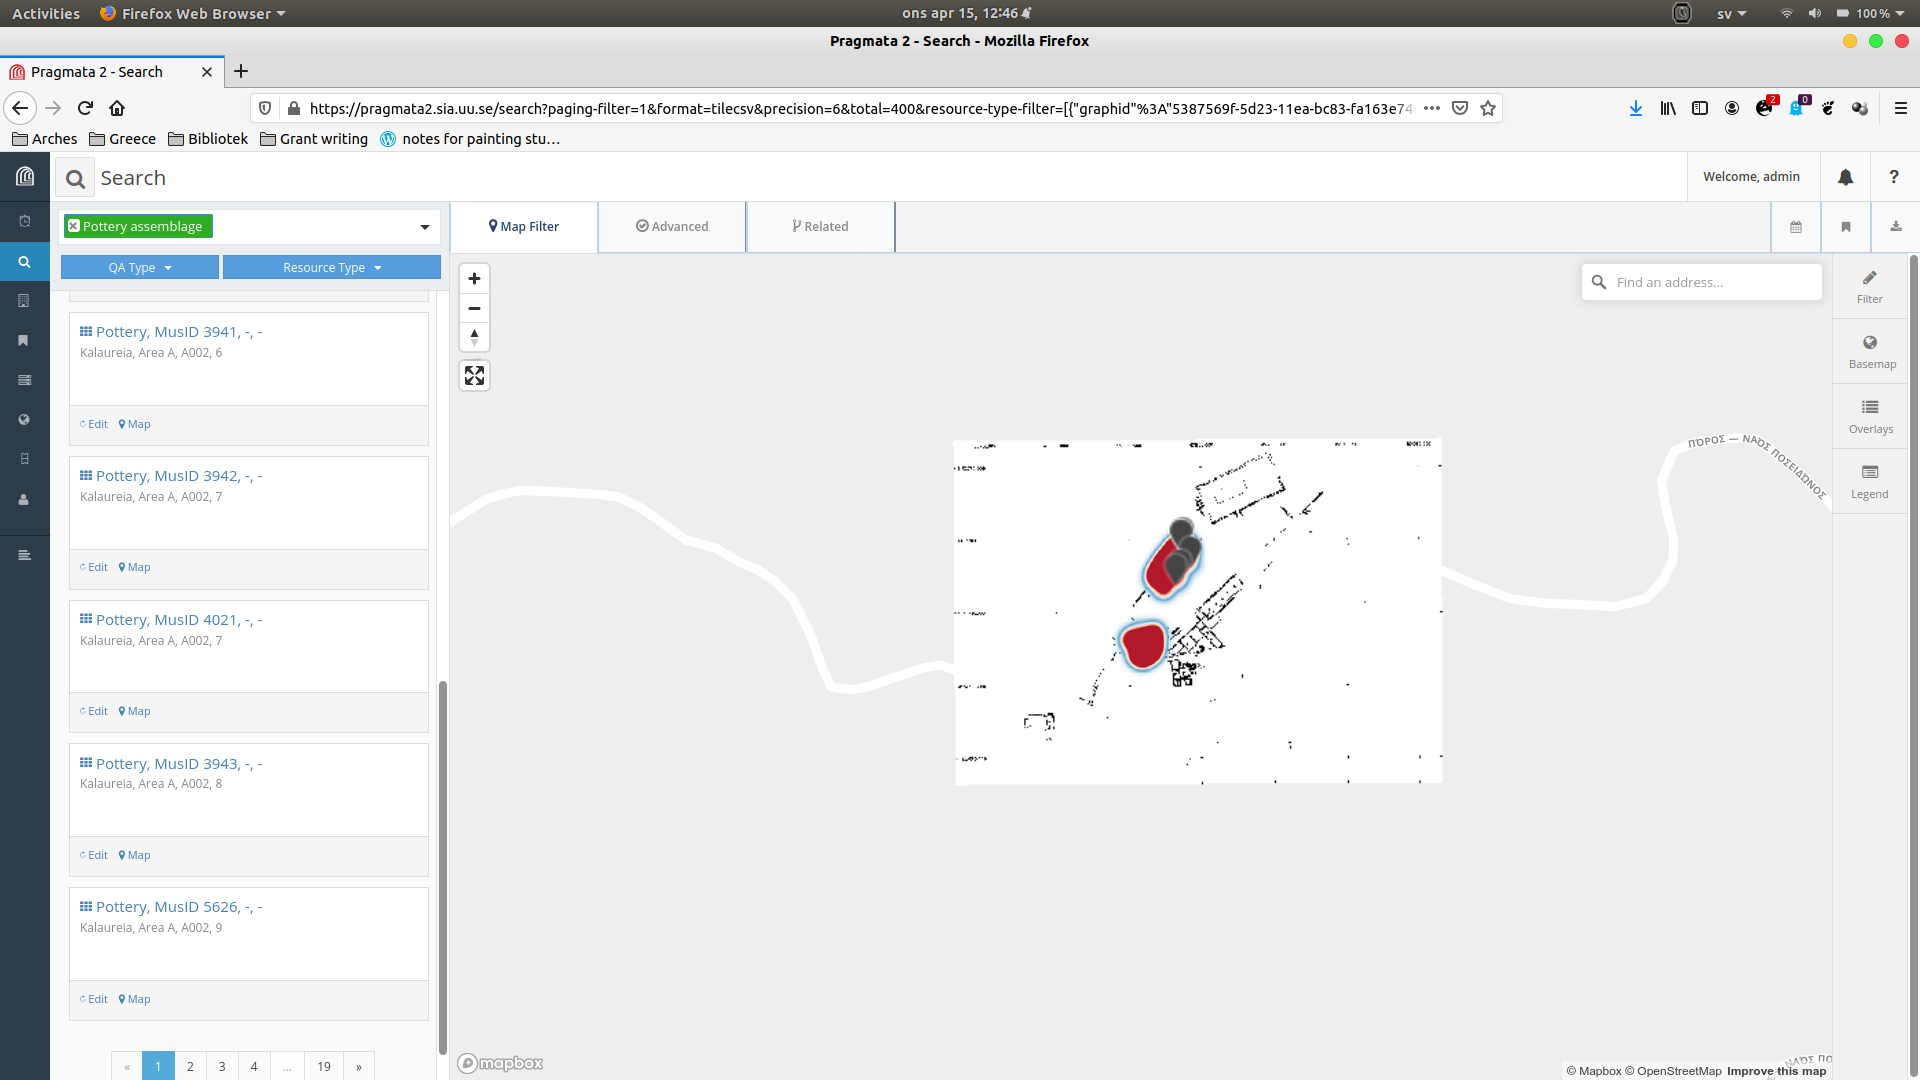
Here it is visible.
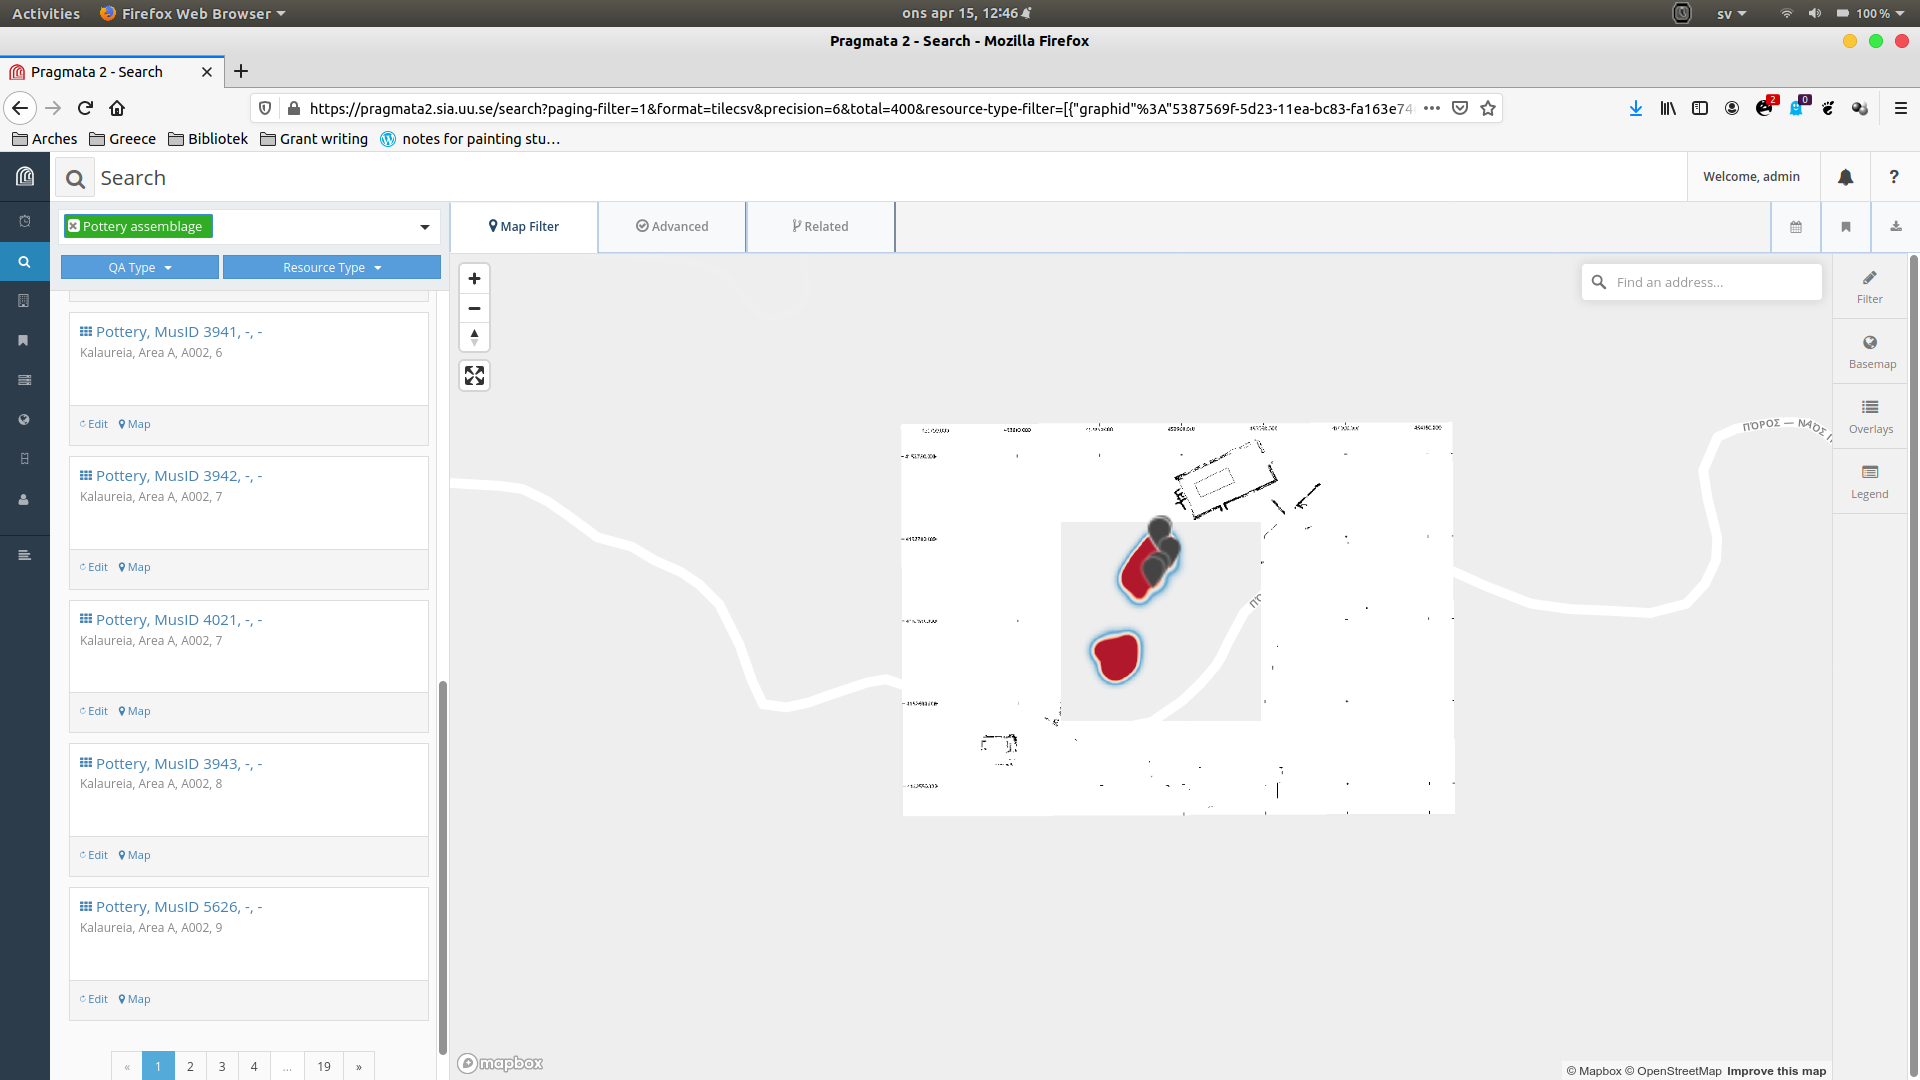
But at a closer level, the middle disappears.
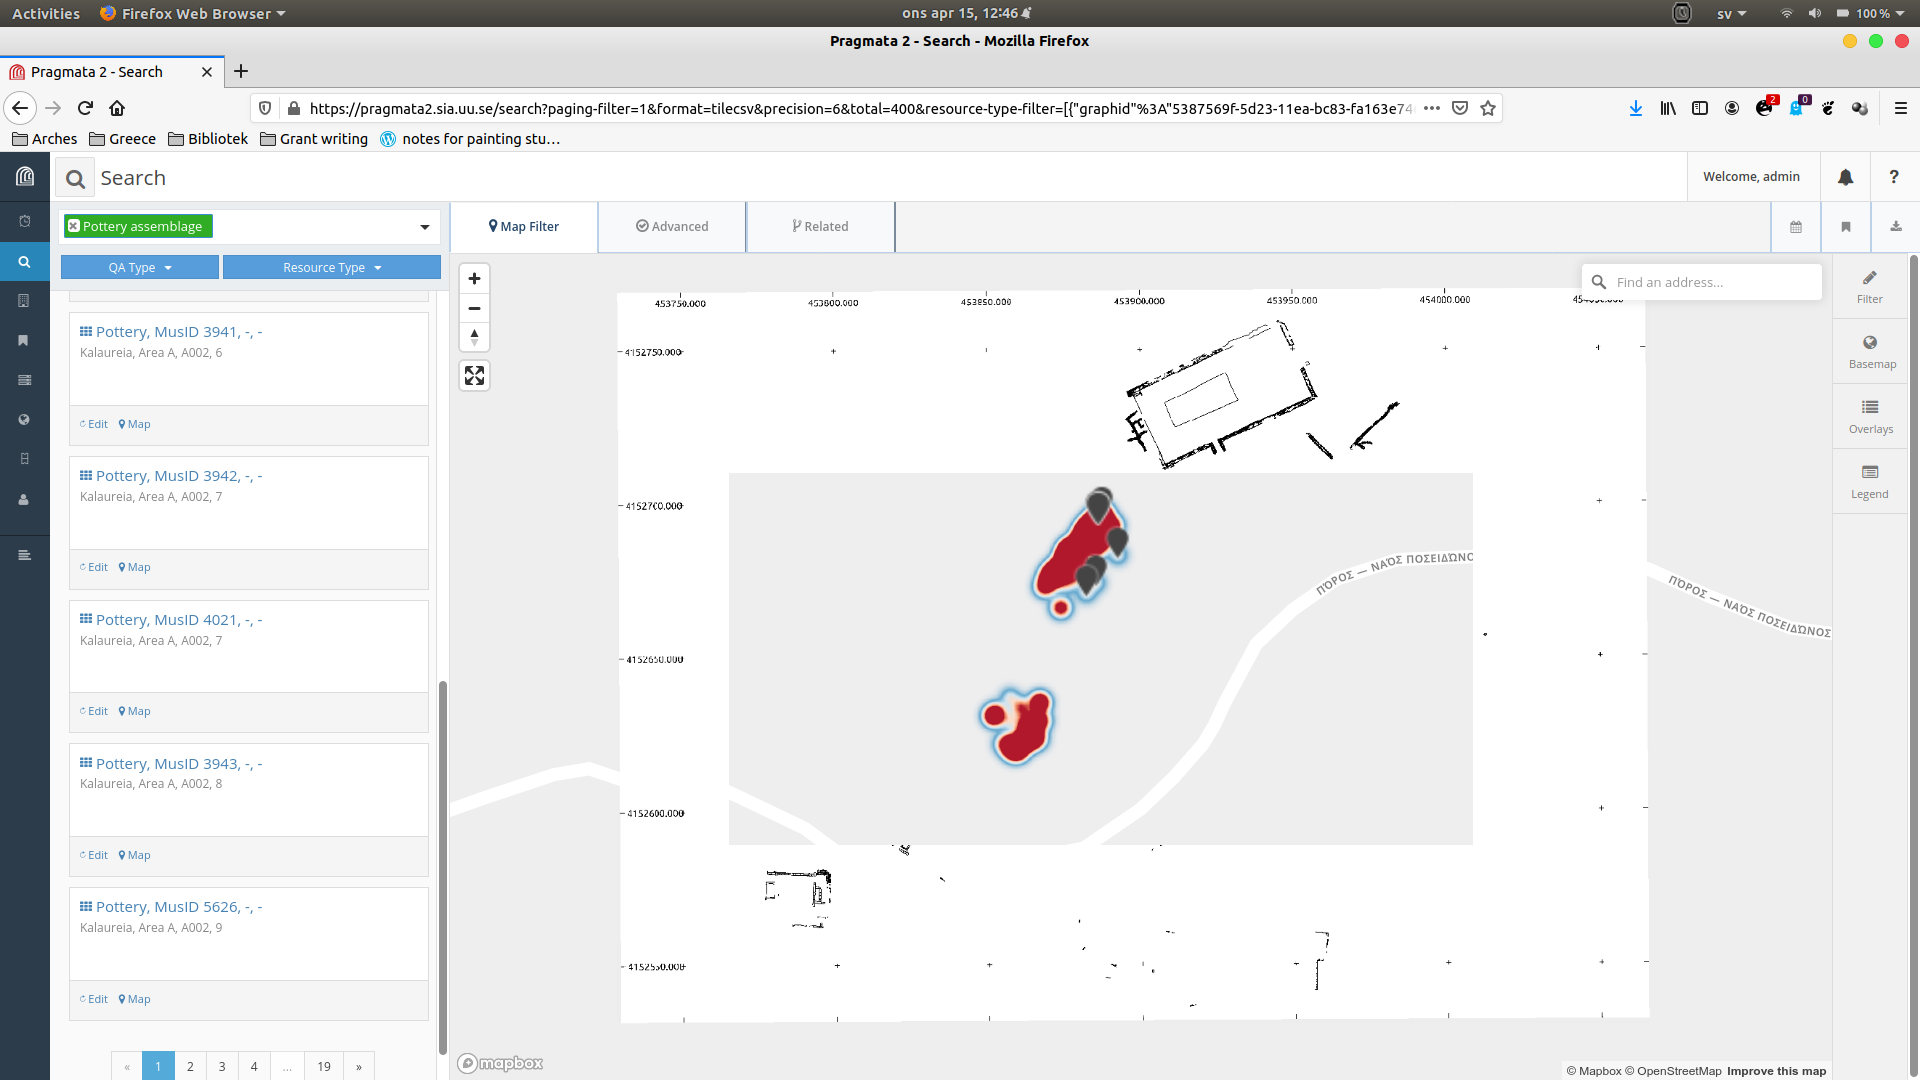
Even closer, more disappears...
Is there something I should do?
Also, additional question! :) Is there a way of setting the default zoom level for individual resource models? Right now, the default is that you start on a ridiculously close level:
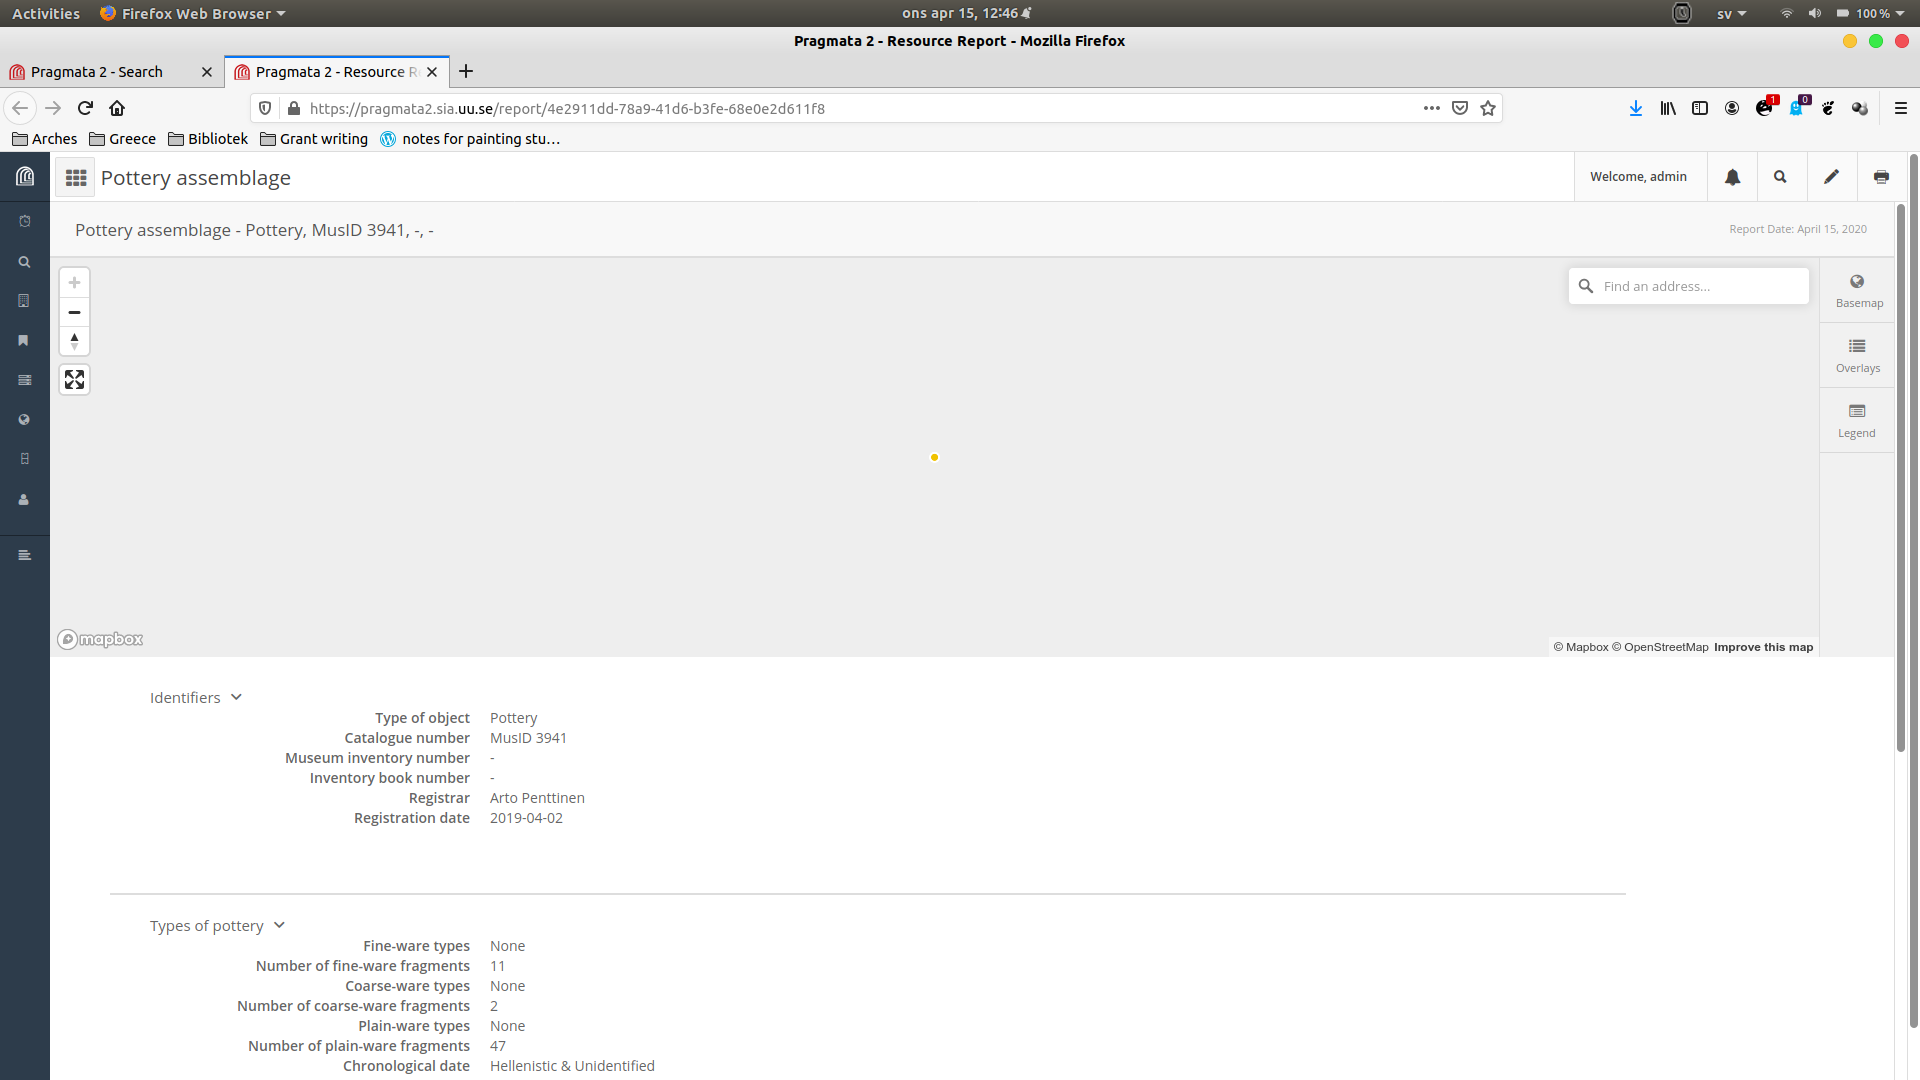
...and nothing can be seen...
All my very best from Athens, Greece
Robin
Dennis Wuthrich
Apr 16, 2020, 2:57:53 PM4/16/20
to Arches Project
Hi Robin,
Dennis
You should check your geoserver configuration to see why the tiff disappears at certain zoom levels.
As to your second question: Arches automatically zooms reports to the instance geometry (if it exists). If your instance is represented by a point geometry, then the map does get zoomed in pretty close. You could write an ticket requesting an enhancement to Arches at the github repository that summarizes this issue.
Cheers,
Dennis

Harri Kiiskinen
Jun 4, 2020, 11:31:59 AM6/4/20
to Arches Project
Hi all,
(if it would be better to start a new subject for this, let me know)
I've been trying to get the following layer visible in Arches:
The map source definition is like this:
{"type": "raster", "tiles": ["http://vps815520.ovh.net:8080/geoserver/hk/wms?service=WMS&version=1.1.1&request=GetMap&bbox={bbox-epsg-3857}&format=image/png&srs=EPSG%3A3857&width=256&height=256&layers=hk:ostia"], "tileSize": 256}
which to me looks very much like it should be according to the examples in this thread. Also
- the map is visible as overlay
- the geoserver log files actually show the requests coming to the server from arches, and there are no error messages
- the bbox in the request covers the bbox of the map in the geoserver layer definitions.
And I still cannot see anything in Arches.
Any suggestions on where to look? My installation is very recent, like this week monday, and "pip list" shows arches version 5.0.
Otherwise things seem to work as they should.
Best,
Harri Kiiskinen
Dennis Wuthrich
Jun 4, 2020, 11:49:51 AM6/4/20
to Arches Project
Hi Harri,
You should confirm that you are referencing your geoserver layer properly. Check to confirm that you have a map layer definition that looks something like so:
[{"id": "test-raster", "type": "raster", "source": "test-raster"}]
where test-raster is the name you gave your map source. Assuming you've done this, you should confirm that you've set your CORS policy properly. I get the following error when trying to access your Geoserver layer in Arches
Access to fetch at 'http://vps815520.ovh.net:8080/geoserver/hk/wms?service=WMS&version=1.1.1&request=GetMap&bbox=1565430.3392804079,5948635.289265558,1878516.4071364924,6261721.357121639&format=image/png&srs=EPSG%3A3857&width=256&height=256&layers=hk:ostia' from origin 'http://localhost:8000' has been blocked by CORS policy: No 'Access-Control-Allow-Origin' header is present on the requested resource. If an opaque response serves your needs, set the request's mode to 'no-cors' to fetch the resource with CORS disabled.
Hope this points you in the proper direction.
-Dennis
Harri Kiiskinen
Jun 5, 2020, 12:08:40 PM6/5/20
to Dennis Wuthrich, Arches Project
Thanks for help, that helped me to the right direction; instead of dealing with CORS settings, I set up a Proxy with Apache to redirect the connection so it looks like everything takes place on the same server and now the maps appear perfectly. (The layer definitions were quite ok already).
But where do you get the error messages? I probably could have figured out this myself if I had seen the error message somewhere, but the arches.log is empty, and I'm running the test server with Debug=True which does not give any meaningful messages either.
Thanks for the help, though,
Harri K.
--
-- To post, send email to arches...@googlegroups.com. To unsubscribe, send email to archesprojec...@googlegroups.com. For more information, visit https://groups.google.com/d/forum/archesproject?hl=en
---
You received this message because you are subscribed to the Google Groups "Arches Project" group.
To unsubscribe from this group and stop receiving emails from it, send an email to archesprojec...@googlegroups.com.
To view this discussion on the web visit https://groups.google.com/d/msgid/archesproject/eaf06da2-212c-47d2-ad97-aabf2535095e%40googlegroups.com.

Gabriel Contreras
Sep 2, 2020, 9:40:52 AM9/2/20
to Arches Project
Hi all,

I just found this thread, I am not sure if should I create a new one or if can follow this thread, please let me know if I should follow different approach.
I am trying to import a KML (doc) to an arches project it comes form a KMZ file for the full grids for the project. I just read the isntructions for adding the geotiff I was wondering if could follow similar steps to add this KML as map source.
I have added a map source with name eamena_1 and using:
{"type": "raster", "tiles": ["http://localhost:8080/geoserver/eamena_kmz/wms?service=WMS&version=1.1.0&request=GetMap&layers=eamena_kmz%3Adoc&bbox=-18.0%2C12.0%2C64.0%2C40.0&width=768&height=330&srs=EPSG%3A4326&format=kmz&width=256&height=256&layers=eamena_kmz:eamena_1&transparent=true"], "tileSize": 256}
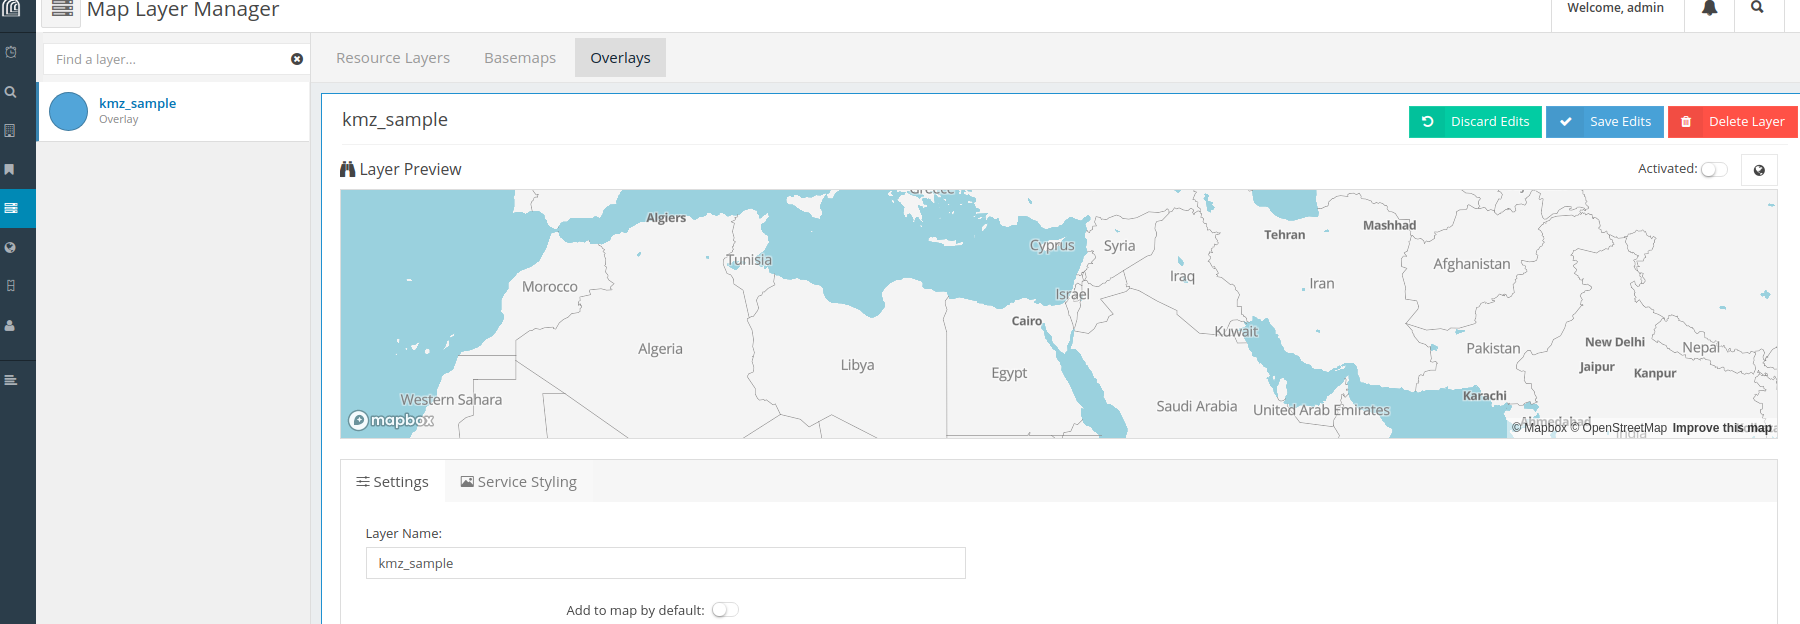
and I add the map layer with the name kmz_sample:
[{"id": "eamena_1", "type": "raster", "source": "eamena_1"}]
But it is not displaying nothing in the project (The map layer has been created but it not showing the sources ), I have thought about the SRS but seems that it is correct (EPSG:4326).
Thank you very much in advance for your help and I would really appreciate if you can point me in some direction about how to resolve this issue.
Reply all
Reply to author
Forward
0 new messages