Raspberry Pi Model B+ Support
6,665 views
Skip to first unread message

trouch
Jul 14, 2014, 12:24:22 PM7/14/14
to web...@googlegroups.com
A new Pi is out ! See http://www.raspberrypi.org/blog/#introducing-raspberry-pi-model-b-plus
WebIOPi should support it out of the box with almost no limitation.New I/O are actually not mapped yet, you can only use 26 firsts pins, which are the same as the previous models.
You can use a "downgrade" cable to avoid any confusion : http://www.adafruit.com/products/1986
I plan to buy a new Pi when french retailers will have some.
I'll try to release a new WebIOPi version supporting B+ model as soon as possible.
Best,
Eric/trouch.
Message has been deleted

Joseph Curtis
Jul 15, 2014, 2:08:47 PM7/15/14
to web...@googlegroups.com
Eric, your product is awesome thanks for keeping the dream alive!

Toshi Bass
Jul 26, 2014, 12:23:41 PM7/26/14
to web...@googlegroups.com
Hi Eric
I have had a b+ for 10 days now and can confirm everything that I've tried works fine "out of the box" of coarse it would be nice to have additional GPIO mapped and GPIOHeader page showing new extended GPIO layout, but currently I am controlling them via python
regards
Toshi
Eric PTAK
Jul 29, 2014, 5:17:02 PM7/29/14
to web...@googlegroups.com
Good to know, thanks you !
Thinking again, using the 'expert' app, you shoud be able to use all B+ GPIOs.
Can you check it ?
--
You received this message because you are subscribed to the Google Groups "WebIOPi" group.
To unsubscribe from this group and stop receiving emails from it, send an email to webiopi+u...@googlegroups.com.
For more options, visit https://groups.google.com/d/optout.
Toshi Bass
Jul 29, 2014, 5:49:13 PM7/29/14
to web...@googlegroups.com
Sure I can check it, but what is the "expert app"?
Toshi
Eric PTAK
Jul 30, 2014, 1:35:00 PM7/30/14
to web...@googlegroups.com
On Tue, Jul 29, 2014 at 11:49 PM, Toshi Bass <toshib...@gmail.com> wrote:
Sure I can check it, but what is the "expert app"?
Toshi
Toshi Bass
Jul 31, 2014, 3:39:04 AM7/31/14
to web...@googlegroups.com
hmmm this webiopi-chrome-expert.png is from webiopi 0.5.3 - for raspberry pi model A, however looking at index.html and style.css for that on the svn, its the same as http://xxx.xxx.x.xx:8000/app/gpio-list
<!DOCTYPE html PUBLIC "-//W3C//DTD HTML 4.01 Transitional//EN" "http://www.w3.org/TR/html4/loose.dtd">
<html>
<head>
        <meta http-equiv="Content-Type" content="text/html; charset=UTF-8">
<meta name="viewport" content = "height = device-height, width = 420, user-scalable = no" />
<title>WebIOPi | GPIO List</title>
<script type="text/javascript" src="/webiopi.js"></script>
<script type="text/javascript">
webiopi().ready(function() {
webiopi().Expert().createList("content");
w().refreshGPIO(true);
});
</script>
<style type="text/css">
button {
margin: 2px 2px 2px 2px;
width: 50px;
}
.Description {
display: inline;
}
</style>
</head>
<body>
<div id="content"></div>
</body>
</html>
If this is your meaning "using the 'expert' app, you should be able to use all B+ GPIOs." i.e. try gpio-list then unfortunately it does not include any of the new GPIO,s on the B+ .
Toshi
Eric PTAK
Jul 31, 2014, 2:41:47 PM7/31/14
to web...@googlegroups.com
yes, gpio-list :D
by default, it should display all 54 GPIO of the BCM chip, including "new" GPIO wired on the B+ model.
Toshi--
Toshi Bass
Jul 31, 2014, 4:46:03 PM7/31/14
to web...@googlegroups.com
Ok well as I say its not working like that shows only GPIO like original model b non of the new GPIO on the model b+
Toshi

florian eggers
Aug 2, 2014, 5:39:58 PM8/2/14
to web...@googlegroups.com
Hey,
finally i wanted to measure precisely if buttons were pressed-
due to the fact that i only needed 20 GPIOs heres the code i developed- feel free to use it!
finally i wanted to measure precisely if buttons were pressed-
due to the fact that i only needed 20 GPIOs heres the code i developed- feel free to use it!
<!DOCTYPE html PUBLIC "-//W3C//DTD HTML 4.01 Transitional//EN" "http://www.w3.org/TR/html4/loose.dtd">
<html>
<head>
<meta http-equiv="Content-Type" content="text/html; charset=UTF-8">
        <title>WebIOPi | Light Control</title>
<h1> <center>Hiermit liest man die neuen GPIOs aus</center></H1>
     <script type="text/javascript" src="/webiopi.js"></script>
        <script type="text/javascript">

webiopi().ready(function() {
                var button;

                // create a "LED" labeled button for GPIO2
                button = webiopi().createGPIOButton(2, "io2");
                $("#cell1").append(button); // append button to top middle div

                // create a "LED" labeled button for GPIO3
                button = webiopi().createGPIOButton(3, "io3");
                $("#cell2").append(button); // append button to top left div

                // create a "LED" labeled button for GPIO4
                button = webiopi().createGPIOButton(4, "io4");
                $("#cell3").append(button); // append button to top right div

                // create a "LED" labeled button for GPIO17
                button = webiopi().createGPIOButton(17, "io17");
                $("#cell4").append(button); // append button to top left div

                // create a "LED" labeled button for GPIO27
                button = webiopi().createGPIOButton(27, "io27");
                $("#cell5").append(button); // append button to bottom left div

                // create a "LED" labeled button for GPIO22
                button = webiopi().createGPIOButton(22, "io22");
                $("#cell6").append(button); // append button to bottom middle div


                // create a "LED" labeled button for GPIO10
                button = webiopi().createGPIOButton(10, "io10");
                $("#cell7").append(button); // append button to top middle div

                // create a "LED" labeled button for GPIO9
                button = webiopi().createGPIOButton(9, "io9");
                $("#cell8").append(button); // append button to top left div

                // create a "LED" labeled button for GPIO11
                button = webiopi().createGPIOButton(11, "io11");
                $("#cell9").append(button); // append button to top right div

                // create a "LED" labeled button for GPIO5
                button = webiopi().createGPIOButton(5, "io5");
                $("#cell10").append(button); // append button to top left div

                // create a "LED" labeled button for GPIO6
                button = webiopi().createGPIOButton(6, "io6");
                $("#cell11").append(button); // append button to bottom left div

                // create a "LED" labeled button for GPIO13
                button = webiopi().createGPIOButton(13, "io13");
                $("#cell12").append(button); // append button to bottom middle div

                // create a "LED" labeled button for GPIO19
                button = webiopi().createGPIOButton(19, "io19");
                $("#cell13").append(button); // append button to bottom left div

                // create a "LED" labeled button for GPIO26
                button = webiopi().createGPIOButton(26, "io26");
                $("#cell14").append(button); // append button to bottom middle div

// und jetzt rechts

                // create a "LED" labeled button for GPIO18
                button = webiopi().createGPIOButton(18, "io18");
                $("#cell15").append(button); // append button to bottom middle div

                // create a "LED" labeled button for GPIO23
                button = webiopi().createGPIOButton(23, "io23");
                $("#cell16").append(button); // append button to bottom middle div

                // create a "LED" labeled button for GPIO24
                button = webiopi().createGPIOButton(24, "io24");
                $("#cell17").append(button); // append button to bottom left div

                // create a "LED" labeled button for GPIO25
                button = webiopi().createGPIOButton(25, "io25");
                $("#cell18").append(button); // append button to bottom middle div

                // create a "LED" labeled button for GPIO8
                button = webiopi().createGPIOButton(8, "io8");
                $("#cell19").append(button); // append button to bottom left div

                // create a "LED" labeled button for GPIO7
                button = webiopi().createGPIOButton(7, "io7");
                $("#cell20").append(button); // append button to bottom middle div


            // Refresh GPIO buttons

// pass true to refresh repeatedly of false to refresh once
                webiopi().refreshGPIO(true);
       });

        </script>

        <style type="text/css">
                button {
                        display: block;
                        margin: 5px 5px 5px 5px;
                        width: 200px;
                        height: 45px;
                        -moz-border-radius:10px;
                        -webkit-border-radius:10px;
                        border-radius:10px;
                        font-size: 24pt;
                        font-weight: bold;
                        color: white;
 }

#gpio2.LOW  {
                background-color: Orange;
                color:black;
                }
#gpio2.HIGH {
                background-color: Purple;
                color:white;
                }
#gpio3.LOW  {
                background-color: Orange;
                color:black;
                }
#gpio3.HIGH {
                background-color: Purple;
                color: white;
                }
#gpio4.LOW  {
                background-color: Orange;
                color:white;
                }
#gpio4.HIGH {
                background-color: Purple;
                color:white;
                }
#gpio17.LOW  {
                background-color: Orange;
                color:white;
                }
#gpio17.HIGH {
                background-color: Purple;
                color:white;
                }
#gpio27.LOW     {
                background-color: Orange;
                color:white;
                }
#gpio27.HIGH    {
                background-color: Purple;
                color:white;
                }
#gpio22.LOW     {
                background-color: Orange;
                color:white;
                }
#gpio22.HIGH    {
                background-color: Purple;
                color:white;
                }
#gpio10.LOW     {
                background-color: Orange;
                color:white;
                }
#gpio10.HIGH    {
                background-color: Purple;
                color:white;
                }
#gpio9.LOW     {
                background-color: Orange;
                color:white;
                }
#gpio9.HIGH    {
                background-color: Purple;
                color:white;
                }
#gpio11.LOW     {
                background-color: Orange;
                color:white;
                }
#gpio11.HIGH    {
                background-color: Purple;
                color:white;
                }
#gpio5.LOW     {
                background-color: Orange;
                color:white;
                }
#gpio5.HIGH    {
                background-color: Purple;
                color:white;
                }
#gpio6.LOW     {
                background-color: Orange;
                color:white;
                }
#gpio6.HIGH    {
                background-color: Purple;
                color:white;
                }
#gpio13.LOW     {
                background-color: Orange;
                color:white;
                }
#gpio13.HIGH    {
                background-color: Purple;
                color:white;
                }
#gpio19.LOW     {
                background-color: Orange;
                color:white;
                }
#gpio19.HIGH    {
                background-color: Purple;
                color:white;
                }
#gpio26.LOW     {
                background-color: Orange;
                color:white;
                }
#gpio26.HIGH    {
                background-color: Purple;
                color:white;
                }

#gpio18.LOW     {
                background-color: Orange;
                color:white;
                }
#gpio18.HIGH    {
                background-color: Purple;
                color:white;
                }
#gpio23.LOW     {
                background-color: Orange;
                color:white;
                }
#gpio23.HIGH    {
                background-color: Purple;
                color:white;
                }
#gpio24.LOW     {
                background-color: Orange;
                color:white;
                }
#gpio24.HIGH    {
                background-color: Purple;
                color:white;
                }

#gpio25.LOW     {
                background-color: Orange;
                color:white;
                }
#gpio25.HIGH    {
                background-color: Purple;
                color:white;
                }
#gpio8.LOW     {
                background-color: Orange;
                color:white;
                }
#gpio8.HIGH    {
                background-color: Purple;
                color:white;
                }
#gpio7.LOW     {
                background-color: Orange;
                color:white;
                }
#gpio7.HIGH    {
                background-color: Purple;
                color:white;
                }


                .label {
                        width: 50px;
                        font-size: 16pt;
                        font-weight: bold;
                        text-align: center;
                        }

        </style>
</head>
<body>

<table border="5" cellpadding="1" cellspacing="2" style="background-color:White">
        <tr>
                <td><div class="label">IO-2</div></td>
                <td><div id="cell1" ></div></td>
                <td><div class="label">IO-3</div></td>
                <td><div id="cell2"  ></div></td>
                <td><div class="label">IO-4</div></td>
                <td><div id="cell3"></div></td>
        </tr>
</table>

<table border="5" cellpadding="1" cellspacing="2" style="background-color:White">
        <tr>
                <td><div class="label">IO-17</div></td>
                <td><div id="cell4" ></div></td>
                <td><div class="label">IO-27</div></td>
                <td><div id="cell5"  ></div></td>
                <td><div class="label">IO-22</div></td>
                <td><div id="cell6"></div></td>
        </tr>
</table>


<table border="5" cellpadding="1" cellspacing="2" style="background-color:White">
        <tr>
                <td><div class="label">IO-10</div></td>
                <td><div id="cell7" ></div></td>
                <td><div class="label">IO-9</div></td>
                <td><div id="cell8"  ></div></td>
                <td><div class="label">IO-11</div></td>
                <td><div id="cell9"></div></td>
        </tr>
</table>


<table border="5" cellpadding="1" cellspacing="2" style="background-color:White">
        <tr>
                <td><div class="label">IO-5</div></td>
                <td><div id="cell10" ></div></td>
                <td><div class="label">IO-6</div></td>
                <td><div id="cell11"  ></div></td>
                <td><div class="label">IO-13</div></td>
                <td><div id="cell12"></div></td>
        </tr>
</table>

<table border="5" cellpadding="1" cellspacing="2" style="background-color:White">
        <tr>
                <td><div class="label">IO-19</div></td>
                <td><div id="cell13" ></div></td>
                <td><div class="label">IO-26</div></td>
                <td><div id="cell14"  ></div></td>
                <td><div class="label">IO-18</div></td>
                <td><div id="cell15"  ></div></td>
        </tr>
</table>

<table border="5" cellpadding="1" cellspacing="2" style="background-color:White">
        <tr>
                <td><div class="label">IO-23</div></td>
                <td><div id="cell16" ></div></td>
                <td><div class="label">IO-24</div></td>
                <td><div id="cell17"  ></div></td>
                <td><div class="label">IO-25</div></td>
                <td><div id="cell18"  ></div></td>
        </tr>
</table>

<table border="5" cellpadding="1" cellspacing="2" style="background-color:White">
        <tr>
                <td><div class="label">IO-7</div></td>
                <td><div id="cell19" ></div></td>
                <td><div class="label">IO-8</div></td>
                <td><div id="cell20"  ></div></td>
        </tr>
</table>

</body>
</html>

Code hier eingeben...Message has been deleted
Toshi Bass
Aug 19, 2014, 1:43:27 PM8/19/14
to web...@googlegroups.com
Regarding Expert App / GPIO-List
After my vacation had another look at the expert / gpio-list code in webiopi.js seams like line 630:
if (w().GPIO[i].mapped == true) {
limits the display to only mapped GPIO
So if you want to see/interact with the new GPIO on the gpio-list screen, I made small modification until Eric gets his new Pi b+ and maps the gpio etc
Temporarily modify line 630 in webiopi.js to read :
if (w().GPIO[i].mapped == true||[i]==5||[i]==6||[i]==12||[i]==13||[i]==16||[i]==19||[i]==20||[i]==21||[i]==26) {
For the modification to take effect run sudo ./stetup.sh skip-apt
Toshi
Message has been deleted
Message has been deleted

Erwin Kooi
Aug 19, 2014, 4:36:44 PM8/19/14
to web...@googlegroups.com
Hi Toshi,
(grmbl Google forums, can't edit my own posts...)
Nice digging in the code.
Perhaps more elegant is to replace the actual pin definitions in the ./python/utils/version.py file.
If you append line 11 for _MAPPING[2] to read
_MAPPING[2] = ["V33", "V50", 2, "V50", 3, "GND", 4, 14, "GND", 15, 17, 18, 27, "GND", 22, 23, "V33", 24, 10, "GND", 9, 25, 11, 8, "GND", 7, "DNC", "DNC" , 5, "GND", 6, 12, 13, "GND", 19, 16, 26, 20, "GND", 21]
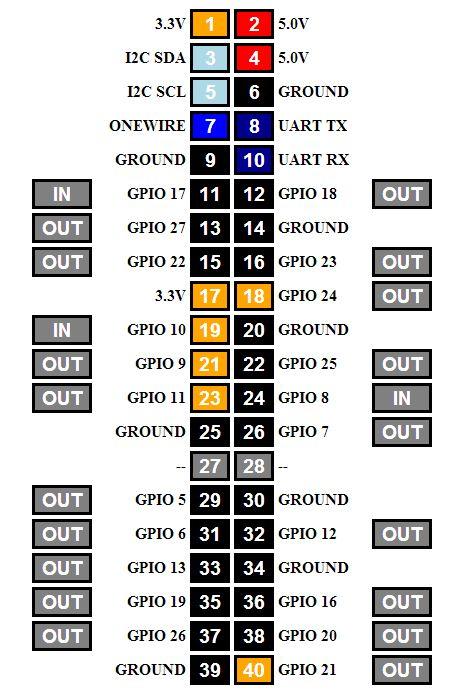
(the bold text is new), then the pins will be identified correctly throughout Webiopi. Unfortunately, at this moment there is no real distinction between the B and the B+ models, so both will be recognized as a revision 2 board (hence editing the _MAPPING[2]). It will be interesting to see what can be found as a differentiator and make the B+ model a rev3 with its own mapping.
The GPIO List page http://webiopi:8000/app/gpio-list reflects this now correctly (http://webiopi:8000/map shows the raw mapping).
For the GPIO Header page http://webiopi:8000/app/gpio-header to work correctly, two modifications in the ./htdocs/webiopi.js file are needed.
Line 76 lists a total number of 27 pins. this should be 41. So line 76 should be
this.PINS = Array(41);
Line 580 makes a table with 26 cells and it should make a table with 40 cells. So line 580 should be
for (var pin=1; pin<=40; pin++) {
You need to recompile with the modified files, so you need a "sudo ./setup.sh skip-apt" and all works beautifully with all 40 pins in the default webapp.
--Erwin
(grmbl Google forums, can't edit my own posts...)
Nice digging in the code.
Perhaps more elegant is to replace the actual pin definitions in the ./python/utils/version.py file.
If you append line 11 for _MAPPING[2] to read
_MAPPING[2] = ["V33", "V50", 2, "V50", 3, "GND", 4, 14, "GND", 15, 17, 18, 27, "GND", 22, 23, "V33", 24, 10, "GND", 9, 25, 11, 8, "GND", 7, "DNC", "DNC" , 5, "GND", 6, 12, 13, "GND", 19, 16, 26, 20, "GND", 21]
(the bold text is new), then the pins will be identified correctly throughout Webiopi. Unfortunately, at this moment there is no real distinction between the B and the B+ models, so both will be recognized as a revision 2 board (hence editing the _MAPPING[2]). It will be interesting to see what can be found as a differentiator and make the B+ model a rev3 with its own mapping.
The GPIO List page http://webiopi:8000/app/gpio-list reflects this now correctly (http://webiopi:8000/map shows the raw mapping).
For the GPIO Header page http://webiopi:8000/app/gpio-header to work correctly, two modifications in the ./htdocs/webiopi.js file are needed.
Line 76 lists a total number of 27 pins. this should be 41. So line 76 should be
this.PINS = Array(41);
Line 580 makes a table with 26 cells and it should make a table with 40 cells. So line 580 should be
for (var pin=1; pin<=40; pin++) {
You need to recompile with the modified files, so you need a "sudo ./setup.sh skip-apt" and all works beautifully with all 40 pins in the default webapp.
--Erwin
Toshi Bass
Aug 20, 2014, 2:10:15 AM8/20/14
to web...@googlegroups.com
Hi Erwin
Works great, its what I was trying to achieve last night so its saved me a bunch of time, I don't use the gpio-header regularly but its really handy to reference when connecting circuits and testing code, nice hack thanks.
Toshi

Robert More
Aug 28, 2014, 2:17:08 AM8/28/14
to web...@googlegroups.com
Very nice, thank you Erwin!
Erwin Kooi
Aug 28, 2014, 10:37:14 AM8/28/14
to web...@googlegroups.com
For the lazy ones, I made a patch file to incorporate these changes.
untar the WebIOPi-0.7.0.tar.gz archive.
cd into the newly created WebIOPi-0.7.0 directory.
save the WebIOPi-0.7.0.Bplus.patch file in this directory
run the command patch -p1 < WebIOPi-0.7.0.Bplus.patch
compile WebIOPi by running the command sudo ./setup.sh
(if you already installed WebIOPi, recompile by running the command sudo ./setup.sh skip-apt
As a tip, I rename the WebIOPi-0.7.0 directory to WebIOPi-0.7.0.Bplus after applying the patch, which reminds me that this dir contains modified code from the original archive.
--Erwin
Robert More
Aug 29, 2014, 12:30:28 AM8/29/14
to web...@googlegroups.com
Most excellent !

Daoud
Sep 23, 2014, 5:09:49 AM9/23/14
to web...@googlegroups.com
Hey Eric,
Is there any new upgraded to support RPi B+ version ?
Thanks.
Daoud.

Roberto Placido
Dec 8, 2014, 5:51:48 PM12/8/14
to web...@googlegroups.com
Hi Eric,
i'm an user of your mythical project; thanks for your work!!!
I'm waiting for iomotix and i'll install it asap...
In the mean time i was analyzing WebioPI and i've seen you had'nt included the C source of GPIO.cpython-32mu.so
Am i not able to find it but it is somwhere? If not, there is any particular reason you did not publish it? Is it possible to have it in some way?
Thanks for everything; you soon with iomotix!!!!
Roberto
P.S I'm italian and maybe it was better i wrote in French

Andreas Riegg
Dec 9, 2014, 11:45:46 AM12/9/14
to web...@googlegroups.com
Hi,
you find all C sources that are used for WebIOPi here:
https://code.google.com/p/webiopi/source/browse/#svn%2Ftags%2F0.7.0%2Fpython%2Fnative
Andreas
you find all C sources that are used for WebIOPi here:
https://code.google.com/p/webiopi/source/browse/#svn%2Ftags%2F0.7.0%2Fpython%2Fnative
Andreas
Roberto Placido
Dec 10, 2014, 3:17:30 AM12/10/14
to web...@googlegroups.com
Thanks Andreas,
in Tuscany we say "bischero"; a traslation can be "silly" or "numb".
Thanks again
Roberto
Message has been deleted
Message has been deleted
Message has been deleted

Cloter Mig
Apr 9, 2015, 11:50:42 AM4/9/15
to web...@googlegroups.com
Erwin Kooi, this worked also for the webiopi version 0.7.1 on a RPI 2
(the quad core one from 03/2015). Perhaps the patch could be updated to this version
of webiopi and hardware.
Excellent!
Excellent!
Erwin Kooi
Apr 20, 2015, 1:10:29 AM4/20/15
to web...@googlegroups.com
I just received my new v2 board. Working on it.

Adam S
Apr 20, 2015, 2:35:08 PM4/20/15
to web...@googlegroups.com
First of all, I don't really understand diff and even after googling it
really don't know much about it. That said, I can't understand how this
patch still works on the 0.7.1 version? If I update your file to have WebIOPi-0.7.1 instead of WebIOPi-0.7.0 it will not work, and not only that, if I run the original file it DOES work. I checked the files and they were updated with the correct values. What exactly is this command doing?

Parikshit Varade
May 23, 2015, 10:14:52 PM5/23/15
to web...@googlegroups.com
Hello Erwin
I installed webiopi with you patch but now I cannot see anything when I login on weaved.com and go in GPIO header. It was working previously without your patch. So can you tell me how to resolve this problem?? or can you please tell me how to uninstall webiopi completely so that I can do fresh installation.
Parikshit.

mike aspinall
May 31, 2015, 4:19:20 AM5/31/15
to web...@googlegroups.com
im the same after installing the patch I get nothing but a blank screen
well back to the drawing board
Message has been deleted
Message has been deleted
Erwin Kooi
Jun 13, 2015, 3:06:54 PM6/13/15
to web...@googlegroups.com
Hi Adam,
All the patch does, is modify the mentioned files with the changes. So it changes the pin definitions in the ./python/utils/version.py file and changes the values for the pin count from 26 (Pi model B) to 40 (Pi model B+) in the ./htdocs/webiopi.js file.
This was explicitly done for the version 0.7 of WebIOPi. I have not had to time to dig through the 0.7.1 code to see if something changed to the forementioned files. I have not even moved to 0.7.1 or Eric's newest version.
diff takes a patch file, looks at the file it has to change, looks at the change it has to make in that file and then applies that change. It could very well be that line numbers have changed. Depending on how smart diff is, that could mean it rips out a part of other code. Just copying the vanilla (unchanged) WebIOPi files over the patched ./python/utils/version.py and ./htdocs/webiopi.js will completely undo the patch.
--Erwin

Florin Naidin
Jul 6, 2015, 5:28:21 PM7/6/15
to web...@googlegroups.com
I applied the changes manually on a Raspberry PI 2 model B with Webiopi 0.7.1 and after changing the line 580 in webiopi.js from
for (var pin=1; pin<=26; pin++) {
to
for (var pin=1; pin<=26; pin++) {
to
for (var pin=1; pin<=40; pin++) {
the page http://webiopi:8000/app/gpio-header is empty
Message has been deleted

Jan Eyking
Jul 2, 2017, 10:47:38 AM7/2/17
to WebIOPi
That is most likely because you've edited /usr/share/webiopi/htdocs/webiopi.js instead of ~/WebIOPi-0.7.1/htdocs/webiopi.js and didn't recompile.
Reply all
Reply to author
Forward
0 new messages