Understanding terrain features
1,300 views
Skip to first unread message

Peter Van Geit
Jun 6, 2011, 10:16:56 AM6/6/11
to The Chennai Trekking Club
A nice tutorial on understanding terrain features and identifying the same on topographic maps -
Quite interesting for participants of our treks to take along a print out of a topographic map of the actual trekking location (maps.google.com - terrain view) and relate the terrain features seen during the actual trek to those on the map. A compass can be helpful to orient the correct position of the map.
Identifying Terrain Features On A Map

TERRAIN FEATURES (Information taken from FM 25-26 Military Map Reading)
Knowing how to identify terrain features on a map is very important if you are using a map to navigate with. Being able to identify the various types of features will enable you to traverse the land using the best and least resistant route possible. For example, the closer the contours lines are on a map the higher or steeper the terrain is on the actual ground. This helps to avoid traveling in a direction that would require a lot of effort to move across.
The listed terrain features are normally found on topographical style maps. Each map will list different technical information needed to use and read the map. This post will show the different types of terrain and what they look like on a topographical map.
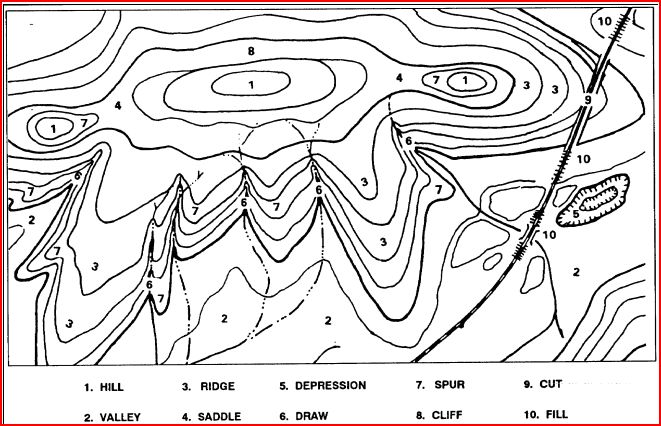
All terrain features are derived from a complex landmass known as a mountain or ridgeline. The term ridgeline is not interchangeable with the term ridge. A ridgeline is a line of high ground, usually with changes in elevation along its top and low ground on all sides from which a total of 10 natural or man-made terrain features are classified.
 |
| Ridgeline |
a. Major Terrain Features.
(1) Hill. A hill is an area of high ground. From a hilltop, the ground slopes down in all directions. A hill is shown on a map by contour lines forming concentric circles. The inside of the smallest closed circle is the hilltop.
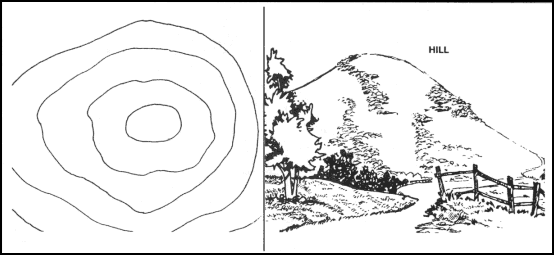 |
| Hill |
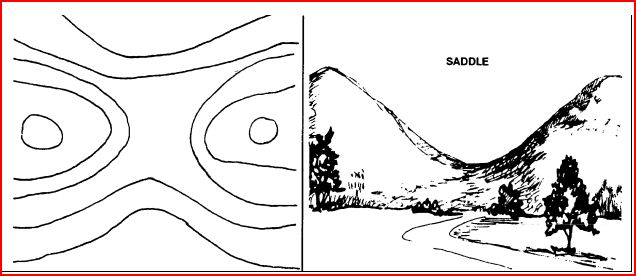 |
| Saddle |
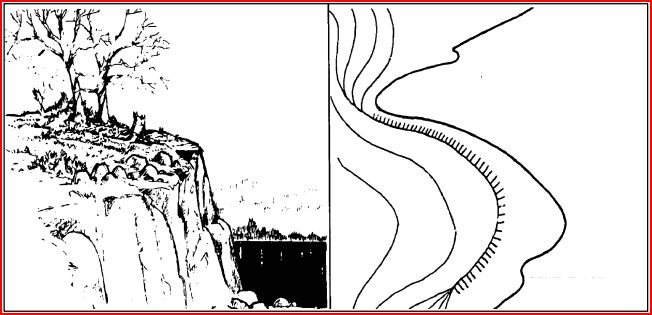
(3) Valley. A valley is a stretched-out groove in the land, usually formed by streams or rivers. A valley begins with high ground on three sides, and usually has a course of running water through it. If standing in a valley, three directions offer high ground, while the fourth direction offers low ground. Depending on its size and where a person is standing, it may not be obvious that there is high ground in the third direction, but water flows from higher to lower ground. Contour lines forming a valley are either U-shaped or V-shaped. To determine the direction water is flowing, look at the contour lines. The closed end of the contour line (U or V) always points upstream or toward high ground.
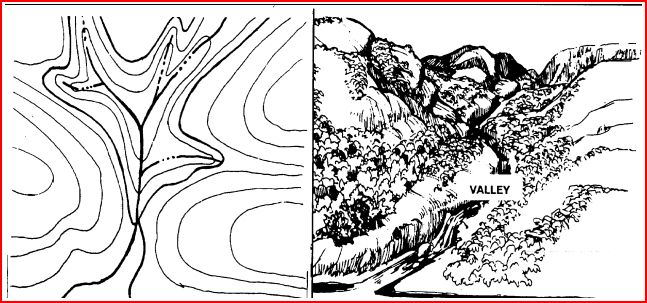 |
| Valley |
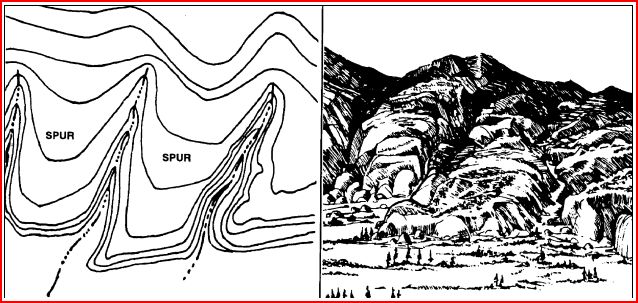
(4) Ridge. A ridge is a sloping line of high ground. If you are standing on the centerline of a ridge, you will normally have low ground in three directions and high ground in one direction with varying degrees of slope. If you cross a ridge at right angles, you will climb steeply to the crest and then descend steeply to the base. When you move along the path of the ridge, depending on the geographic location, there may be either an almost unnoticeable slope or a very obvious incline. Contour lines forming a ridge tend to be U-shaped or V-shaped. The closed end of the contour line points away from high ground.
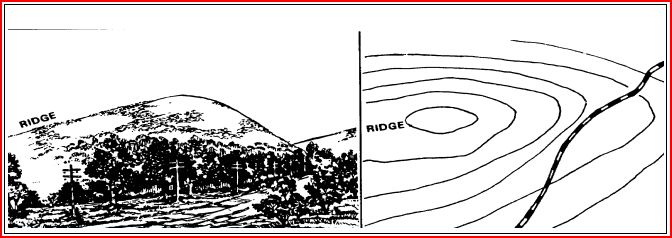 |
| Ridge |
(5) Depression. A depression is a low point in the ground or a sinkhole. It could be described as an area of low ground surrounded by higher ground in all directions, or simply a hole in the ground. Usually only depressions that are equal to or greater than the contour interval will be shown. On maps, depressions are represented by closed contour lines that have tick marks pointing toward low ground.
 |
| Depression |
(1) Draw. A draw is a less developed stream course than a valley. In a draw, there is essentially no level ground and, therefore, little or no maneuver room within its confines. If you are standing in a draw, the ground slopes upward in three directions and downward in the other direction. A draw could be considered as the initial formation of a valley. The contour lines depicting a draw are U-shaped or V-shaped, pointing toward high ground.
 |
| Draw |
(2) Spur. A spur is a short, continuous sloping line of higher ground, normally jutting out from the side of a ridge. A spur is often formed by two rough parallel streams, which cut draws down the side of a ridge. The ground sloped down in three directions and up in one direction. Contour lines on a map depict a spur with the U or V pointing away from high ground.
 |
| Spur |
(3) Cliff. A cliff is a vertical or near vertical feature; it is an abrupt change of the land. When a slope is so steep that the contour lines converge into one "carrying" contour of contours, this last contour line has tick marks pointing toward low ground. Cliffs are also shown by contour lines very close together and, in some instances, touching each other.
 |
| Cliff |
(1) Cut. A cut is a man-made feature resulting from cutting through raised ground, usually to form a level bed for a road or railroad track. Cuts are shown on a map when they are at least 10 feet high, and they are drawn with a contour line along the cut line. This contour line extends the length of the cut and has tick marks that extend from the cut line to the roadbed, if the map scale permits this level of detail.
 |
| Cut and Fill |
(2) Fill. A fill is a man-made feature resulting from filling a low area, usually to form a level bed for a road or railroad track. Fills are shown on a map when they are at least 10 feet high, and they are drawn with a contour line along the fill line. This contour line extends the length of the filled area and has tick marks that point toward lower ground. If the map scale permits, the length of the fill tick marks are drawn to scale and extend from the base line of the fill symbol.
INTERPRETATION OF TERRAIN FEATURES
Terrain features do not normally stand a lone. To better understand these when they are depicted on a map, you need to interpret them. Terrain features are interpreted by using contour lines, ridgelining, or streamlining.
 |
| Terrain Features |
--
Peter Van Geit
Dare to create your own path rather than follow existing trails
http://www.google.com/profiles/peter.vangeit
Peter Van Geit
Jun 9, 2011, 9:33:30 AM6/9/11
to The Chennai Trekking Club
Putting theory into practice - below some insight into this weekend's Nagari exploration mapping and trail analysis -


The plan is to explore 4 new valleys/streams. The reason to trek along streams is three-fold - presence of running (drinkable) water, presence of larger trees which offer shade for the tropical sun and less steep gradient to climb up the hill. Let's take a closer look at each stream on the topographic map (taken from Google Terrain Maps) -
Stream 1
Each thick (or thin) contour line on this topographic map indicates an increase in altitude of 100m (or 20m).
The scale at the bottom-left indicates a horizontal distance of 500m
The first stream is marked using a blue line - the stream runs at the bottom of a valley - on both left and right side of the blue line you can see contour lines corresponding to higher altitudes indicating you are inside a valley at a lower altitude
Initially the stream runs from 220m to 620m altitude (400m climb) over a horizontal distance of approx 2.5km which corresponds to an average ratio of 0.16 or slope of 7.2 degrees (ratio 1 = 45 degrees).
From 620m till 920m the stream becomes much steeper (contour lines are closer) - 300m climb over 1km distance corresponds to ratio of 0.3 or 13.5 degree slope - nearly double the initial stream gradient.
This is the usual pattern of a typical stream - less amount of (rain)water gets collected near the top so there is less erosion of the rock mountains. However as we proceed downstream more water gets collected from surrounding slopes into the valley which causes more erosion and the stream cuts deeper in the mountain. This is clearly visible in the topographic map - straight contour lines near the top while they become more curved/deformed downstream. The amount of erosion obviously also depends on the hardness of the underlying rocks.
Another important question is the likely hood to find running (drinkable) water in a given stream. This obviously depends on the season (summer vs. monsoon) but another key aspect here is the drainage area for a given stream. I indicated the drainage area for our stream using green lines. Any rainwater that falls inside the green area will eventually get collected inside the blue stream. Any rain falling outside the green lines will flow down towards other streams. Approximate drainage area is 3 square kilometer.
Obviously more water gets collected downstream increasing the likely hood to find water at the base of the stream compared to higher up where less water is present. Where exactly the water will start flowing is hard to predict - it depends on the season (=time after monsoon - large refill) and recent rainfall (small refill). The waterline will recede as we get further behind the monsoon.
Stream 2
The second stream on this weekend's plan looks quite different. It's around 3.5km long running West from top to base of the mountain and has eroded a much deeper valley. One can see 300-400m near-vertical rocks at the Northern side of the stream. The drainage area is much narrower reducing the likely hood to find water here, especially during the summer season now unless recent rains would have refilled the stream.
From 900 to 700m the stream gradually slopes down over 1.5km (contour lines are wide apart)
From 700 to 560m the slope increases (contour lines become closer)
From 560 to 360m it becomes more steep (contour lines are very close)
From 360 to 220m it becomes gradual again (contour lines space out again)
Stream 3
The third stream below seems quite doable (gradual slope) except for one section between 450 and 550m which is extremely steep and might be difficult to climb (possible waterfall). The drainage area of the stream is again relatively narrow making presence of water less likely -
Stream 4
The last stream (blue line) has a much less profound signature (less deformation of the contour lines) in the mountain. It however has a large network of side-streams (yellow) which drain a much larger area (green) then any of the above streams. As a result there is a much higher likely hood to find water in this stream, especially towards the base where more yellow side-streams would have joined/contributed to the main blue stream.
The slope of the stream is gradual along nearly its entire 4.5km length from top to bases so trekking along this one would be fairly easy without much steep drops.
Peter
Reply all
Reply to author
Forward
0 new messages