Serial console without modding the Pi

James L-W
I picked up a shiny new Pi 3 to drive my PiDP, and didn't really want to get at it with a soldering iron just yet... I found that with some tweaks, it's possible to overcome the I2C pullups and scan out the switches quite reliably.
Shorting the three row resistors gets you most of the way there, but not at all reliably - the 390R column resistor plus the diode drop are just a bit much. It turns out that the GPIO pads have a Schmitt trigger input, which can be bypassed; without hysteresis, Vih is low enough to sense correctly.
The necessary mods are:
1. replace the three row resistors with 100 ohms
2. patch gpio.c to disable hysteresis (patch follows).
100 ohms *should* be enough to avoid frying the LEDs if you mess up the programming and drive both the switch and LED rows simultaneously.
I then also found that the Pi 3 has changed over the serial port from ttyAMA0 to ttyS0, and that the latter is clocked from the core clock - so if clock scaling is enabled (which it usually is) then the port baud rate is all over the shop. With the latest firmware you can add enable_uart=1 to /boot/config.txt; on a Pi 3 this will lock the core clock, and on older models it is a no-op. Another option is to set force_turbo=1 which will lock the core at max - if you can spare the heat & power.
I'd be curious to hear if this works on earlier Pis as well.
Cheerio,
James
--- snip ---
--- pidp8/src/gpio.c 2015-12-16 08:49:26.000000000 +1100
+++ gpio_pads.c 2016-05-08 20:24:57.286266930 +1000
@@ -29,6 +28,7 @@
static unsigned get_dt_ranges(const char *filename, unsigned offset); // Pi 2 detect
struct bcm2835_peripheral gpio; // needs initialisation
+struct bcm2835_peripheral pads; // needs initialisation
long intervl = 300000; // light each row of leds this long
@@ -113,6 +113,12 @@
return (void *)-1;
}
+ // Disable the hysteresis on the GPIO inputs
+ #define BCM2835_GPIO_PADS 0x100000
+ pads.addr_p = bcm_host_get_peripheral_address() + BCM2835_GPIO_PADS;
+ map_peripheral(&pads);
+ pads.addr[0x2c/4] = (pads.addr[0x2c/4] & 0xf7) | (0x5A << 24);
+
// initialise GPIO (all pins used as inputs, with pull-ups enabled on cols)
// INSERT CODE HERE TO SET GPIO 14 AND 15 TO I/O INSTEAD OF ALT 0.
// AT THE MOMENT, USE "sudo ./gpio mode 14 in" and "sudo ./gpio mode 15 in". "sudo ./gpio readall" to verify.

Oscar Vermeulen
100 ohms *should* be enough to avoid frying the LEDs if you mess up the programming and drive both the switch and LED rows simultaneously.

Neil Higgins
Sure it's ok for a baud rate generator to be "all over the place" (not!) I wonder what genius had that idea? The hurried progress of the BCM series, and the corresponding rush from Pi 2 to Pi 3, were always going to be grounds for wondering what mistakes had slipped through the cracks.

AB
andy b

Dylan McNamee
Dr. James
> I replace the 3 x 1K resistors with 100 ohm resistors, right?
> Do I still need to cut the traces on the PiDP/8 board?
serial port lines for scanning the matrix. This is also reflected in the
SERIALSETUP compile flag, which you will need to supply.
> Do I still install the X (=500) and 2*X (=1K) resistors?
device into ~3.3V safe levels for the Pi. You won't receive anything
without them.
> I'm guessing not, and also that I don't need to recompile pidp8 with the
> serialmod compile flag, is that correct?
levels.
Good luck! Excited to hear how you go.
Cheerio,
James
Dylan McNamee

Peter Willard
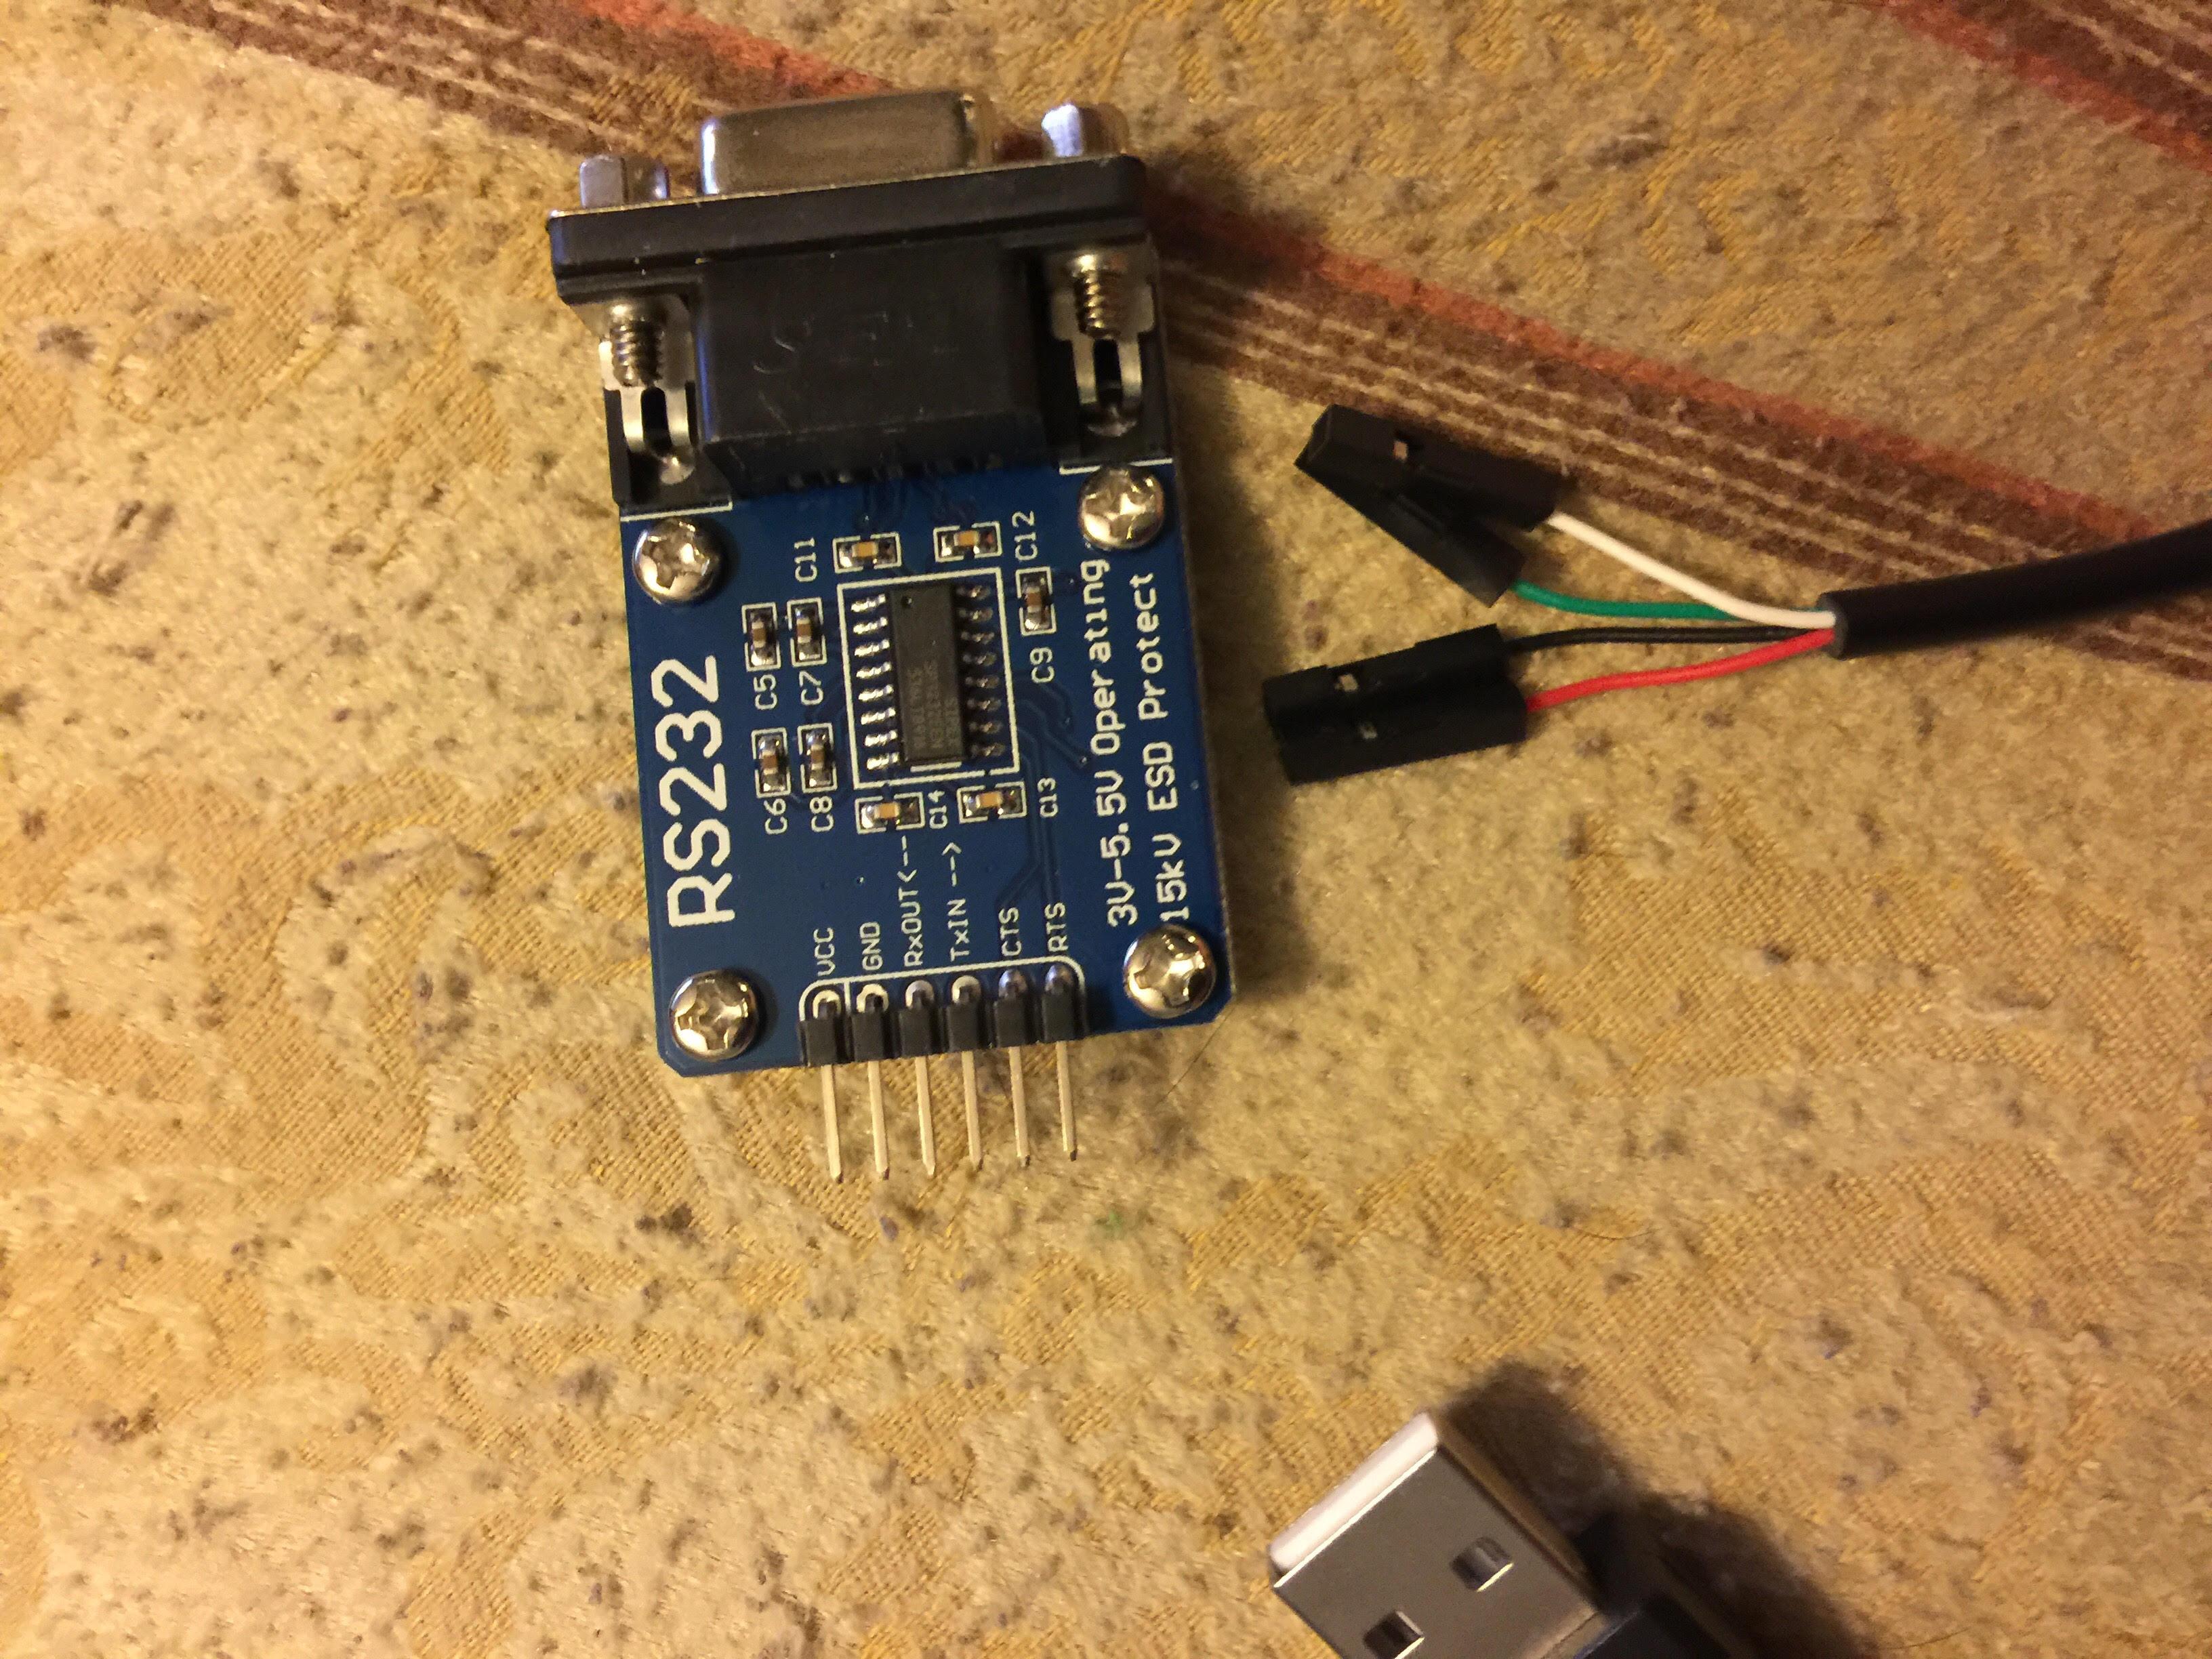
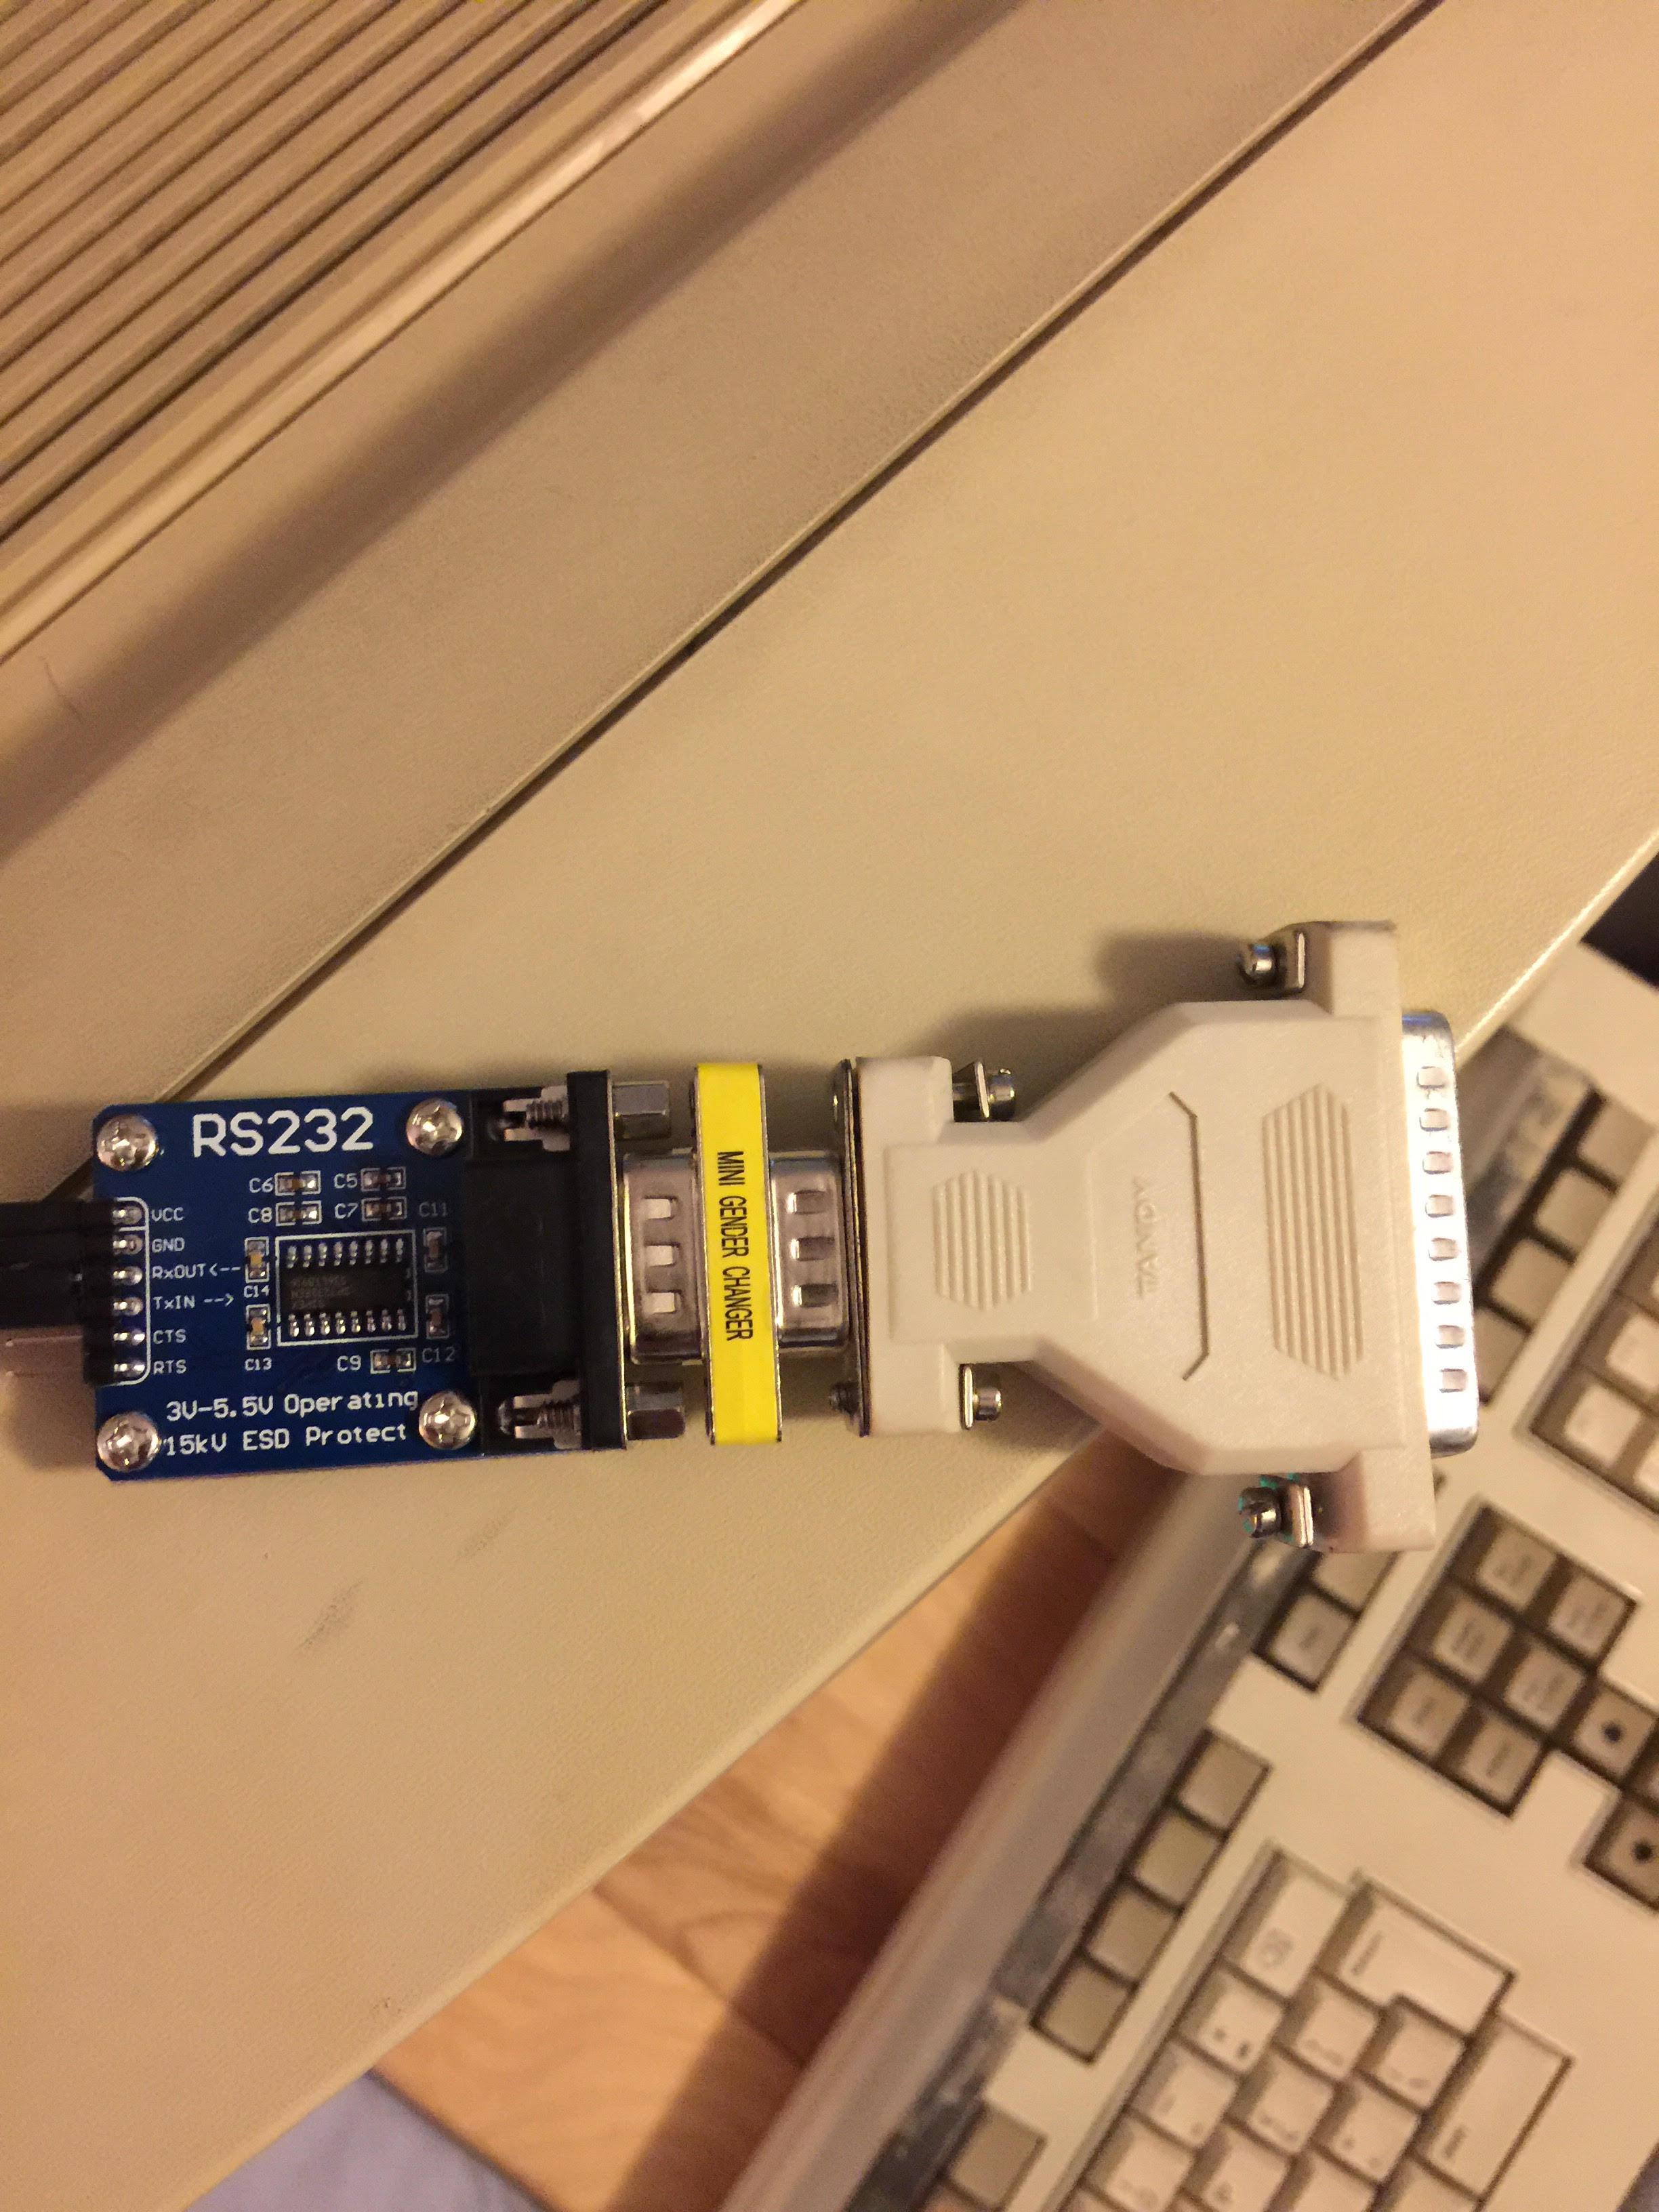
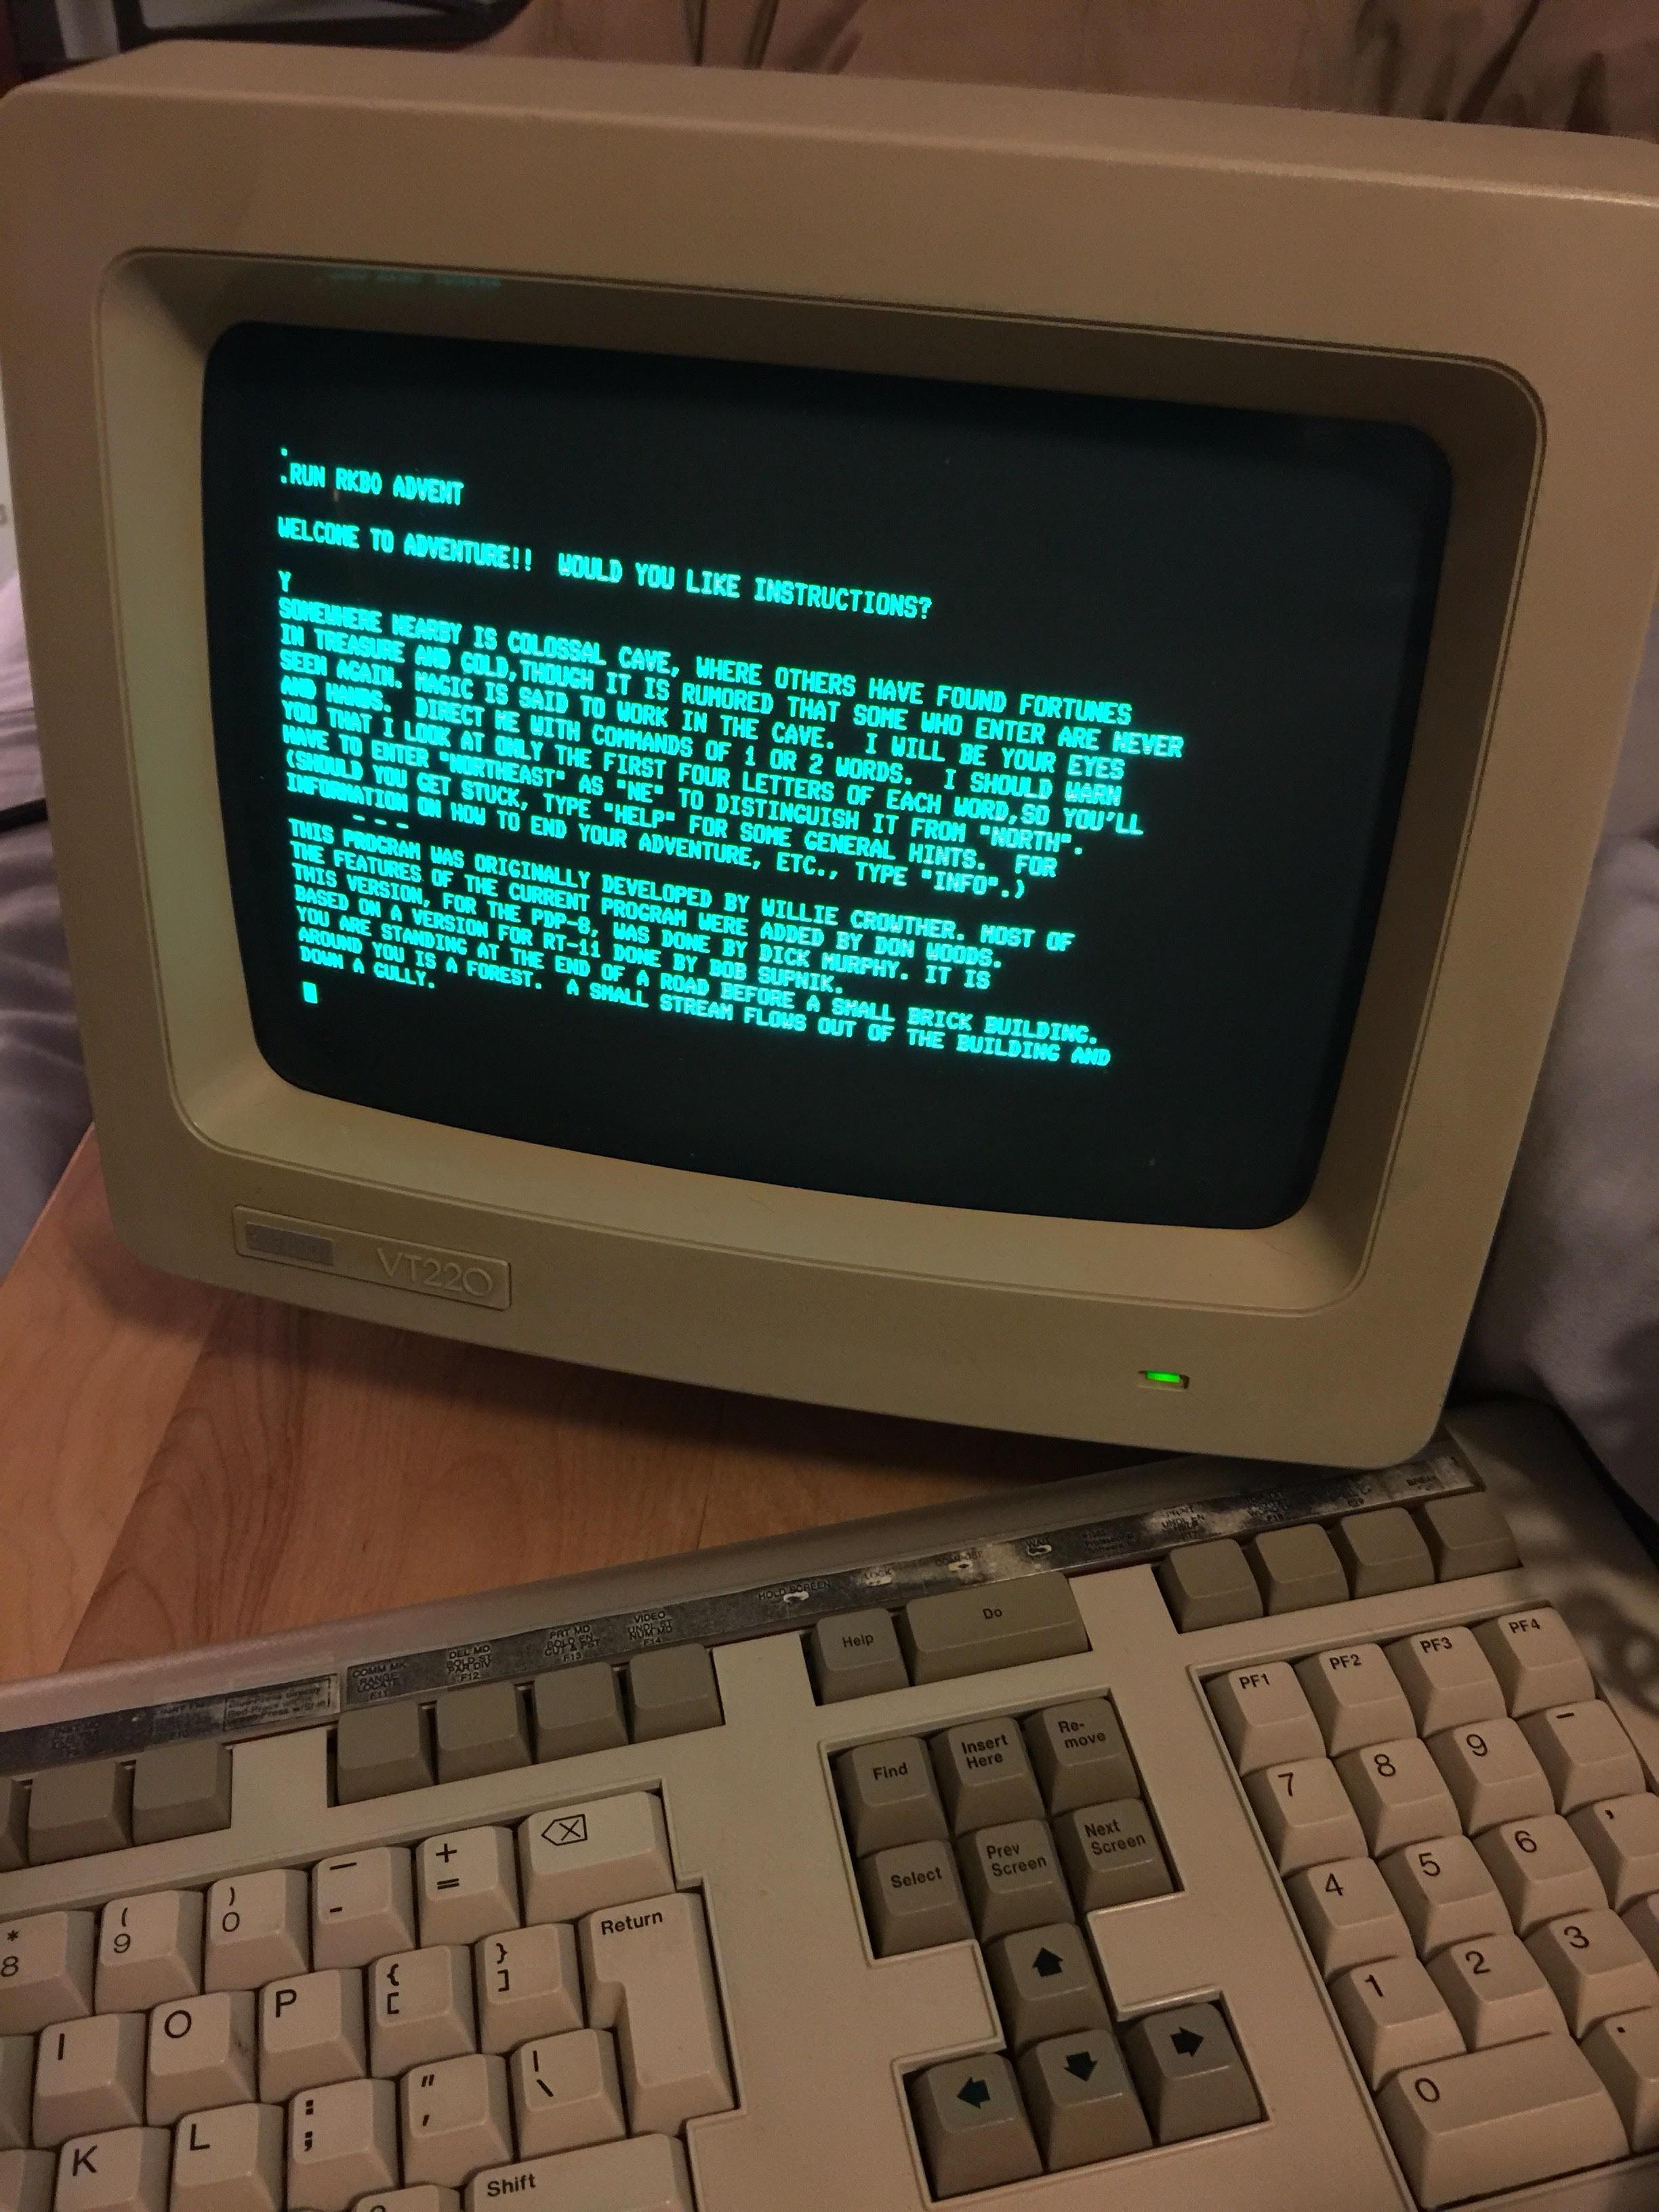
The really easy way to get serial without modding.
Oscar Vermeulen
1. Copy the file 'serial-getty@.service' from '/lib/systemd/system' to
- '/etc/systemd/system' (for standard Raspbian)
- '/etc/systemd/system/xyz' - where xyz is a 'wants' subdirectory whose exact name I forgot, but it'll be obvious.
2. The file must be renamed, so that it points to your serial terminal which will be ttyUSB0. The filename becomes:
'serial...@ttyUSB0.service'
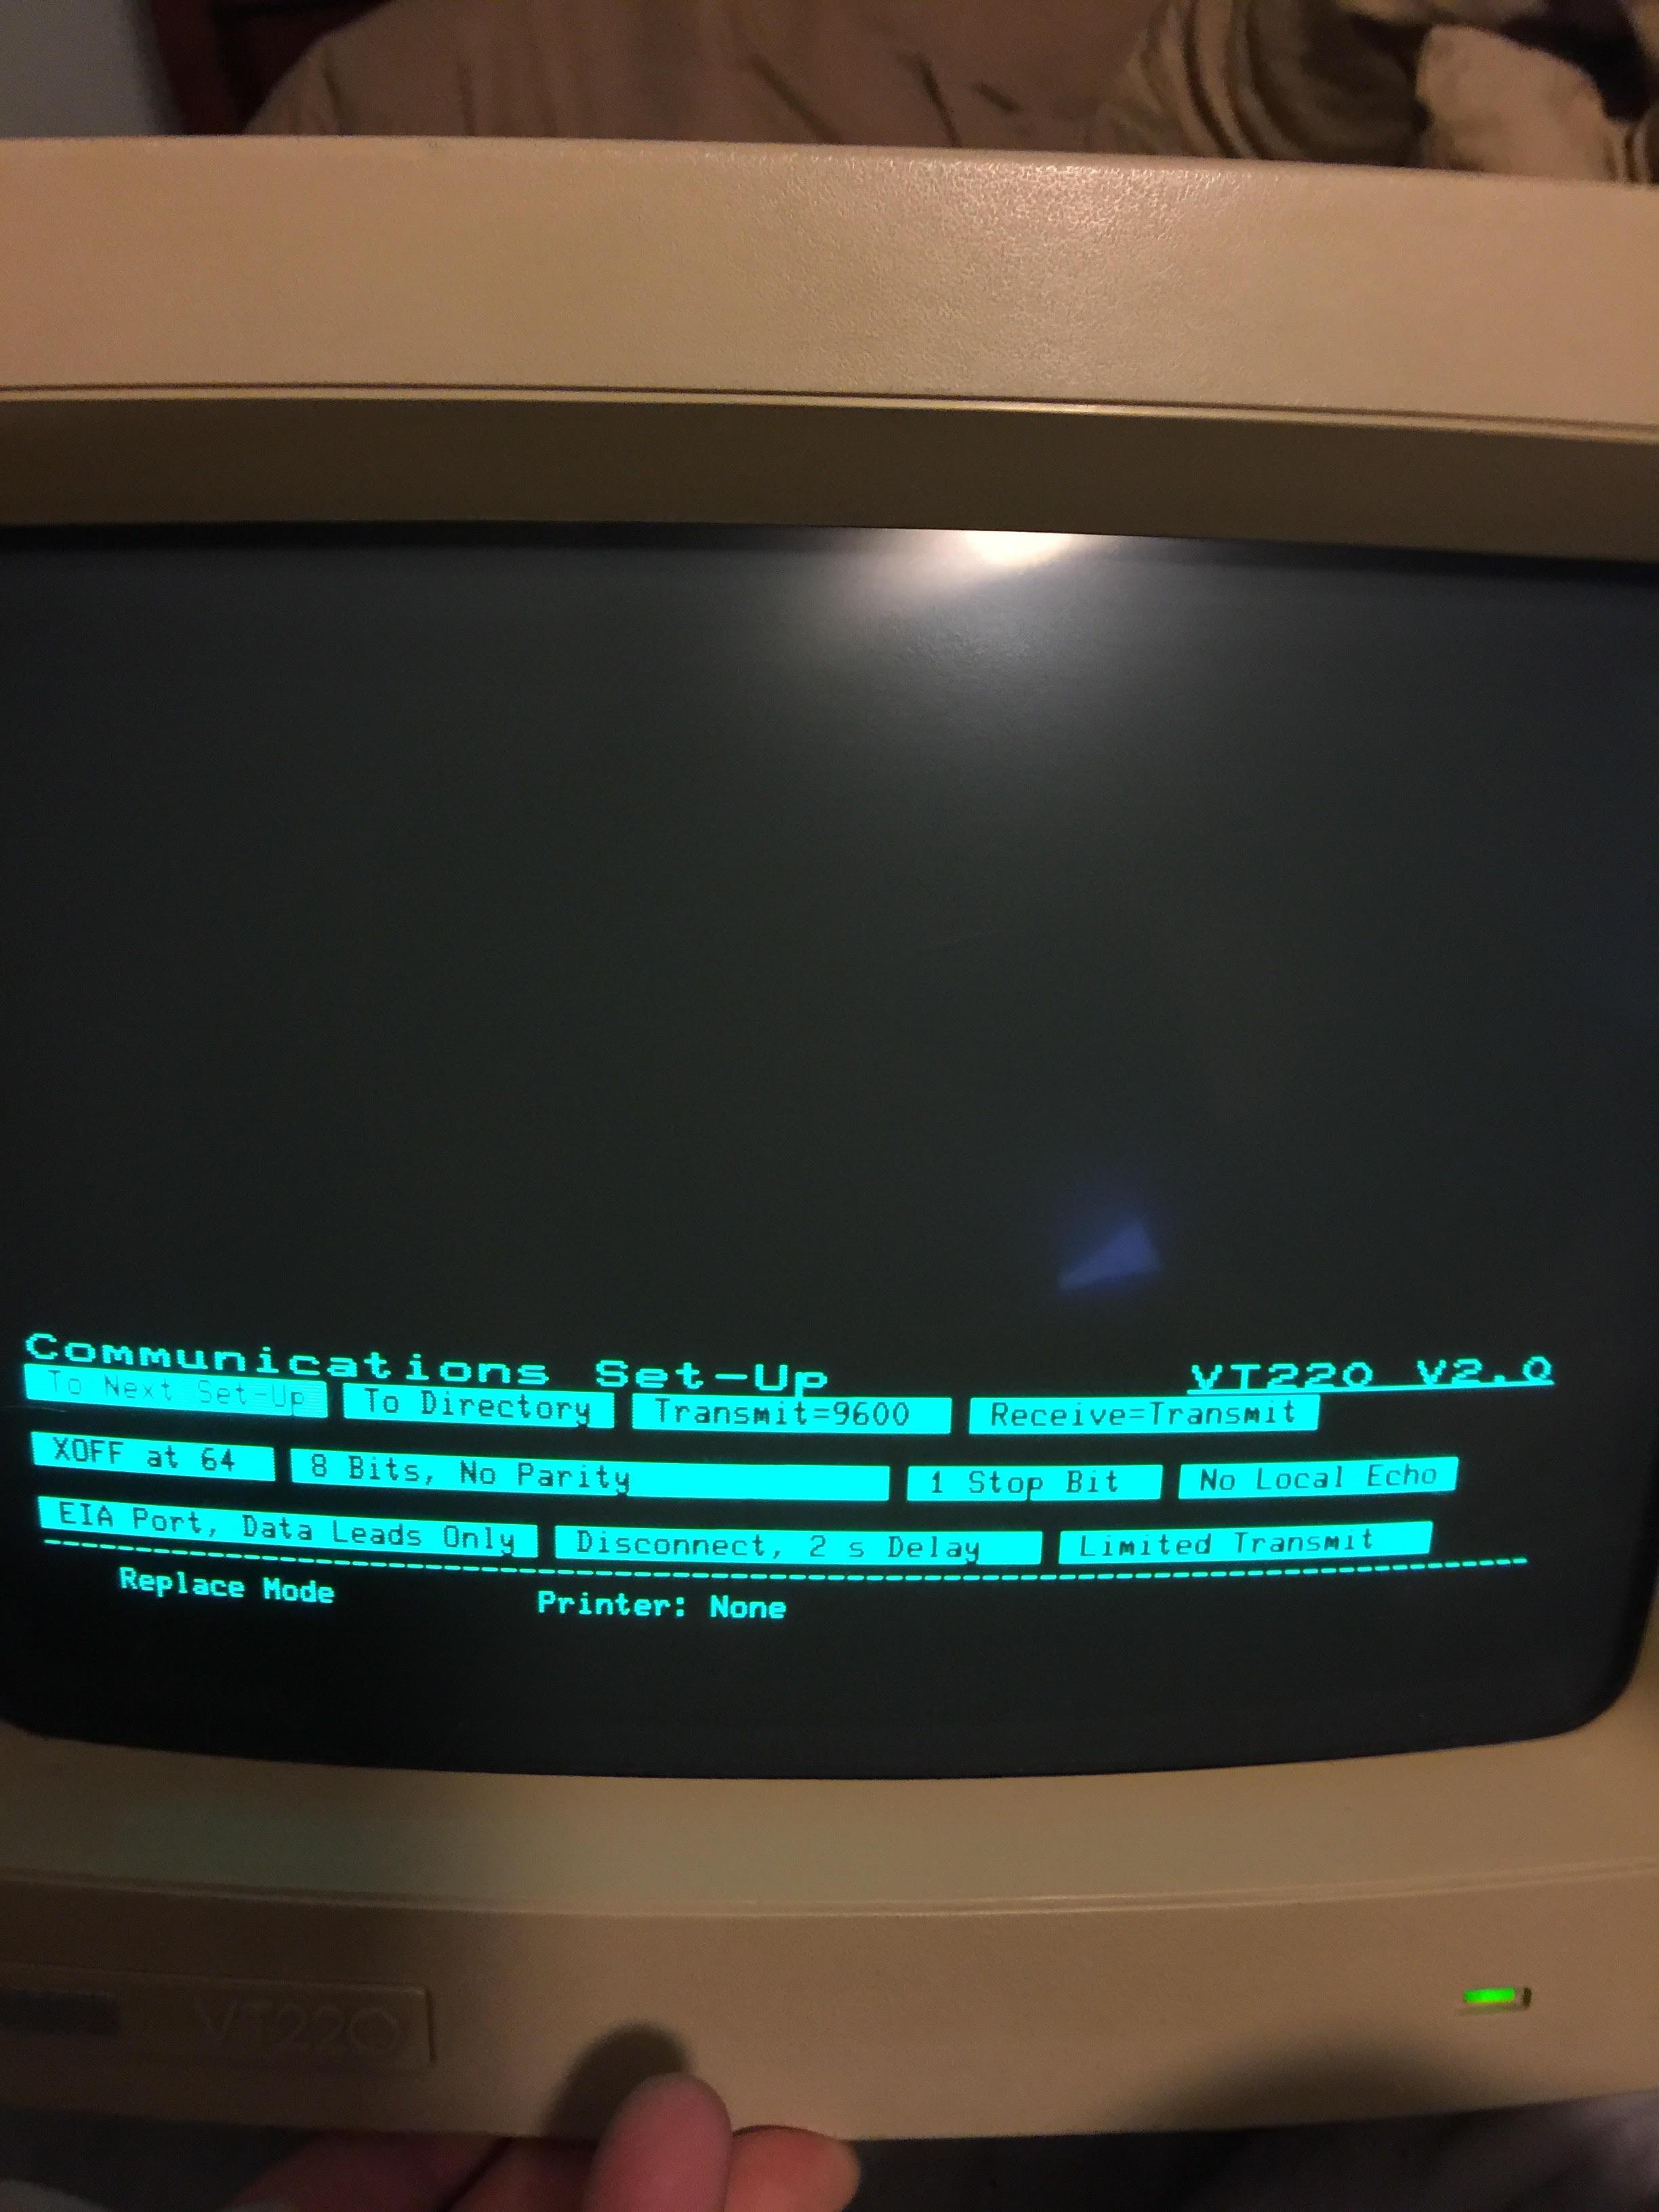
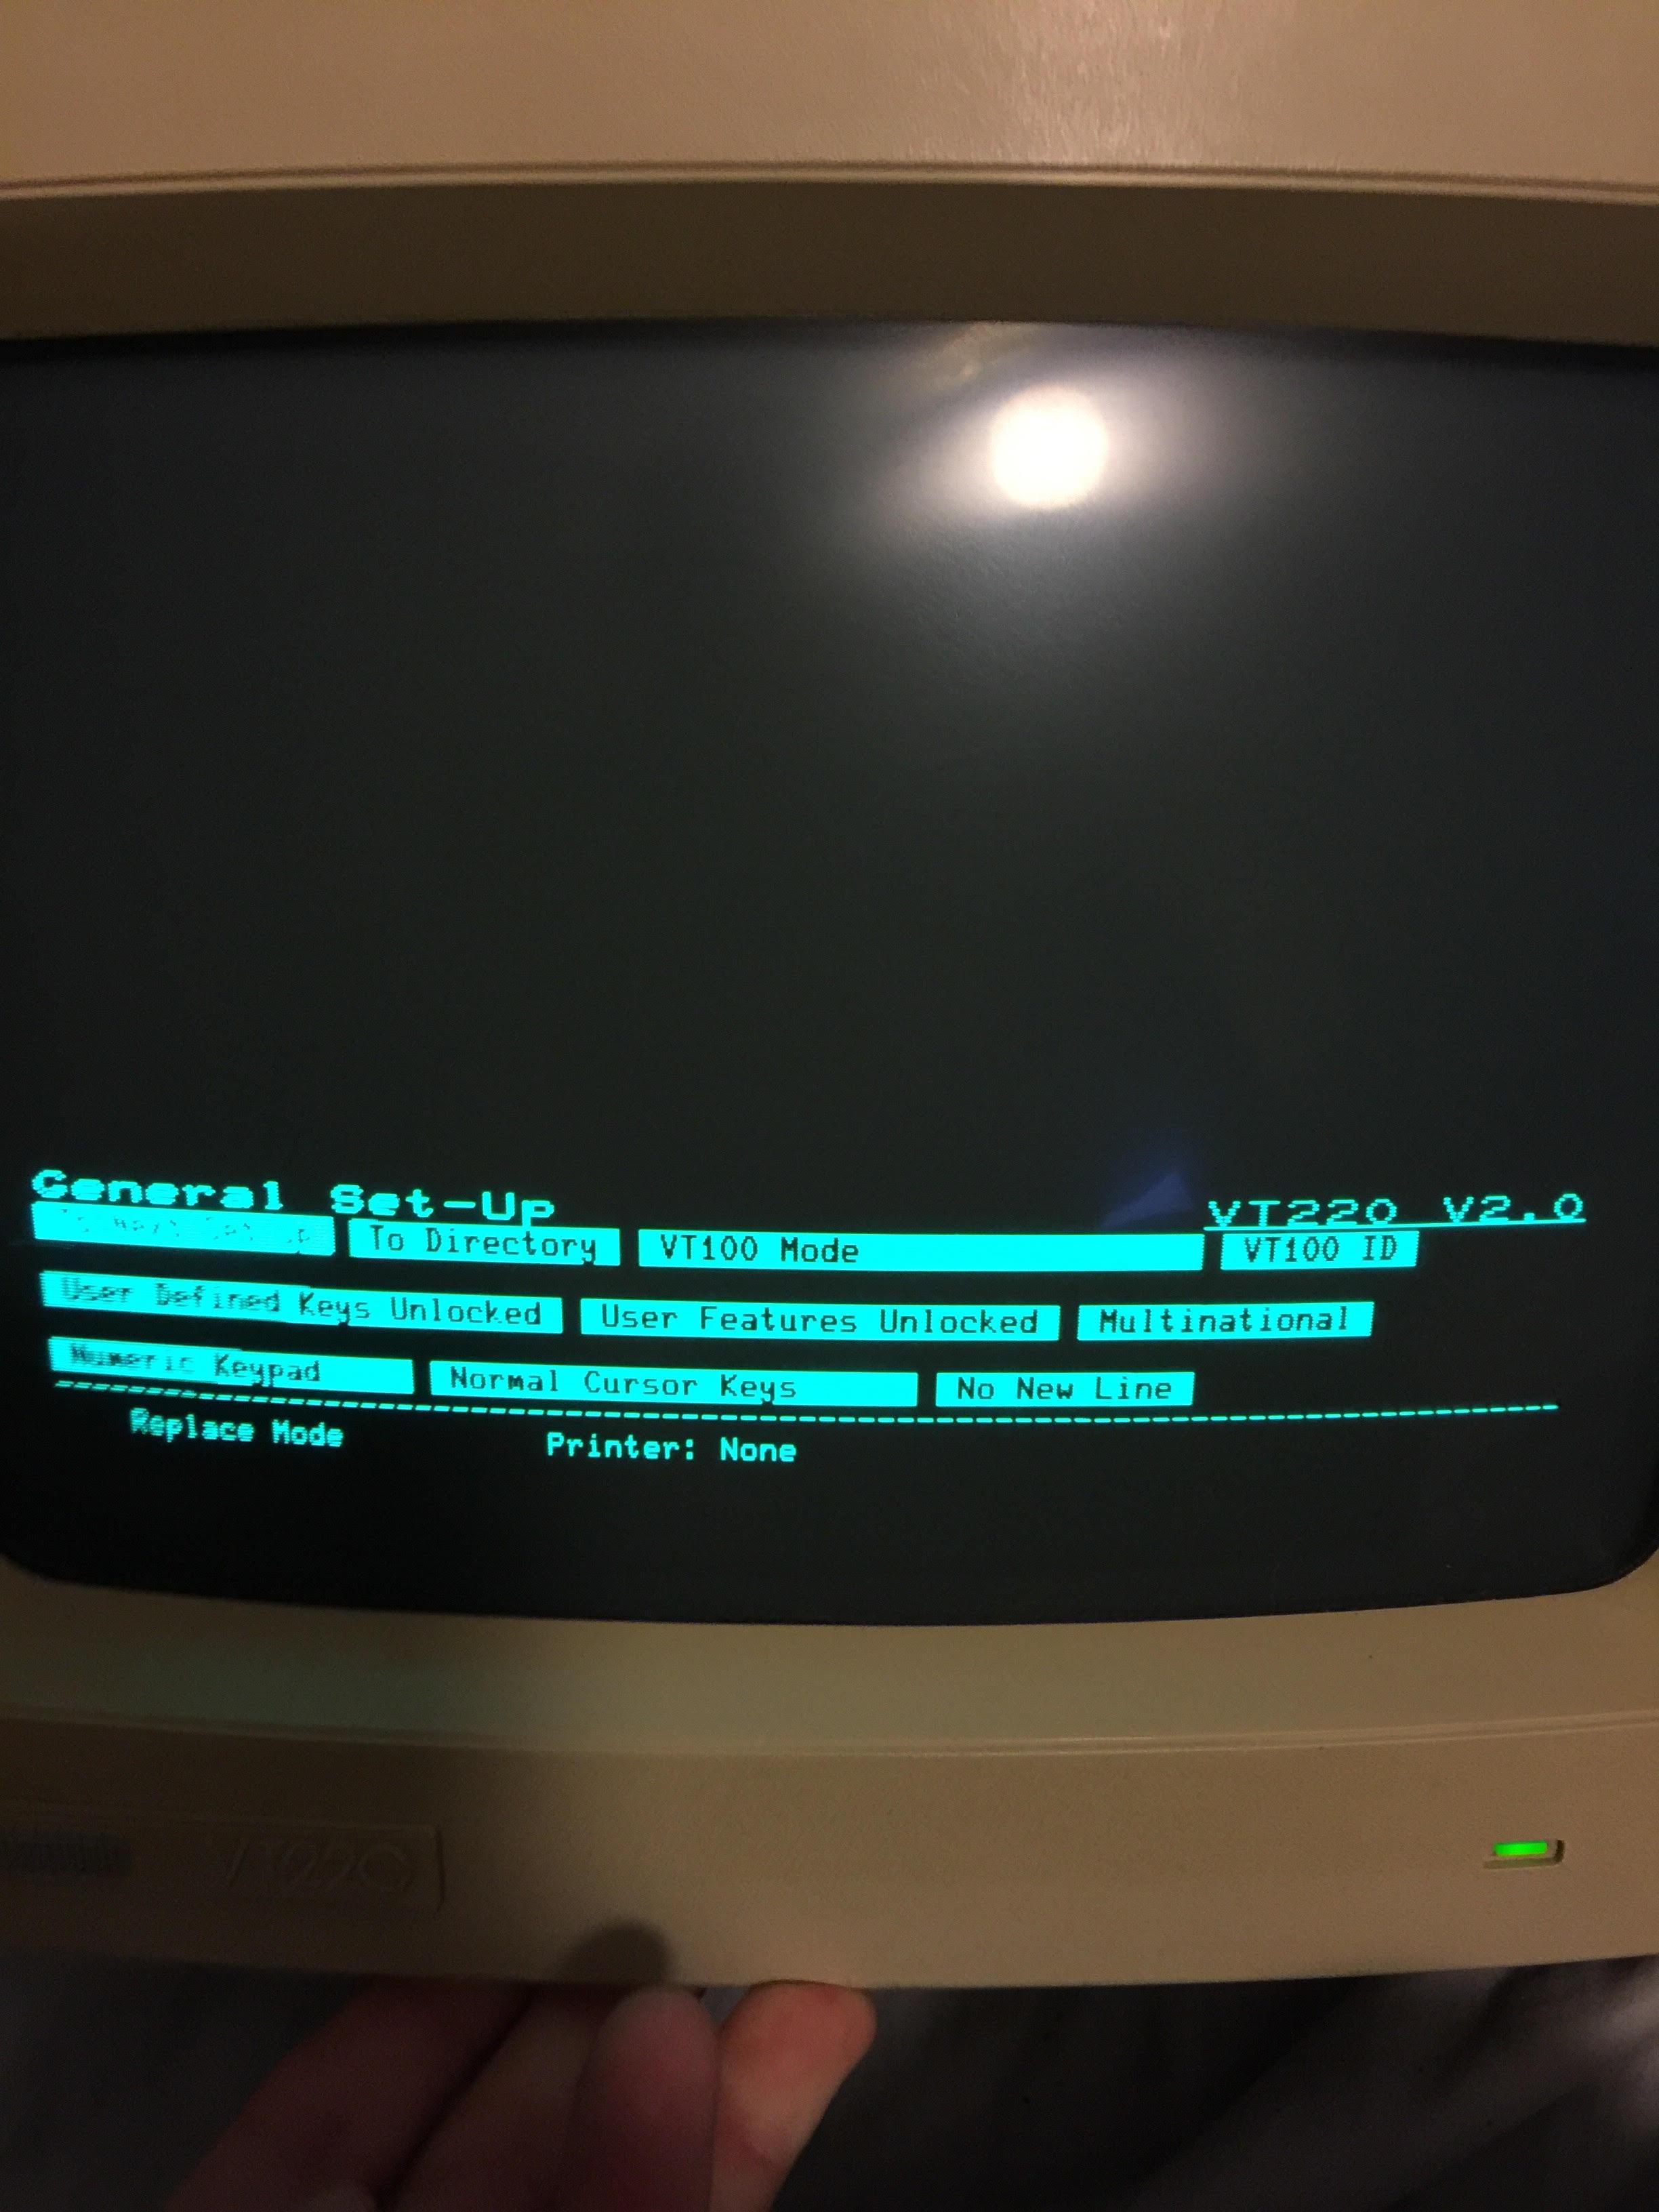
3. The file may need to be edited with the parameters of your serial terminal, or the default setting may work.
In my case I changed the first line in the [Service] section to read:
ExecStart=-/sbin/agetty ttyUSB0 9600 vt100
4. Now, enable the service with:
'sudo systemctl enable serial...@ttyUSB0.service'
You should get a 'Creating sim link ....' message. The service will now start up at every boot.
Reboot. I agree - this setup is the ideal way to communicate with the PiDP. No networking needed.
Peter Willard

Chris Smith
A Pi running with no networking (no Ethernet, no WiFi) has power consumption well within what a standard USB port should be able to deliver. I'm not certain what the front panel consumes, but scanning panels (as opposed to static lit panels) often have very lower consumption.
It's even possible that you could take the data connections and ground from the back to back USB serial solution, and route it out through a carefully wired Y-adapter which also connects to the power port. This would give you a PiDP8 which has exactly one USB connection that you plug into your computer.
It doesn't get much cleaner than that.
I will want to keep my networking and video options open, but I can see using the back-to-back serial and routing the extra USB "client" port to the back panel.
... Chris
Oscar Vermeulen
In hindsight, it's too bad the Pi doesn't do this by default with the power USB connector.
A Pi running with no networking (no Ethernet, no WiFi) has power consumption well within what a standard USB port should be able to deliver. I'm not certain what the front panel consumes
It's even possible that you could take the data connections and ground from the back to back USB serial solution, and route it out through a carefully wired Y-adapter which also connects to the power port. This would give you a PiDP8 which has exactly one USB connection that you plug into your computer.
It doesn't get much cleaner than that.
AB
I followed your notes below but I assume I do nothing here for pipaos right?
- '/etc/systemd/system/xyz' - where xyz is a 'wants' subdirectory whose exact name I forgot, but it'll be obvious.
cheers!
andy b
On Wednesday, May 25, 2016 at 9:09:34 AM UTC-4, Obsolescence wrote:
Obsolescence
On Monday, May 30, 2016 at 4:38:59 AM UTC+2, AB wrote:
will this approach work for (say) a keyspan usb using your standard pipaos image?
I don't know the keyspan USB-serial cable. I only used the (cheap, Chinese made) PL2303 and FTDI USB serial cables. Both of these are supported with drivers in the standard Raspbian, so no need to install any drivers. If that's true for your USB-cable, it will work.
I followed your notes below but I assume I do nothing here for pipaos right?
- '/etc/systemd/system/xyz' - where xyz is a 'wants' subdirectory whose exact name I forgot, but it'll be obvious.
For pipaOS you need to copy the file to the above-mentioned directory - pipaOS needs to have the file in that 'wants' subdirectory Normal Raspbian needs it in /etc/systemd/system itself (the parent directory). I hate this new initd stuff in Raspbian Jessie, although I understand the benefits it brings...
And of course I still have all the attach ttix /dev/ttyusb0 stuff as well?
Err - not sure. I would think that approach needs ttyUSB0 for itself, it might not like it when ttyUSB0 is already tied up with a Linux console before simh ever gets a chance to claim it. My approach just gives you a second 'generic' console port for linux. Which is then happily used by the pidp as well.
Adding a (second) terminal to TSS/8 using ttix in simh just makes TSS/8 aware of a second terminal for its own use. That's a different thing of course.
Kind regards,
Oscar.
AB
serial...@ttyUSB0.service to
/etc/systemd/system/multi-user.target.wants
that's the right directory? The folder options are
poweroff.target.wants
sshd.target.wants
multi-user.target.wants
halt.target.wants
reboot.target.wants
sysinit.target.wants
Anyway I then enabled the service and rebooted.
I did this with my keyspan and repeated with one of my serial-to-USB Prolifics. Connected to my old faithful Dell laptop with serial port using Putty.
Also tried this with and without the attach ttix ttyusb0 and so forth commands in 2.script.
I am doing this on a "fresh" version of Option 1 image
I feel like I am on the threshold of this working.... but something ridiculously small is holding me back (lack of knowledge :-))
cheers!
Andy

Kurt Hamm
serial...@ttyUSB0.service to
/etc/systemd/system/getty.target.wants (Not Multi-user).
AB
attach ttix Line=1 Connect=/dev/ttyUSB1;300-8n1
correct?
(I tried both ways but without luck)
cheers
Andy
Kurt Hamm
Kurt Hamm
AB
I am half expecting Oscar to ask me "Andy- you DID install the parkinised flange sprocket beforehand right?!" :-)
cheers... Andy
Peter Willard
Kurt Hamm
Kurt Hamm
Peter Willard
Oh, I didn't do the serial mod. I just attached a USB/Serial adapter.
AB
cheers!
Andy B
Kurt Hamm
AB
Andy
Kurt Hamm

sunnyboy010101
Oscar,
Just to confirm your post and Peter's...
You are saying that the changes posted above REPLACE Peter's suggestion to change the line in /boot/cmdline.txt ? That cmdline.txt no longer works? Or do we do Peter's change to cmdline.txt AND also do the changes you recommend above?
I'm confused because I'm at the stage of having my serial terminal stuff 'almost' working. That is, the terminal is verified working and can communicate to a PC and vice versa, plus the R-PI USB-serial cable is also installed and available (/dev/ttyUSB0 is there and setserial reports accurate info). However, when I try to use a program like minicom on the Rpi it does not successfully communicate with the terminal. It is not an issue with connections or null modems or such (been there many years ago), but rather just wanting to confirm the Raspbian setup for the serial-usb.
Also - what exactly is the console stuff (either in cmdline.txt or your procedure) actually doing? My thinking is this is setting up a serial boot console much like one would have on an older computer (like my old SUN V440 that did 'first boot' only via serial console).
Thanks.

w9gb
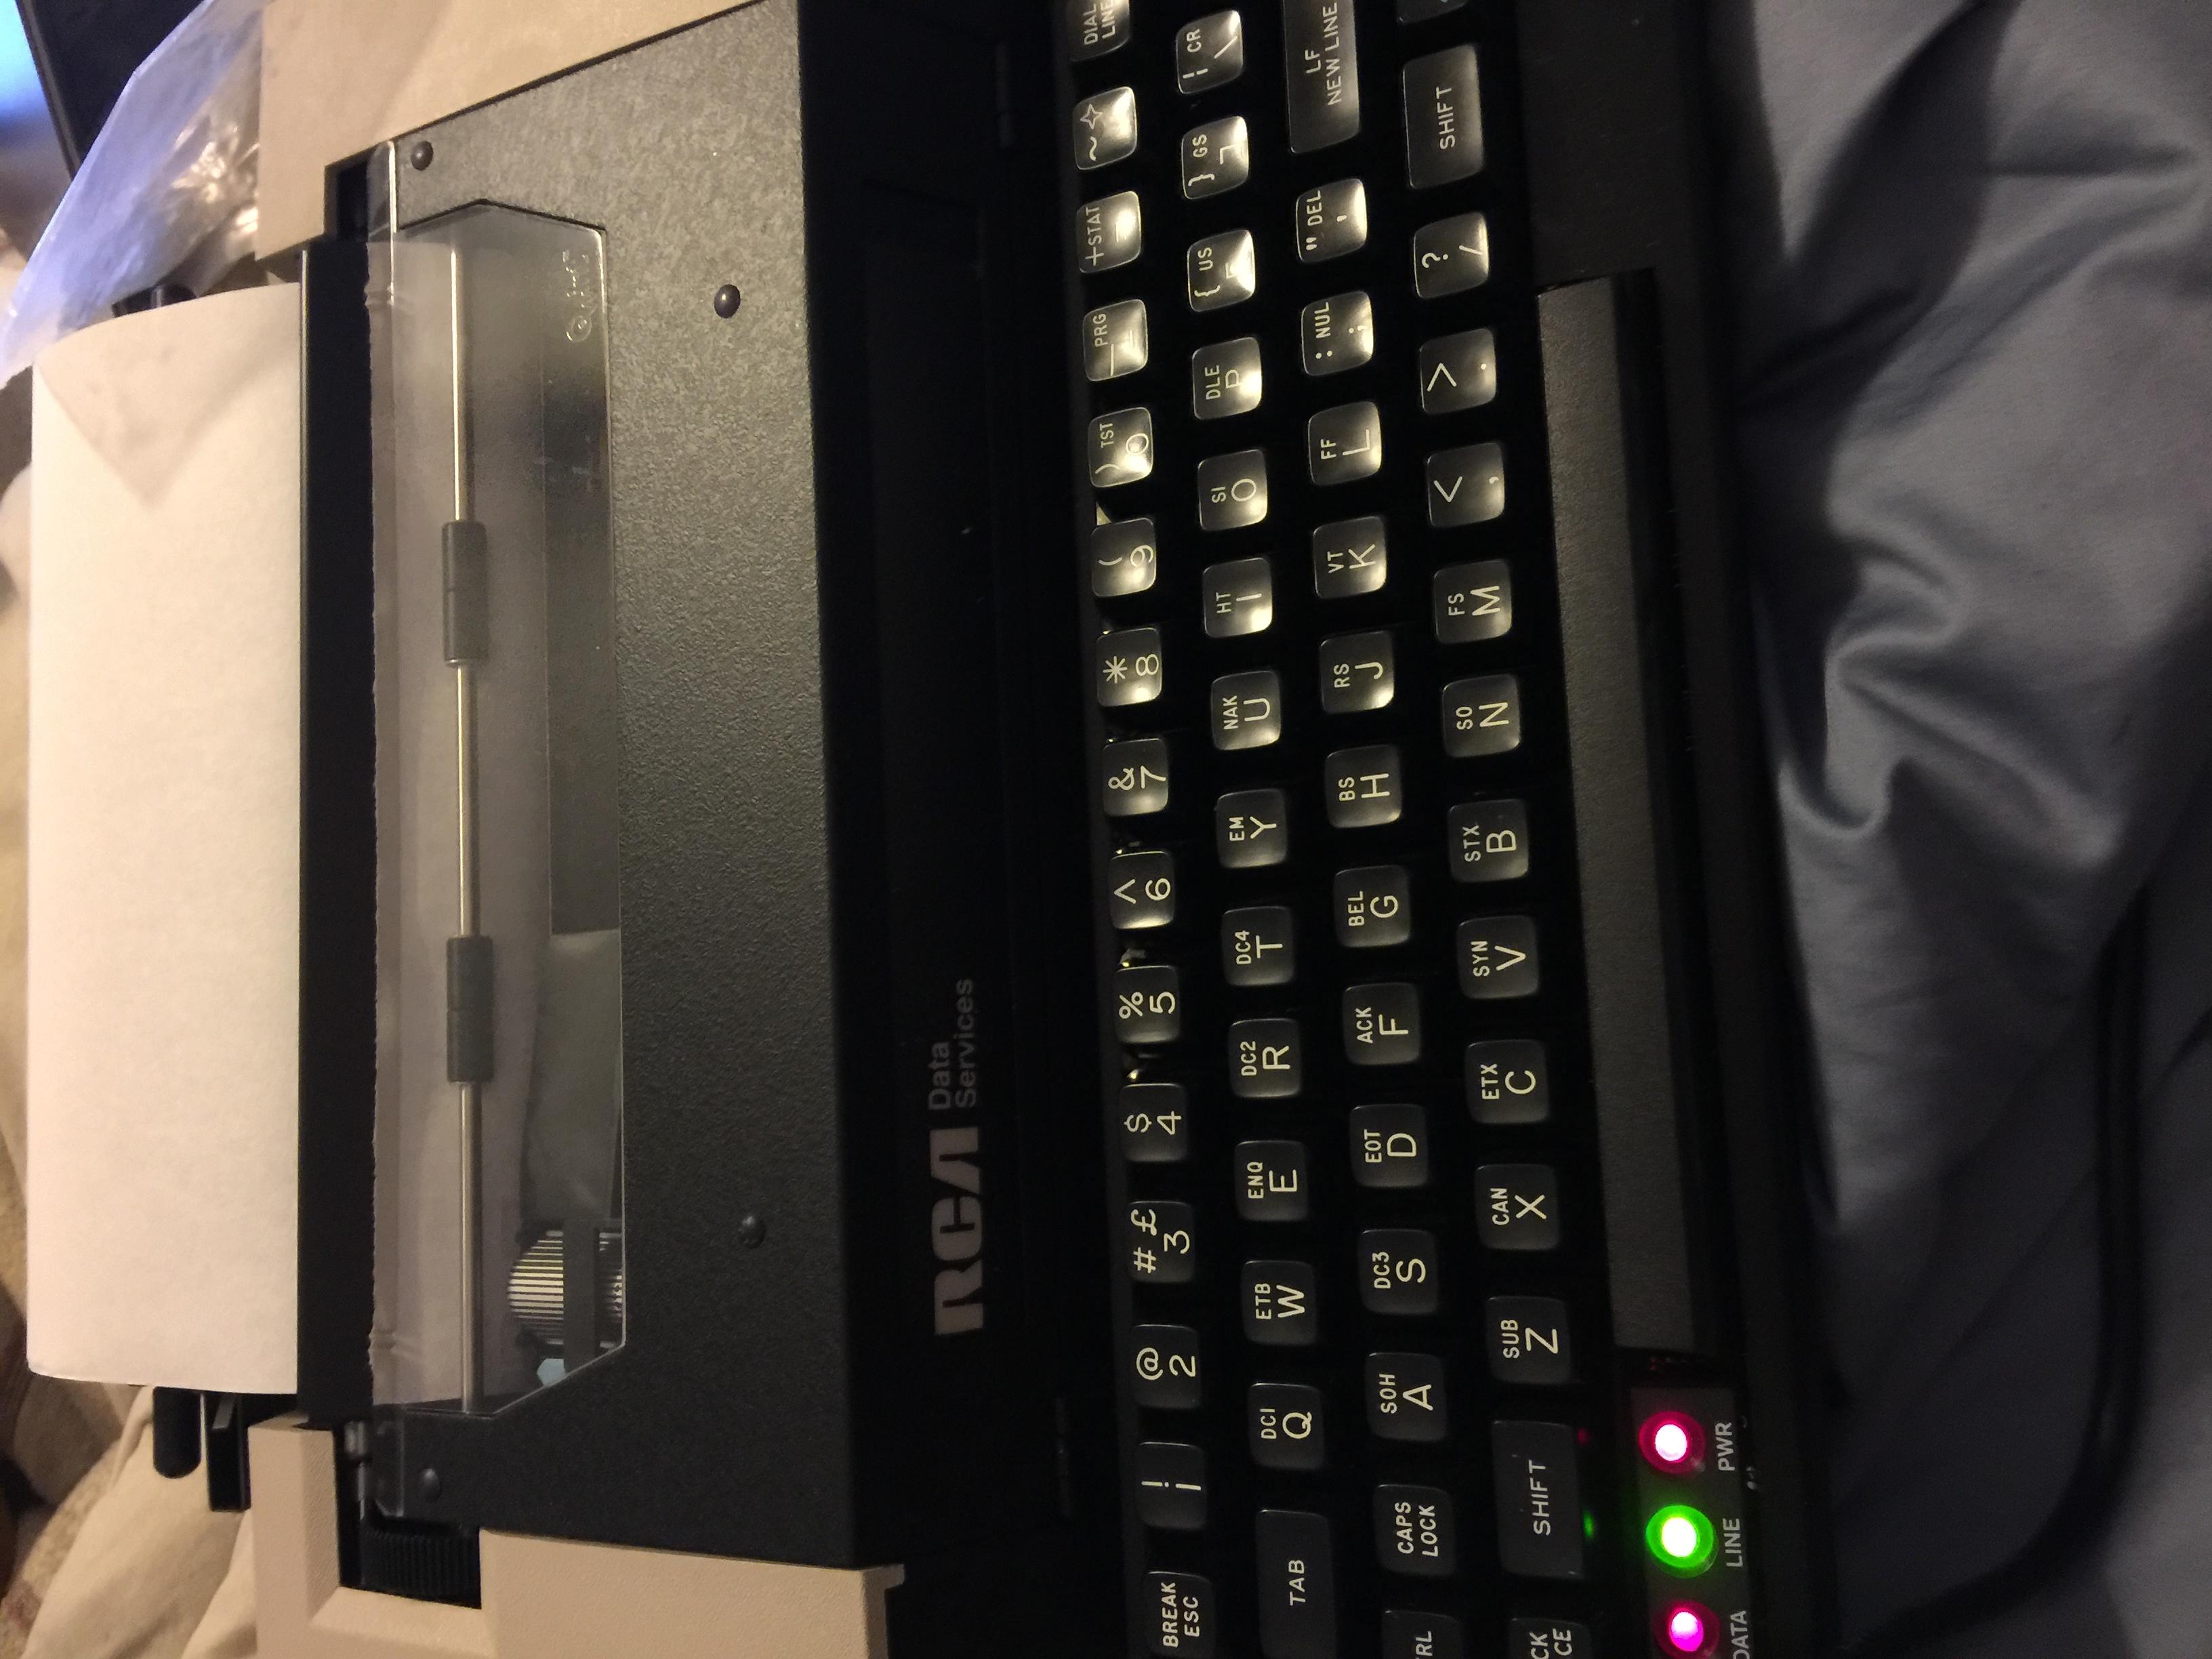
Well this is a "Back to the Future" moment .....
the RCA terminal has MANY options (flexble, but complicated if unfamiliar with that era).
1. Your RCA appears to be 7-bit only (no option for 8-bit).
2. You can change the RCA's PARITY to EVEN, ODD, NO.
3. The Serial option is either simple 3-wire (TxD, RxD, GND) or FULL RS-232 (CTS/RTS, hardware flow controls).
START with the 3-wire option -- easier and with USB/RS-232 conversions you are performing -- less headaches.

slob
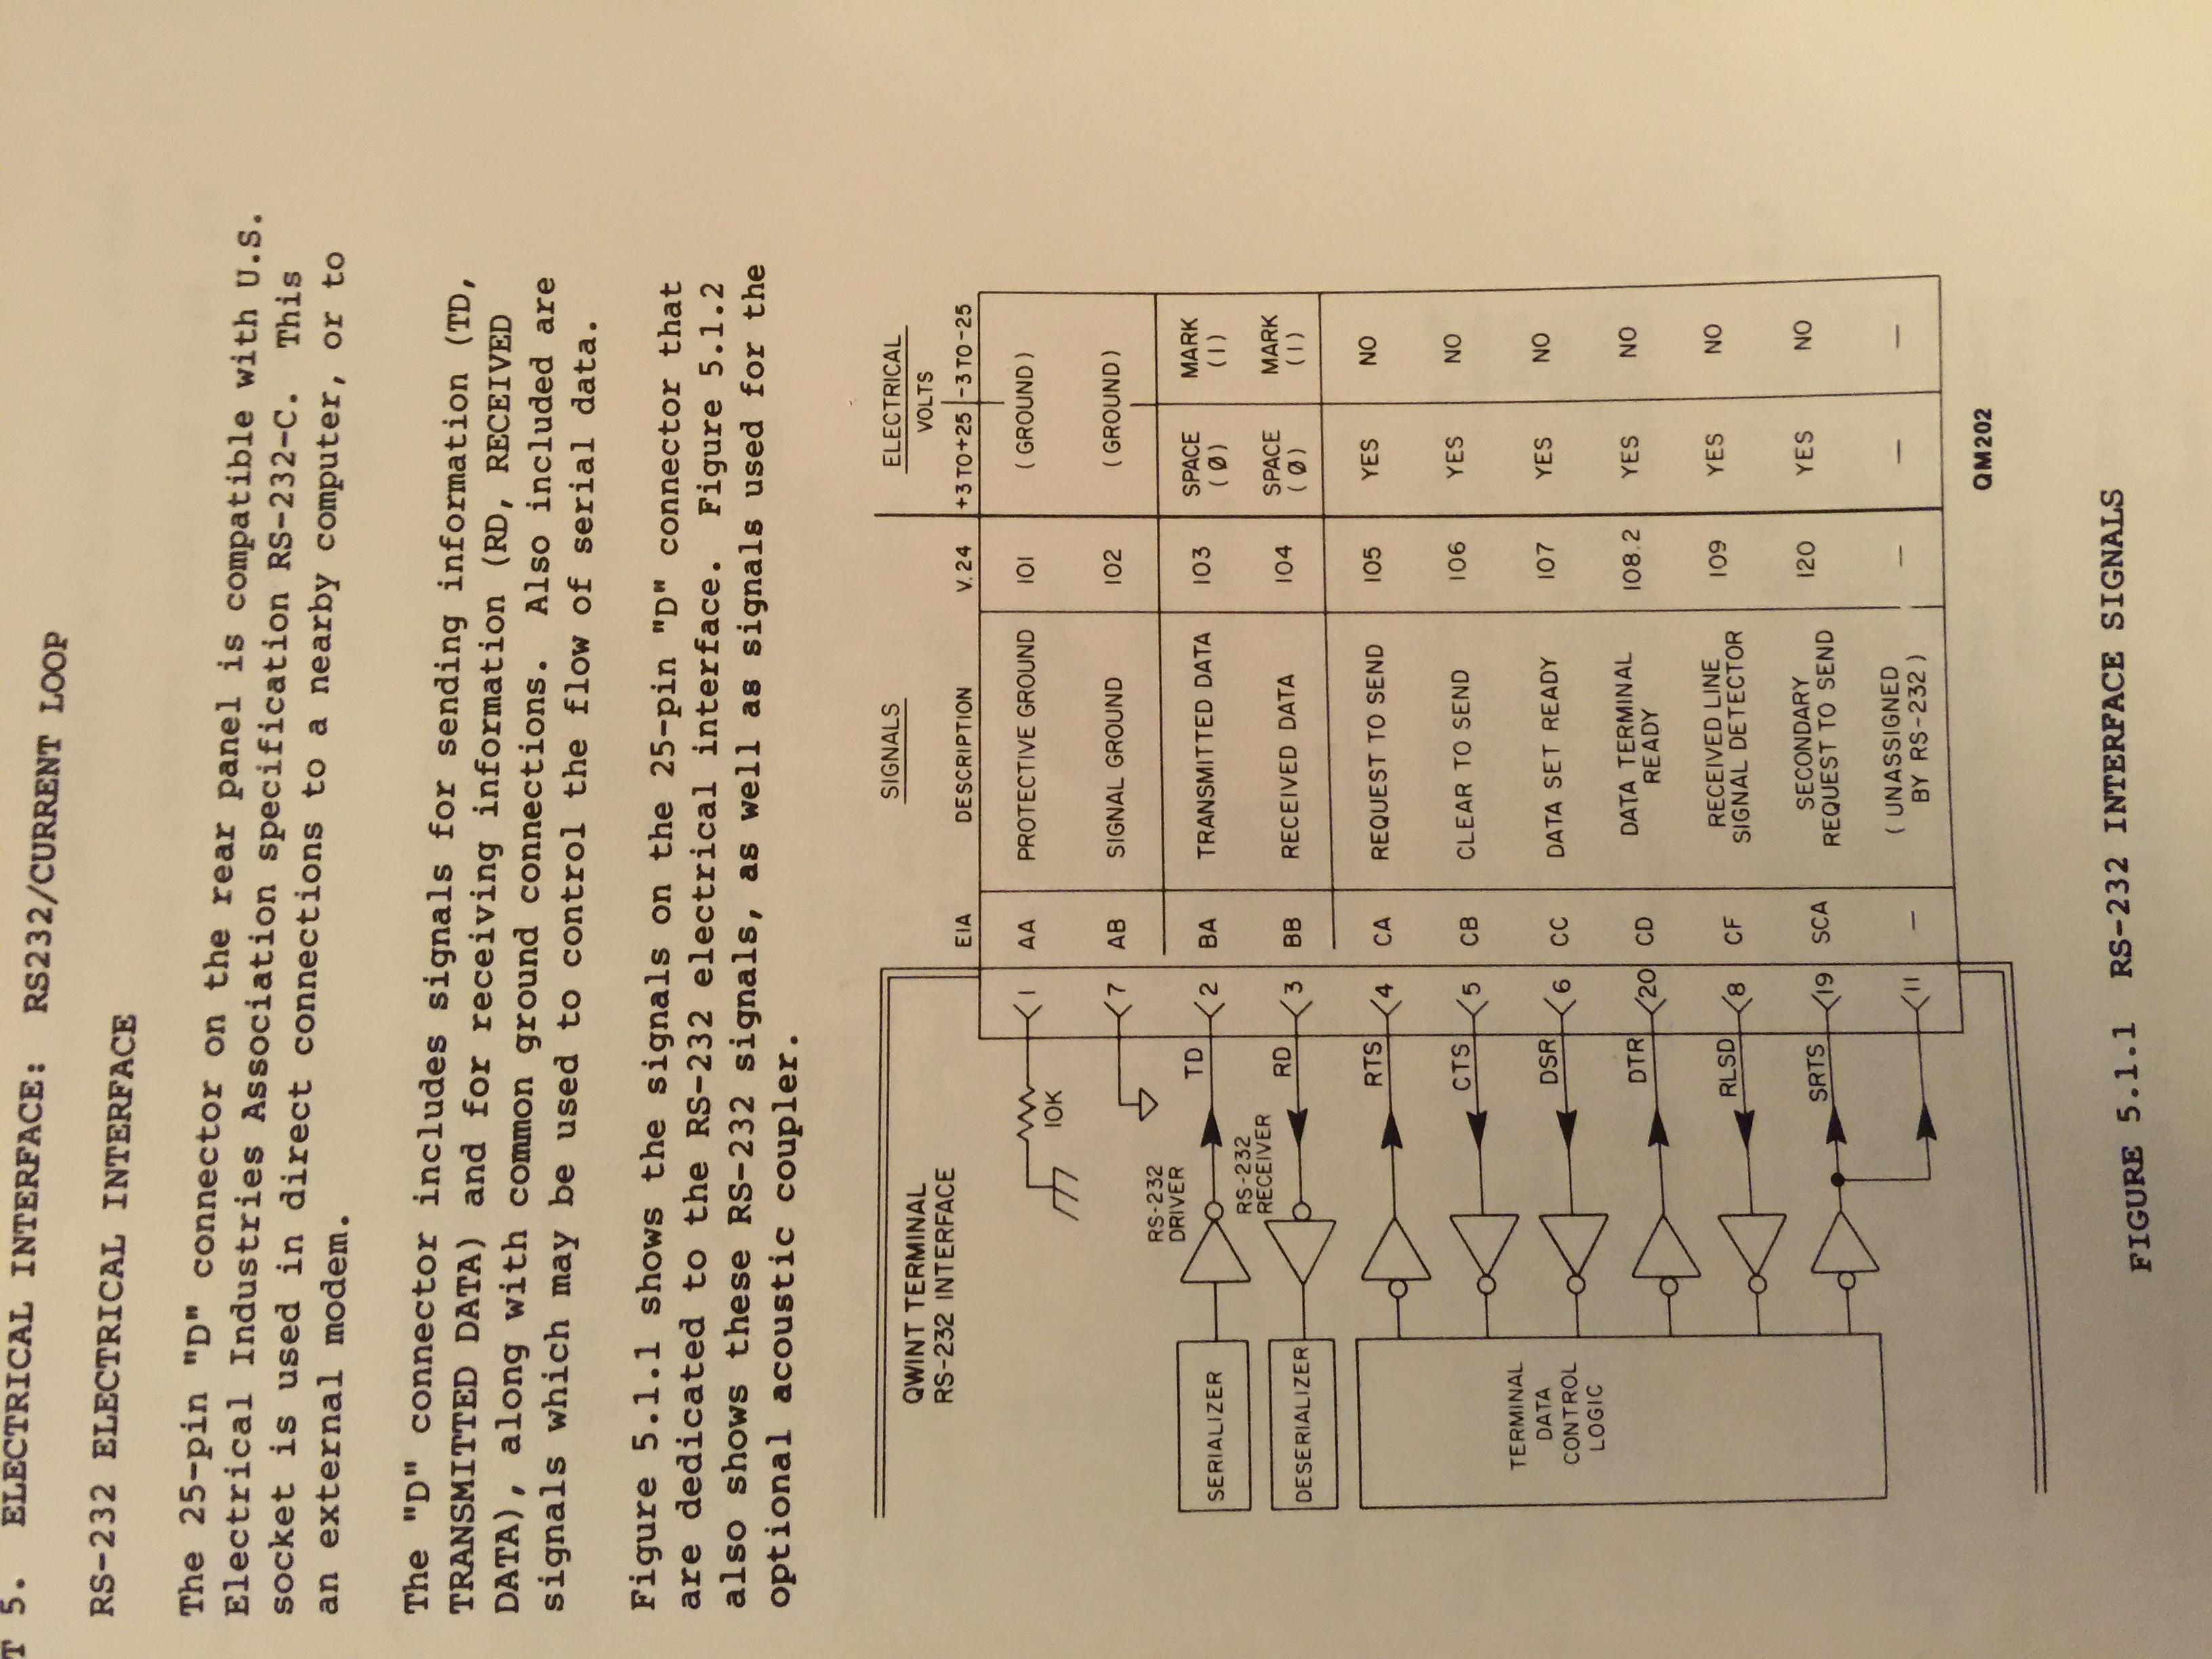
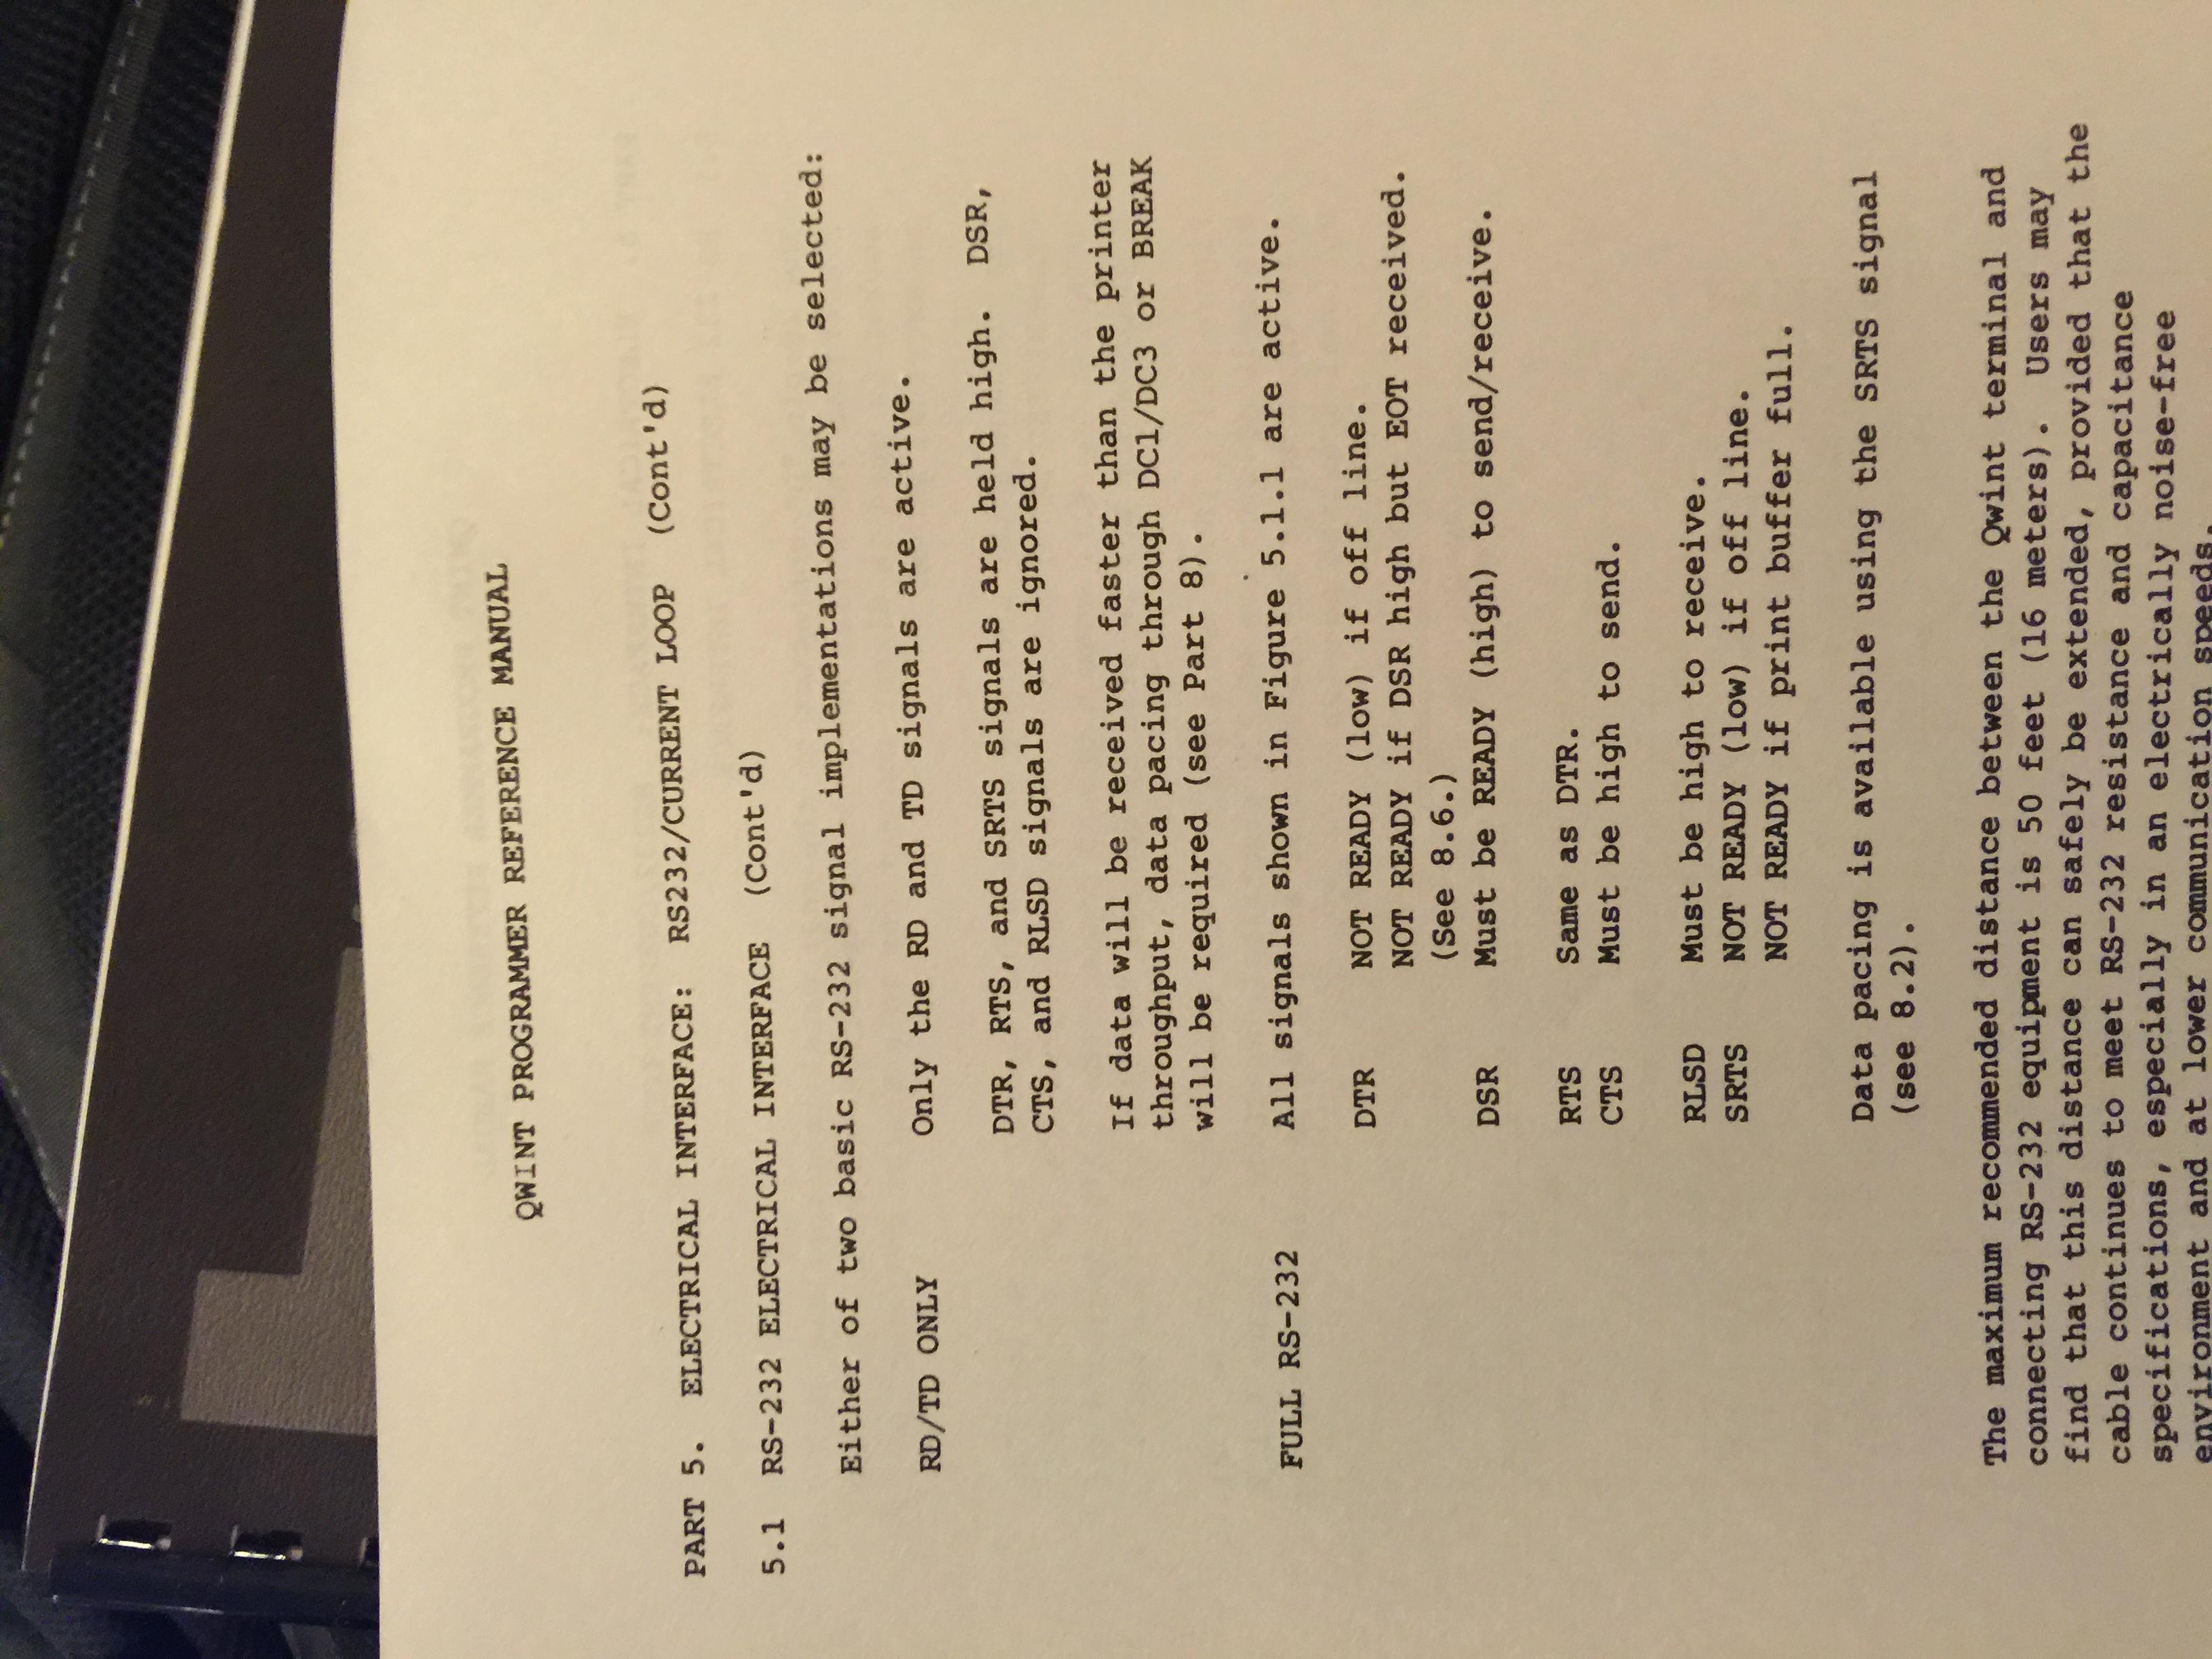
Where did you get this??? I worked for that company and probably wrote a good part of the manual that you are using. I assure you that it can connect to darned near anything up to 9600 baud, 7,8, maybe even 5 bits, even, odd, marking, or spacing. Depending on exactly what model you have, the settings were in battery backed RAM or in WAROM (which was known to poop out).
I have the service manual (I wrote that entirely); I used it to repair mine 25+ years later!
I have my Qwint on loan to the founder of the company who didn't have one and wanted to show it to his grandchildren.
If you are interested in selling it or trading it for a teleprinter or a DEC computer terminal of that era, let me know.