Vacuum pressure

Al Yard
What is a reasonable vacuum pressure to design to? Is -50kPa a reasonable vacuum for picking parts? Or should I plan on a greater vacuum ... or will it work reliably on less?
Thanks,
Al

Michael Anton

ma...@makr.zone
I guess if you know the mass of your heaviest part, and the nozzle diameter you would use with that part, then you should be able to calculate the minimum vacuum required.
Yeah but don't forget to account for the maximum acceleration of your head when both axes speed up in a diagonal multiply by the distance from nozzle tip to your part's centre of mass (leverage over nozzle diameter). This will exert a lateral force on the part trying to pry it away from the nozzle, breaking the vacuum. Then there are Z+ acceleration Z- deceleration (changing the "g force" on the mass of the part), add vibration, jerk, surface properties, leakage variation, air friction ...
Just kidding :-)
No offence, but I think its much more complicated and calls for empirical values.
Nobody out there with solid practical experience?
I haven't placed large parts yet. But with the small parts/small nozzles, I found a value way above -50kPa to be sufficient. If nobody with more experience offers values I can go measure it precisely. Too high values tended to keep the part on the nozzle on discards (probably through valve leakage?).
This is on a Liteplacer mod with the standard small pump and valve. I have the MPXV5050VC6T1 sensor that goes to -50kPa and I am a good way above its range.
_Mark
ma...@makr.zone
This is on a Liteplacer mod with the standard small pump and valve. I have the MPXV5050VC6T1 sensor that goes to -50kPa and I am a good way above its range.
Well I should be more precise: I've got the pump on a hysteresis on a metal bottle to get a good "reserve of vacuum". The pump attached directly could go below the -50kPa limit of the sensor when the valve is closed. But the vacuum immediately "collapses" when the valve opens, even on a very good pick.
_Mark

Cri S
Football needles works for this purposes.
On compressor you connect the tools after the pressure regulator, not directly.
With vacuum reservoir it should be similar.
This only works if you are using filters for the vacuum line, and for
instance, filters
works only if you blow out with pressure for separating the component
and nozzle and
at same time clean the filter.
If you don't blow out and have filter installed, instead of using big
reservoir, use longer vacuum tube and bigger inner diameter tube for
some sections
in order to overcome or smooth the pressure fluctuation of the pump.
2018-05-09 8:39 GMT+02:00, ma...@makr.zone <ma...@makr.zone>:
>
>>
>> This is on a Liteplacer mod with the standard small pump and valve
>> the MPXV5050VC6T1
>> <https://www.digikey.ch/product-detail/de/nxp-usa-inc/MPXV5050VC6T1/MPXV5050VC6T1CT-ND/951857>
>> sensor that goes to -50kPa and I am a good way above its range.
>>
>
> Well I should be more precise: I've got the pump on a hysteresis on a metal
>
> bottle to get a good "reserve of vacuum". The pump attached directly could
> go below the -50kPa limit of the sensor when the valve is closed. But the
> vacuum immediately "collapses" when the valve opens, even on a very good
> pick.
>
> _Mark
>
> You received this message because you are subscribed to the Google Groups
> "OpenPnP" group.
> To unsubscribe from this group and stop receiving emails from it, send an
> email to openpnp+u...@googlegroups.com.
> To post to this group, send email to ope...@googlegroups.com.
> To view this discussion on the web visit
> https://groups.google.com/d/msgid/openpnp/cb928f95-7dd1-4dce-b2ec-04db03e3b5ea%40googlegroups.com.
> For more options, visit https://groups.google.com/d/optout.
>

Marek T.
It doesn't say that 50kPa is not enough of course. Just only info how it was done by some old but professional SMT machine manufacturer.

Al Yard
Al
Al Yard
I was thinking about my little plastic vacuum pump and realized I didn't have a spare and it was likely going to give up one day. I was looking for a cheap spare pump that would fit the existing bracket, and the pumps I found seemed to be only rated to pull about -50 kPa. I wasn't sure if that would be enough and I didn't have a vacuum gauge to see what the pump was pulling. Then I had a brain-wave! ... there are a bunch of aircraft parked around here, so I "borrowed" a Manifold Pressure gauge from one of them. It measures in inHg and is in absolute pressure, but that is easy enough to convert.
I found my little pump could pull about -40kPa. But when I hooked up the nozzle tip, etc, there were enough tiny little leaks (I think mostly in the nozzle coupling and the hose swivel), that the best I could get was -4 kPa with a part on. Although I occasionally get a mis-pick where the part didn't pick up, I haven't had any problems with the parts falling off the nozzle .... even though I only have -4 kPa. This was a surprise to me and tells me what vacuum pressure the pump can pull is of little importance, and what is more important, does it have enough flow to over-come the leaks in the system.
So my project now is to try and reduce some of the leaks (I'm sure there will always be some leaks) and if I can get the pressure up to -10kPa with a part on, then it should be good and reliable. Maybe I'll also get a pump with a little more flow too.
Al

Eagle Media
Al Yard
Thanks,
Al
Marek T.
If you have Juki nozzles with balls holders you can't avoid leaks, it's issue of this construction.
Eagle Media

Mike Menci
Mike Menci
Marek T.
Mike Menci
Mike Menci
Marek T.
Cri S
Normally you convert it to 4-20mA and then from that to 0.66 to 3.3V .
The voltage divider is annother option, cheaper but less immune about noise.
> You received this message because you are subscribed to the Google Groups
> "OpenPnP" group.
> To unsubscribe from this group and stop receiving emails from it, send an
> email to openpnp+u...@googlegroups.com.
> To post to this group, send email to ope...@googlegroups.com.
> To view this discussion on the web visit
Marek T.
Mike Menci
Marek T.
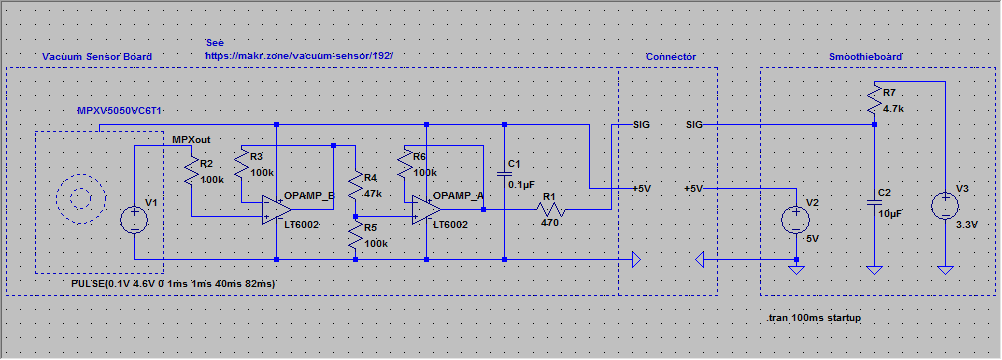
0V on MPXV = 0V on Smoothie
2,5V on MPXV = 1,5V on Smoothie
5V on MPXV = 3V on Smoothie
Smoothie is not measuring from 0V but near 0,6V. MPX is giving 0-5V. But vacuum levels corresponding to values 0-0,6V are very small (like -10kPa or so so) and not very important.
If you ignore GND to AGND separation (not sure if reasonably), just simple two resistors divider will do the job.

TheCunningFellow
ma...@makr.zone

Marek T.
First I'm using MPXV6115 sensor with built-in op-amp (there is a bit more output current than in 5050) to drive low current transoptors and it works well for me.
https://www.nxp.com/docs/en/data-sheet/MPXV6115V.pdf
First, sample with dividing resistor was mainly to explain kind of required working not particular circuit to built. Not buck converter. I don't know how about noises in this case when used higher value dividing resistors to don't overload sensors outputs, never tried and tested that circuit.
Second ad8495 found as better for this solution than Epcos. But maybe it's not important and Epcos is good as well.
http://smoothieware.org/temperaturecontrol#toc5
Third, Mark, 3.3V/4k7 is 0.7mA not 7mA or you took this current from some other calculation. However 0.7 is still more than 0.1 :-).
br
Marek
ma...@makr.zone
Third, Mark, 3.3V/4k7 is 0.7mA not 7mA or you took this current from some other calculation. However 0.7 is still more than 0.1 :-).
Marek T.
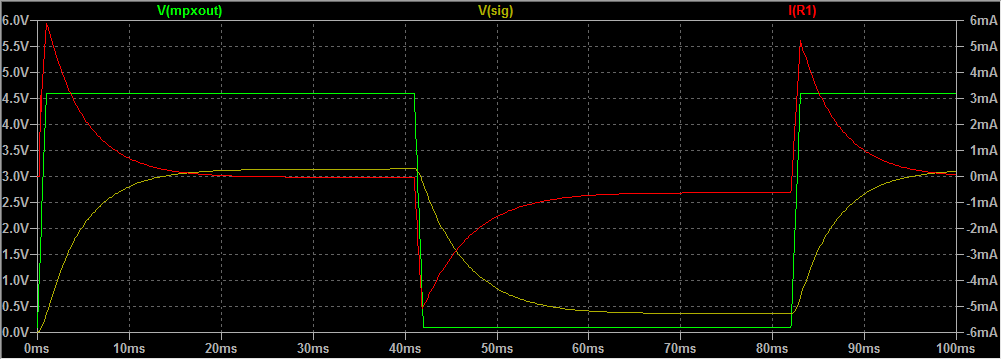
In my case I've found it works faster when replace 10uF on Smoothie into 1uF. But on your scopes it looks good (at this time scale at least).
Mike Menci
Nice and clear explanations!
Is it possible to monitor vacuum values from serial on Open PnP from Smoothie ?
Mike
ma...@makr.zone
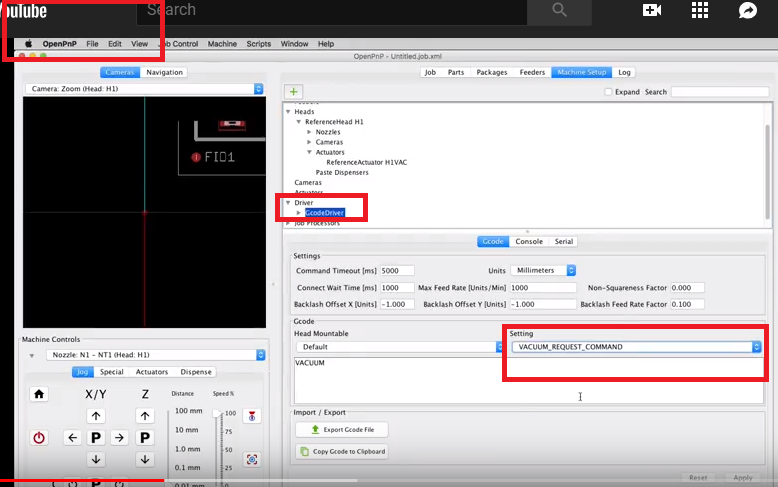
Is it possible to monitor vacuum values from serial on Open PnP from Smoothie ?
<text><![CDATA[M105 ; read temperatures (vacuum)]]></text>
</command>
<command head-mountable-id="A1" type="ACTUATOR_READ_REGEX">
<text><![CDATA[^ok.*V:(?<Value>-?\d+\.\d+).*]]></text>
</command>
ma...@makr.zone
Marek T.
If we want to talk about noises and really proper reading: AGND should be not connected to GND or analog port should be not read in acc to digital GND. At least in theory or in agree to smoothieware recommendation.
See discussion here:
https://plus.google.com/+ReneJurack/posts/hTpjbnZPuPC
Or maybe Arthur will tell something more wise about this, he's following openpnp groups so probably see this here.
ma...@makr.zone
Mark your schematic suggests that thermistor inputs of the smoothie are read to the same digital GND as 5V is what is not true. Analog port of this processor have separated ground AGND which is accessible on pins destined for thermistors only
Marek T.

ma...@makr.zone
have a look at enclosed
Marek T.
Marek T.
Mike Menci
Marek T.
Mike Menci
Mike Menci
Marek T.

jdlv
to add a bit of difficulties, smoothie's inputs have a 4.7kΩ pullup to
3v3 and the MPXV6115V can only output a very limited current, 100µA if
I'm correct.
To overcome this I remove the pullup array resistor, change capacitors
from 10µF to 100nF and add a voltage divider made of 12kΩ and 18kΩ.
To me it was the simplest way but it require to hack the smoothie...
Joël
Mark
Assuming you want to avoid building this...
https://makr.zone/vacuum-sensor/192/
... I'd recommend using an alternative ADC pin on the smoothie instead of hacking it.
I assume Smoothieware does allow you to configure any pin as a temperaturecontrol pin, though I haven't tried.
Spare ADC pins:
AD4 P1.30
AD5 P1.31
Normally used for click button and buzzer on a GLCD display.
http://smoothieware.org/lpc1769-pin-usage#lpc176x-adc-channels-and-pins
I assume you know how to find these pins on the smoothieboard expansion header and I assume you know how to configure the temperaturecontrol to use them.
WARNING: using these pins directly means you have no input protection etc. so be careful to connect the right pin and to use ESD precautions and proper grounding of the sensor.
I still very much recommend to build this:
https://makr.zone/vacuum-sensor/192/
It's not as difficult as it may look.
_Mark
Ref:
https://groups.google.com/d/msg/openpnp/UKI5PPMgu6M/eYXCT3ZjBgAJ
Mike Menci
ma...@makr.zone
On Wednesday, August 1, 2018 at 2:48:11 PM UTC+2, Mike Menci wrote:
Thanks for your kind replysMark I would go for your - https://makr.zone/vacuum-sensor/192/ version but here it is not clear to me:- connector on Eagle cad sch on your web shows SL1 to smoothie thermistor connection to all 4 thermistorsbut your bellow post "Scraping together DIL through-hole, some 0805 smd parts...." is for one sensor only.

I have two heads and 2 sensors MPXV6115V that goes down to -115kPa and its a bit confusing to me to understand aboveWould I be asking to much if I can ask to update your Eagle Sch above with dual op-amp and resistors , caps needed for twin sensors with output to Smoothie 2 thermistors only...
Marek T.
Mark
>Other pins are also 0-3V not 0-5, and only ADC pins have 10uF capacitors.
You are back to the alternative ADC pins, right?
AD4 P1.30
AD5 P1.31
Yes, but these can then be simply driven by a high value resistor divider without having to put the solder iron to your Smoothieboard.
Again, for robustness I do recommend the proper solution with op-amp.
https://makr.zone/vacuum-sensor/192/
_Mark
Mark
Hello,
So for two sensors it can be as enclosed sch?
Yep, except R2, R8 should be 47k (instead of 4.7k).
(and R4, R10 is probably meant to be 100k, instead of 110k)
_Mark
Marek T.
Mark
> > So for two sensors it can be as enclosed sch?
> Yep, except R2, R8 should be 47k (instead of 4.7k).
> (and R4, R10 is probably meant to be 100k, instead of 110k)
Afterthought: You can simplify this by using just one dual op-amp.
Leave out the 1B and 2B Opamps and connect sensor output directly to resistor divider. I only used the two stage design because I had half a dual op-amp “to waste”.

_Mark
Mark
>Resistors that I've mentioned was not intended to solder onto Smoothie but between sensor and Smoothie, so there is not any hacking.
I responded to this quote by Joël:
> To overcome this I remove the pullup array resistor, change capacitors from 10µF to 100nF and add a voltage divider made of 12kΩ and 18kΩ. To me it was the simplest way but it require to hack the smoothie...
And we already discussed some weeks back why hacking it is needed to get a fast response.
_Mark
ma...@makr.zone
Resistors that I've mentioned was not intended to solder onto Smoothie but between sensor and Smoothie, so there is not any hacking.
Mark, what is rising time when vacuum grows from 0 to -80-110kPa?. I guess you have just valve between vacuum pump and nozzle and the vacuum pump is constantly working.I have some problem with this, my rise time is too long as for my expectations, but on the moment still not found if the problem is my sensor circuit or ventouri injectors.
Marek T.
Mike Menci
So the Board needs to be modified accordingly.
Mike
ma...@makr.zone
Mike Menci
Mike Menci
Mark
>I found one Op amp CA1458E - will this do the job?
I don’t know. I found no minimum supply voltage spec and all specs are given for +/-15V = 30V so I guess this rather old model won’t work on 5V.
_Mark
Mark
> Mike
No, this one has it in the data sheet:
> VCC Supply voltage 6 to 36 V
https://www.mouser.ch/datasheet/2/389/tl072-957235.pdf
_Mark
Michael Anton
Michael Anton
Mike Menci
Any recommendation ?
Mike
TheCunningFellow
Mark
>Go to digikey - parametric search the opamps. Select rail to rail and min single ended supply of 5v or less. you will get a few 1000 options better than a 741/ca1548
Cheapest is 0.29€ at 1 piece.
https://www.digikey.ch/product-detail/de/microchip-technology/MCP6002-I-P/MCP6002-I-P-ND/500875
_Mark

SMdude
ma...@makr.zone
You want something that is rail to rail output.
SMdude
Michael Anton

Vinay Dand
Consider LMV324, though it is Quad op-amp, 'V' in LMV324 is for Rail-to-rail output.
Mike Menci
Mike Menci

Jason von Nieda
--
You received this message because you are subscribed to the Google Groups "OpenPnP" group.
To unsubscribe from this group and stop receiving emails from it, send an email to openpnp+u...@googlegroups.com.
To post to this group, send email to ope...@googlegroups.com.
To view this discussion on the web visit https://groups.google.com/d/msgid/openpnp/c0baf4ff-24cc-4d7c-b932-9249bcaba358%40googlegroups.com.
For more options, visit https://groups.google.com/d/optout.
Mike Menci
Would help others to update instructions - link there to video is wrong one - and lead to proper one.
Mike
Jason von Nieda
--
You received this message because you are subscribed to the Google Groups "OpenPnP" group.
To unsubscribe from this group and stop receiving emails from it, send an email to openpnp+u...@googlegroups.com.
To post to this group, send email to ope...@googlegroups.com.
To view this discussion on the web visit https://groups.google.com/d/msgid/openpnp/d262064c-0e45-469a-af8e-15b7544fe9c1%40googlegroups.com.
Mike Menci
Mike Menci
Jason von Nieda
To view this discussion on the web visit https://groups.google.com/d/msgid/openpnp/806afd4f-8afa-4892-b287-a538fb359d93%40googlegroups.com.
Mike Menci
Marek T.
Have you configured properly what the string is needed to be sent to controller to read the sensor and proper regex for it?
Marek T.
Where do you send this "vacuum_1", to Smoothieboard to read the inputs? Do you have "vacuum_1" defined in Smoothieboard as serial code to read an input?
Mike Menci
temperature_control.nozzle.enable true #
temperature_control.nozzle.thermistor_pin 0.23 #
temperature_control.nozzle.heater_pin nc #
temperature_control.nozzle.designator V #
temperature_control.nozzle.min_temp -10 #
temperature_control.nozzle.max_temp 300 #
temperature_control.nozzle.thermistor EPCOS100K # see http://smoothieware.org/temperaturecontrol#toc5
temperature_control.nozzle.runaway_heating_timeout 0 # it seems to crash
temperature_control.nozzle.runaway_range 0 # a rapid delta in temp triggers a halt - 0 disables it
temperature_control.nozzle.readings_per_second 320 # smoothieware takes the median out of the last 32 measurements, so read frequently
Mike Menci
Marek T.
Mike Menci
Marek T.
Marek T.
W dniu niedziela, 19 sierpnia 2018 23:53:53 UTC+2 użytkownik Mike Menci napisał:
Mike Menci
I have some spare PCS - if you need one let me know -?

Melitonas Mikaločius
is it possible to get two pcs?