0816 Automatic Feeder update

Michael G.

Hi!
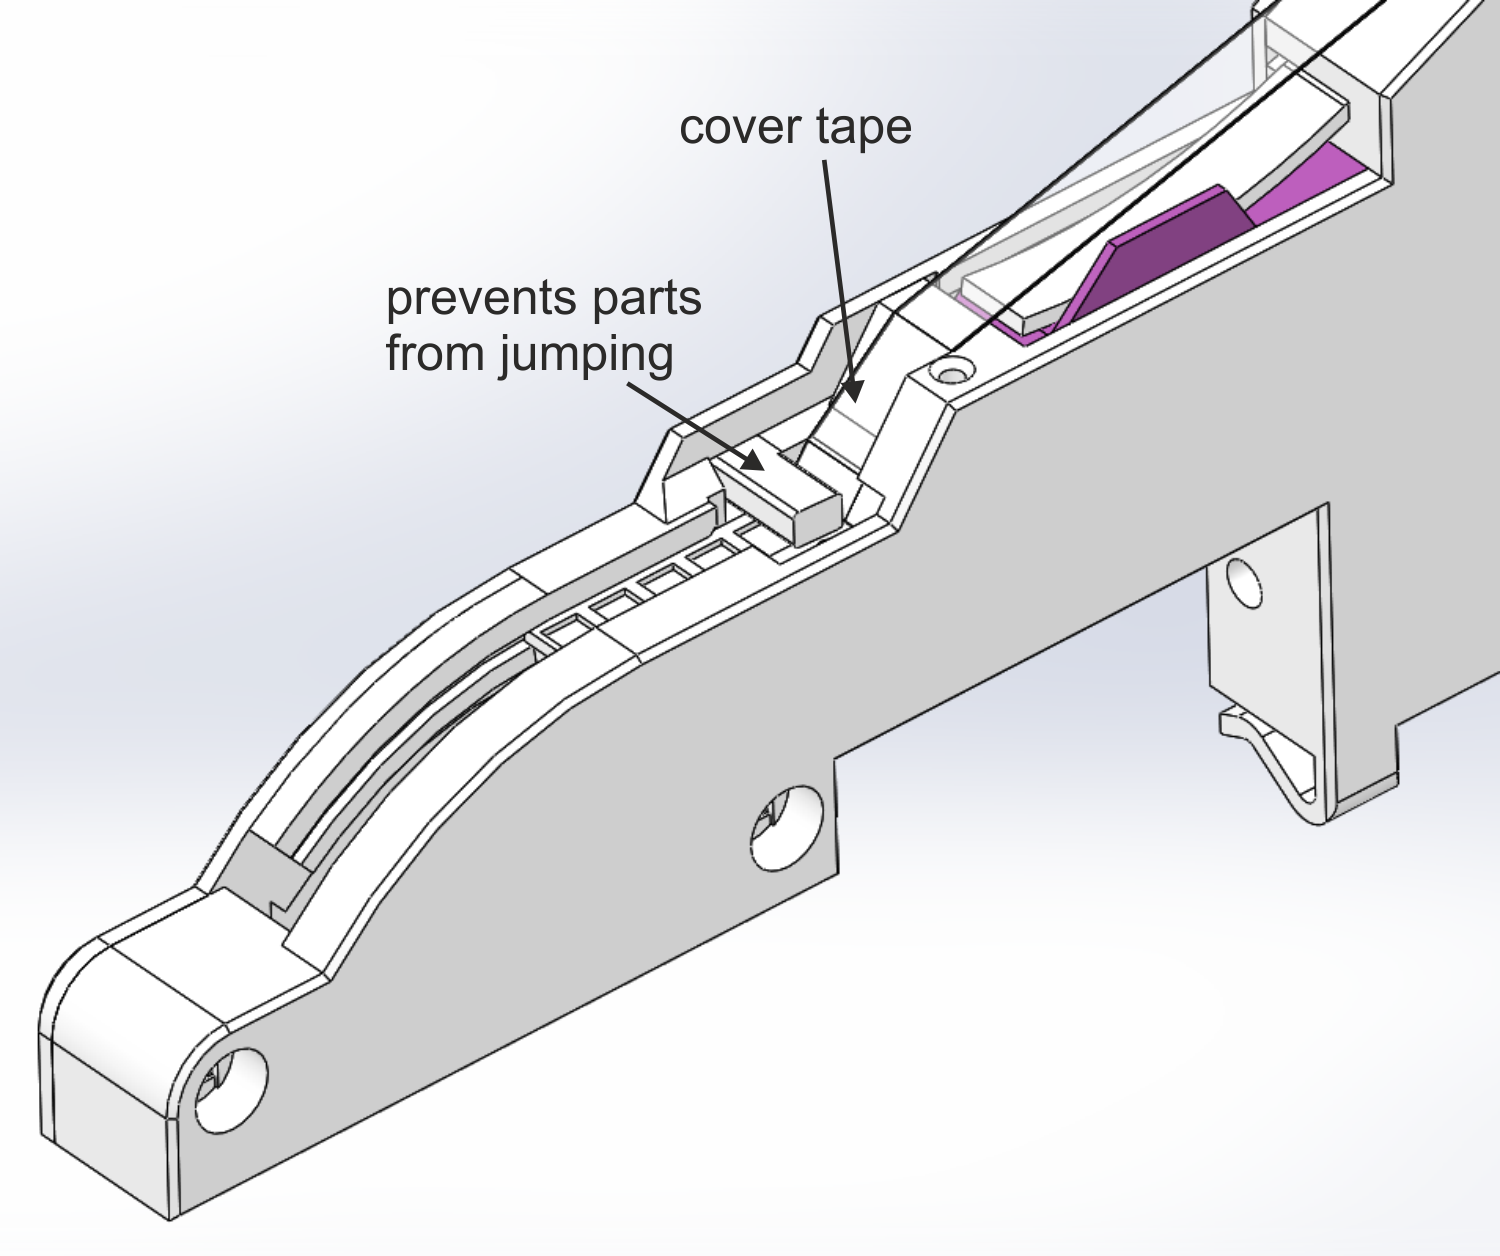
Just had success with my updated feeders on plastic tapes. It seems a small feature after cover tape peeling does the trick to prevent parts from jumping out. Will experiment further and test whether it works at least 99% reliable ;) Paper tapes don't have the problem of jumping parts with this feeder design.
I uploaded the currentmost version as SolidWorks, STL and STEP-files to my page: https://docs.mgrl.de/maschine:pickandplace:feeder:automaticfeeders
Most of the documentation was updated to correspond to the current version already, some parts will be updated soon.
Anthony built one feeder (older version) already and we made a BOM for the US which I will check again and add to the page soon for easier sourcing.
Going to start to build some more feeder of the latest version now... If anybody would like to start these feeder, too, don't hesitate to contact me if you're missing details.
-michael

Anthony Webb
--
You received this message because you are subscribed to the Google Groups "OpenPnP" group.
To unsubscribe from this group and stop receiving emails from it, send an email to openpnp+u...@googlegroups.com.
To post to this group, send email to ope...@googlegroups.com.
To view this discussion on the web visit https://groups.google.com/d/msgid/openpnp/cdb46d8f-f77d-4c56-a21d-639f784f7e40%40googlegroups.com.
For more options, visit https://groups.google.com/d/optout.
<0816-feeder-closed-cad.PNG>
<0816-feeder-machine-photo-controller.jpg>
<0816-feeder-open-cad.png>
<0816-feeder-open-cad-rear.PNG>
<anti-popout.png>

Gregory Davill
Anthony Webb
This is great. I printed one out but don't have the springs yet. Seems to work pretty well from what I can tell so far. A US source of parts would be handy.
--
You received this message because you are subscribed to the Google Groups "OpenPnP" group.
To unsubscribe from this group and stop receiving emails from it, send an email to openpnp+unsubscribe@googlegroups.com.
To post to this group, send email to ope...@googlegroups.com.
To view this discussion on the web visit https://groups.google.com/d/msgid/openpnp/c8b4aabb-bb73-439d-95b1-4139cfd96a4a%40googlegroups.com.
Michael G.
Michael G.
if you found other/better sources since we made the document, I would be happy if you could send me updated links or what you were missing else.
Am Samstag, 16. Dezember 2017 07:09:44 UTC+1 schrieb Anthony Webb:
For me, sourcing the parts, including the springs, was a pretty daunting piece of this. And I found that I ended up buying an entire bulk pack of stuff for just a few items. Now that I've been through the process I can see it isn't so bad.My 11 year old son has offered to put together an easy bag of parts for those of you who are looking for an easy way out to source the exact parts needed at one stop :) I'll try and post up a tindie link in the coming days. Additionally, we have the spreadsheet with the amazon links and such for the different parts we bought that I think will be coming to Michaels instructions as well.Its definitely worth the exercise to print and assemble one of these to see how it works. The more mindshare thinking about this problem and learning what works and what doesnt, the better the solutions we can uncover.
On Fri, Dec 15, 2017 at 9:56 PM, Robert Waters <rbrt...@gmail.com> wrote:
This is great. I printed one out but don't have the springs yet. Seems to work pretty well from what I can tell so far. A US source of parts would be handy.
On Friday, December 15, 2017 at 9:10:50 PM UTC-5, Gregory Davill wrote:Amazing work!I've ordered a set of parts form aliexpress to make up a few to test.Very excited to have some of these feeders running!Great work with the documentation too!
On Saturday, December 16, 2017 at 9:11:20 AM UTC+10:30, Michael G. wrote:
Hi!
Just had success with my updated feeders on plastic tapes. It seems a small feature after cover tape peeling does the trick to prevent parts from jumping out. Will experiment further and test whether it works at least 99% reliable ;) Paper tapes don't have the problem of jumping parts with this feeder design.
I uploaded the currentmost version as SolidWorks, STL and STEP-files to my page: https://docs.mgrl.de/maschine:pickandplace:feeder:automaticfeeders
Most of the documentation was updated to correspond to the current version already, some parts will be updated soon.
Anthony built one feeder (older version) already and we made a BOM for the US which I will check again and add to the page soon for easier sourcing.
Going to start to build some more feeder of the latest version now... If anybody would like to start these feeder, too, don't hesitate to contact me if you're missing details.
-michael
--
You received this message because you are subscribed to the Google Groups "OpenPnP" group.
To unsubscribe from this group and stop receiving emails from it, send an email to openpnp+u...@googlegroups.com.
To post to this group, send email to ope...@googlegroups.com.
Michael G.
if somebody wants to start a feeder in europe, I offer some unassembled controller-pcb plus one feeder-pcb I already have here for evaluation. you only need headers in a minimal version to get it working.
if you are interested, send me your address via private message and I will send them via Deutsche Post to you.

bobgee...@gmail.com
I (like everyone else here) am super impressed with the work. Your documentation is truely excellent as well which is equally important, especially for novices like me.
I have only recently got a 3d printer up and running so now I am looking to start on my feeders. The timing of you releasing this is great for me.
I have got many of the parts sitting in baskets on eBay and Aliexpress, just waiting for me to click checkout. I was just looking at the pcb just now and it is quite expensive to order from OSHpark (although super convenient), because you have to order at least 3x of the large board and they are $40+ on their own.
I was then thinking maybe I would order a run of the boards if there are enough people here who need some. I then saw your last post about having some left over?
I am in the UK and don't mind sorting some out for and shipping them from here, but I can't promise anything will be quick as I tend to do things quite slowly. I.e. if I order pcb, maybe I get them in 2-3 weeks and takes 1-2 weeks to get to people outside of UK after that if I post simple airmail.
So, just on the pcb, Michael, roughly how many have you got lying around? If it isn't enough for everyone out there, I can order some for a good price from China or happy to leave it to you if you want to order more and ship them out to people.
The only other arkward part for sourcing are the springs. It seems quite wasteful if everyone is ordering those selection kits which by my reckoning only let you make 10 feeders and then have a whole load of spare springs left over. I might look around if I can find the springs we need on their own, again only if you haven't already got a box full, and if there are others out there who need them? Anthony, let me know if you get this sorted as well, no point loads of people trying to source the same stuff.
I will probably be back to you soon with more questions on the BOM, but for now I am looking at the PCB and have got motors and springs ready to order.
One thing that does spring to mind immediatley, It isn't totally clear to me how the system mounts to the machine and how I need to arrange my extruded aluminium frame. I will need to order some parts for this as my frame as it currently is, definitely will not work. I have downloaded your machine step file and will try to look at it later, so I might get back to you with questions about this.
Thanks again, really looking forward to having a go at making some of these!

Robert Waters
Robert Waters
Michael Gröne
Am 16.12.2017 um 16:52 schrieb bobgee...@gmail.com:
> I have got many of the parts sitting in baskets on eBay and Aliexpress,
> just waiting for me to click checkout. I was just looking at the pcb
> just now and it is quite expensive to order from OSHpark (although super
> convenient), because you have to order at least 3x of the large board
> and they are $40+ on their own.
>
> I was then thinking maybe I would order a run of the boards if there are
> enough people here who need some. I then saw your last post about having
> some left over?
too expensive there. I have let made some in china already and have in
total 9 left over for the group.
> The only other arkward part for sourcing are the springs. It seems quite
> wasteful if everyone is ordering those selection kits which by my
> reckoning only let you make 10 feeders and then have a whole load of
> spare springs left over. I might look around if I can find the springs
> we need on their own, again only if you haven't already got a box full,
> and if there are others out there who need them? Anthony, let me know if
> you get this sorted as well, no point loads of people trying to source
> the same stuff.
which springs would work. Now I have at least the dimensions of the
springs but not the force constant. maybe I can do some measurements and
look for a specialised shop. but think: the sortiment is about 7€, you
can get 20 feeder out of them (multiple springs work). I would guess one
can't get these cheaper in single pieces?
> One thing that does spring to mind immediatley, It isn't totally clear
> to me how the system mounts to the machine and how I need to arrange my
> extruded aluminium frame. I will need to order some parts for this as my
> frame as it currently is, definitely will not work. I have downloaded
> your machine step file and will try to look at it later, so I might get
> back to you with questions about this.
therein are a bit outdated now, but the mounting has not changed.

n.a.m...@gmail.com
Thank you for this awesome work! I like it very much.
What model 3D printer are you using to make these?
Regards,
Niels.
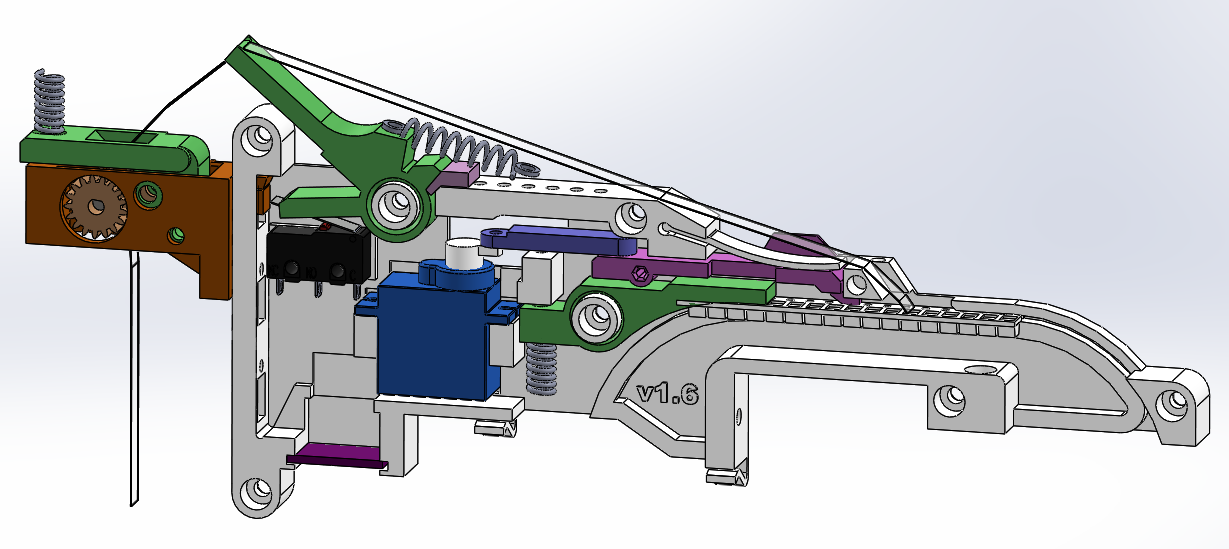
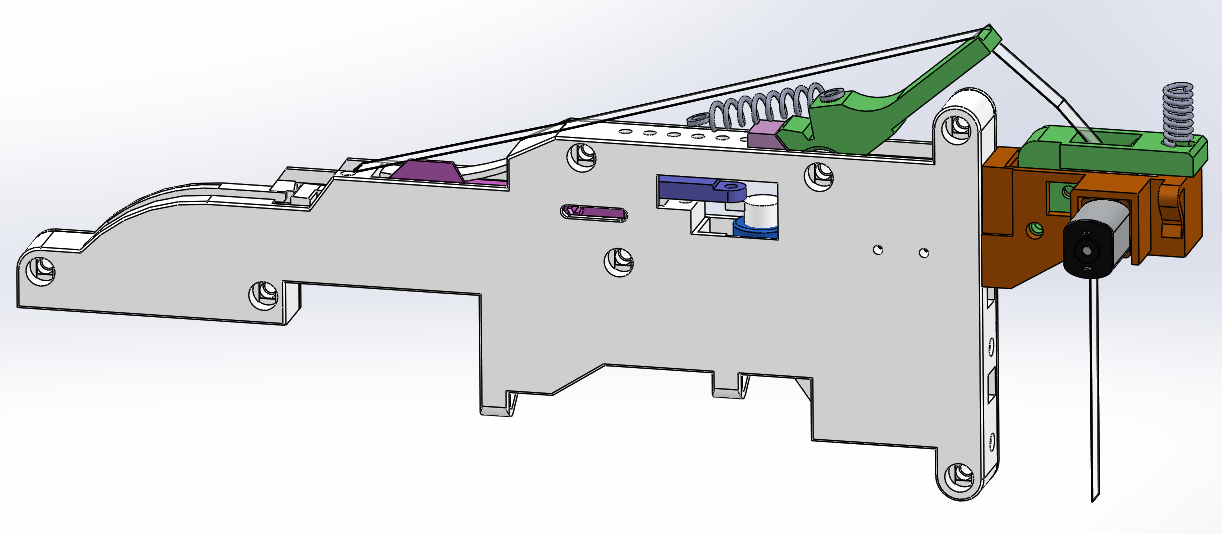
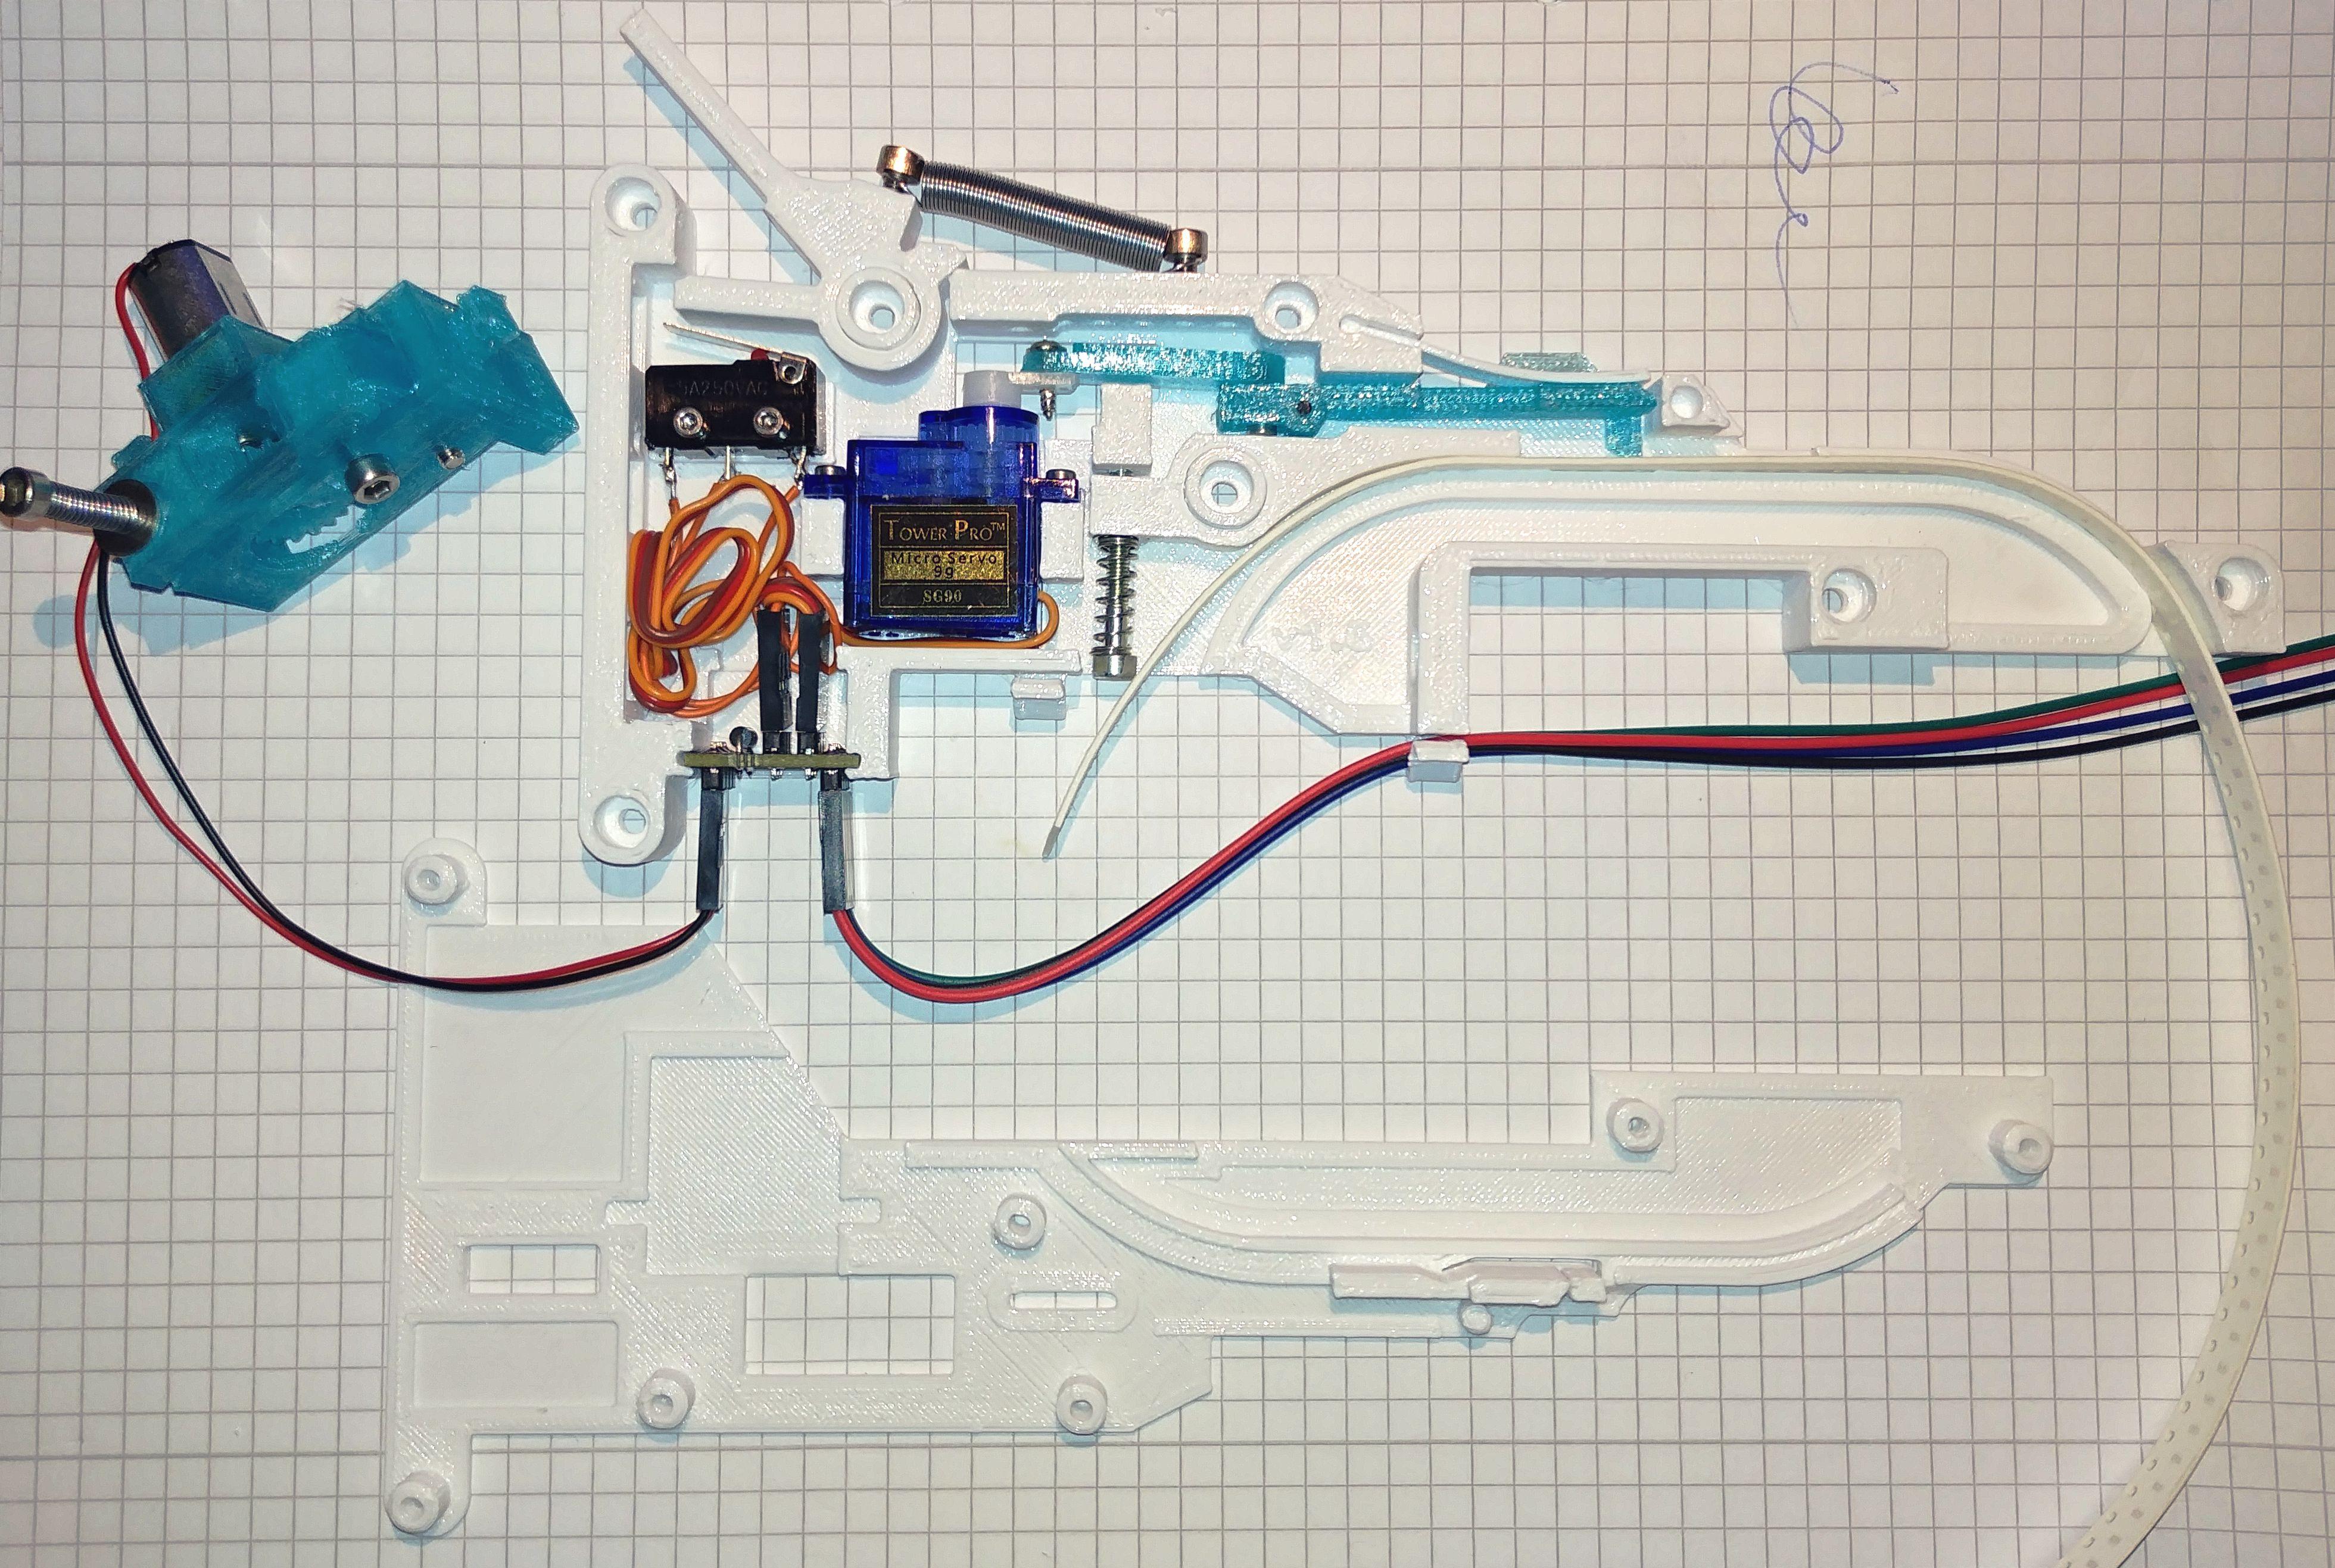
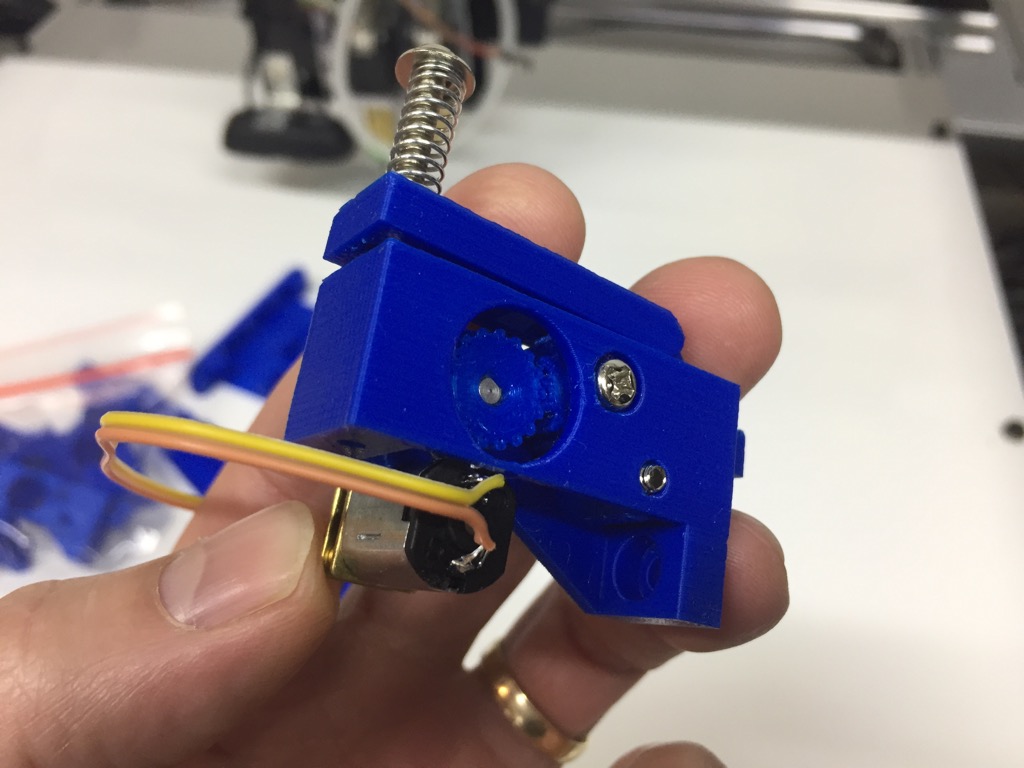
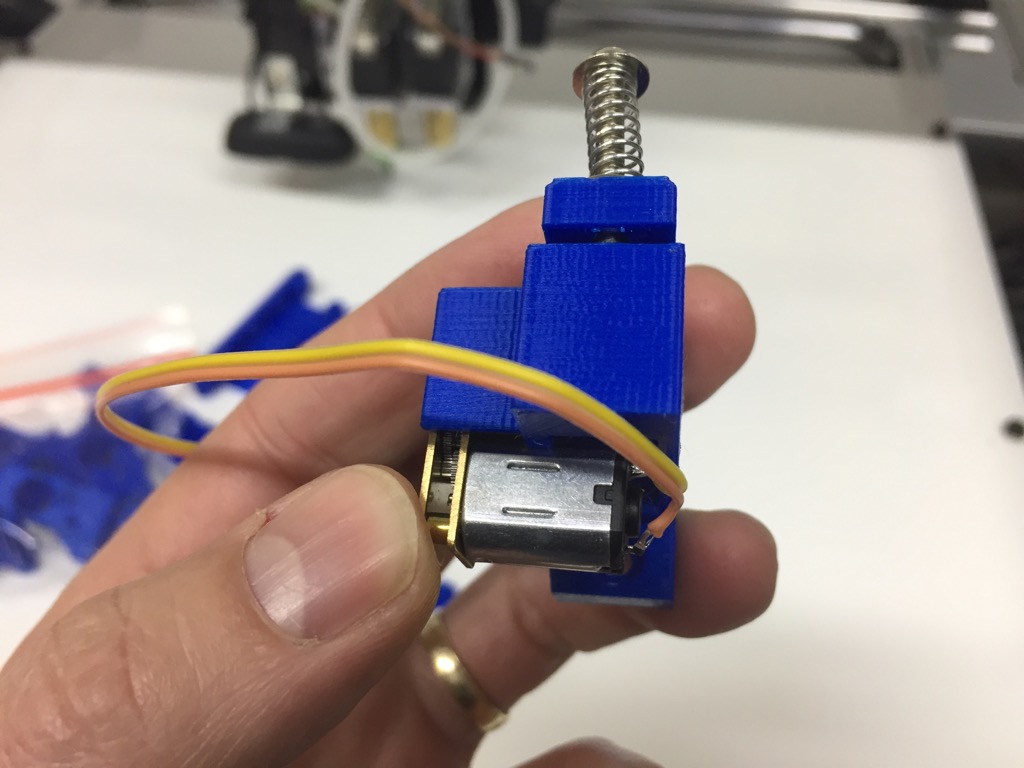
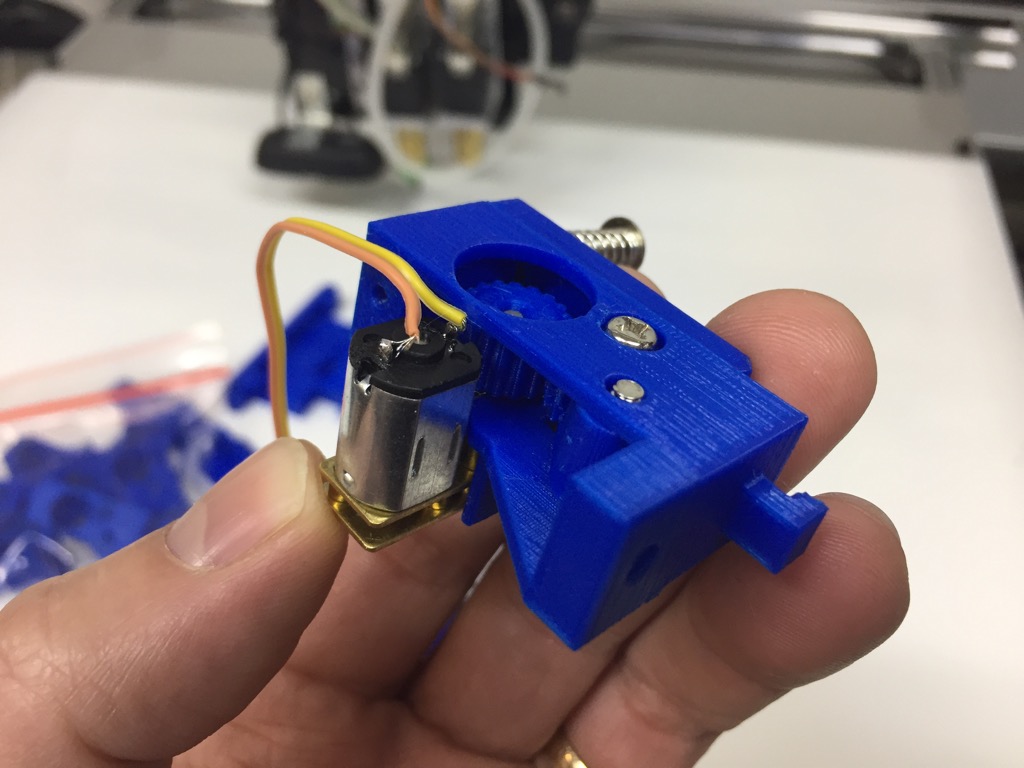
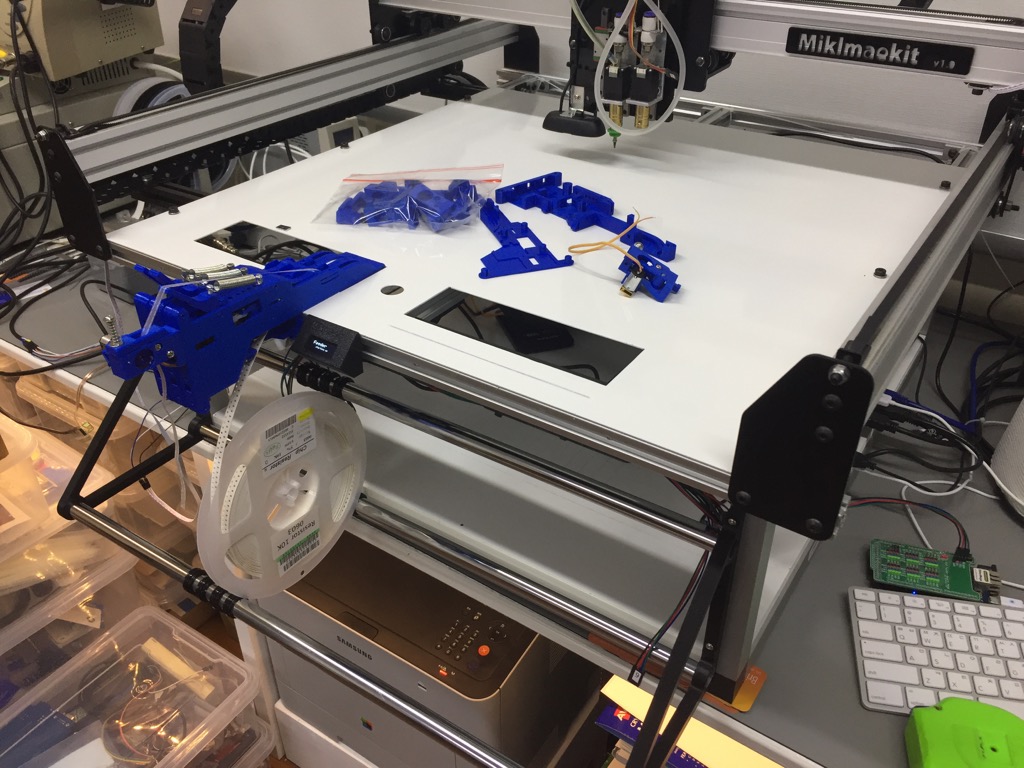
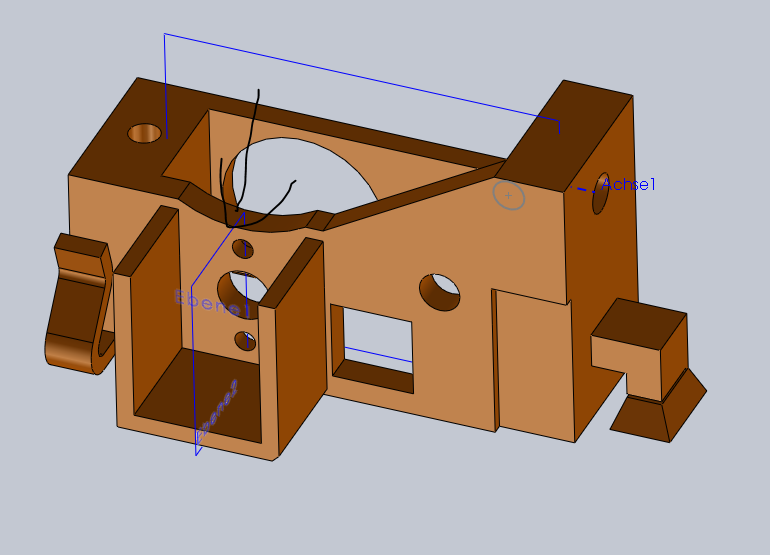
Attached a photo of a finished, but still open feeder with some paper tape loaded and a animation showing the pick-place of a paper tape I just took (sorry for having the pick place out of focus ;).
if somebody wants to start a feeder in europe, I offer some unassembled controller-pcb plus one feeder-pcb I already have here for evaluation. you only need headers in a minimal version to get it working.
if you are interested, send me your address via private message and I will send them via Deutsche Post to you.
--
You received this message because you are subscribed to the Google Groups "OpenPnP" group.
To unsubscribe from this group and stop receiving emails from it, send an email to openpnp+u...@googlegroups.com.
To post to this group, send email to ope...@googlegroups.com.
To view this discussion on the web visit https://groups.google.com/d/msgid/openpnp/c1dcadf9-5baf-44b1-8a25-32b443fc7e12%40googlegroups.com.
Michael Gröne

Bernd Walter
Looks nice.
What width are they?
Both the pneumatic Yamaha as well as the Siplace use ~32mm for 12/16mm and ~16mm for a 8mm lane, modern feeder designs are slimmer.
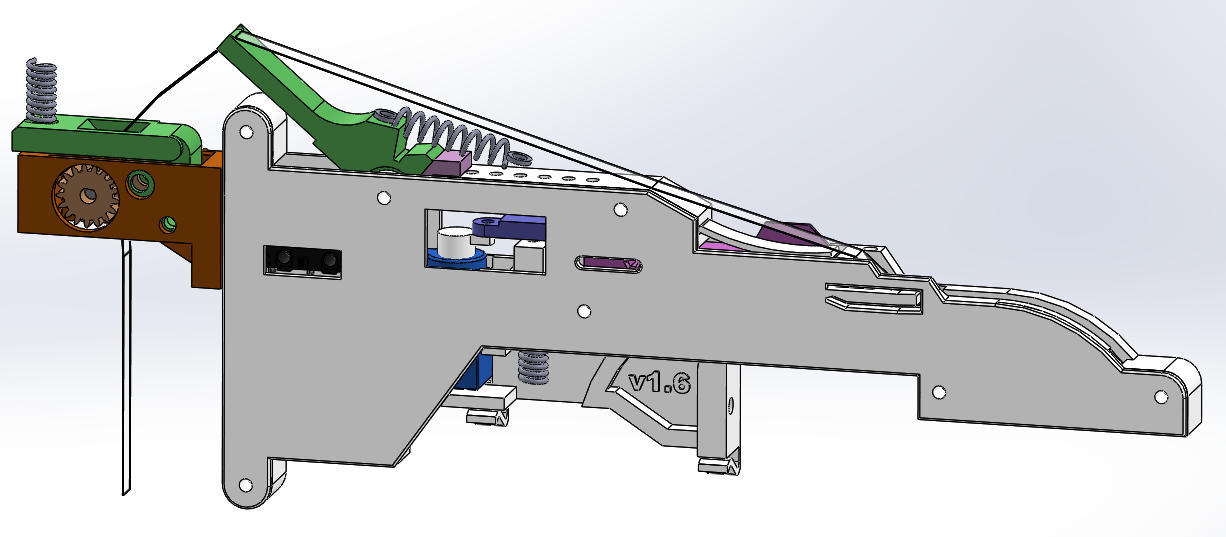
Even after looking on your design page, I still don't understand the adjustable spring tensioner.
It pushes the tape down?
Almost all commercial design pushes the tape up against the pick opening frame to have a consistent pick height.
Only a 56mm feeder pushes it down, but they push the transport sides down (>=32mm have holes on both sides), which also results a consistent height.
What I don't like with your design is that has parts much higher than the pick location.
This can be a real pain with stuffed pick heads, which I already have with the CL feeders.
I can't locate the camera over the pick location without ramming my nozzles into the feeder.
As a side note:
I've noticed your reel holder.
The siplace feeders don't have a reel holder, so this would come handy for me.
What type of rods to you use?
Btw:. If you are ever near Moers and like to see the different feeder types I have live plus...
Anthony Webb
To view this discussion on the web visit https://groups.google.com/d/msgid/openpnp/f899549f-76e2-9fe2-ae62-4dd2cee83ad1%40gmail.com.

Cri S
connecting 32 servos.
In case smoothie don`t have a free heater pin, Hign side switch with
mosfet costs 3Euro
as arduino single channel pcb or solder a logik level power mosfet
with resistor itself
on the board.
> You received this message because you are subscribed to the Google Groups
> "OpenPnP" group.
> To unsubscribe from this group and stop receiving emails from it, send an
> email to openpnp+u...@googlegroups.com.
> To post to this group, send email to ope...@googlegroups.com.
> To view this discussion on the web visit
Anthony Webb

Michael Gröne
Am 16.12.2017 um 17:20 schrieb Bernd Walter:
> Looks nice.
> What width are they?
> Both the pneumatic Yamaha as well as the Siplace use ~32mm for 12/16mm
> and ~16mm for a 8mm lane, modern feeder designs are slimmer.
20mm
> Even after looking on your design page, I still don't understand the
> adjustable spring tensioner.
adding some friction. The lane height is adjusted at the position, where
the cover tape peels off. you can insert a small M2 screw to screw down
the lever arm a bit to lower the lane's height. not optimal but better
than nothing.
> It pushes the tape down?
the lane will get lower.
> Almost all commercial design pushes the tape up against the pick opening
> frame to have a consistent pick height.
tape printed well. maybe in future releases it could be revised.
> What I don't like with your design is that has parts much higher than
> the pick location.
> This can be a real pain with stuffed pick heads, which I already have
> with the CL feeders.
> I can't locate the camera over the pick location without ramming my
> nozzles into the feeder.
reach the pick location by camera but one must take care not to drive
sidewards.
> As a side note:
> I've noticed your reel holder.
> The siplace feeders don't have a reel holder, so this would come handy
> for me.
> What type of rods to you use?
version I used 8mm stell rods, nothing special...
> Btw:. If you are ever near Moers and like to see the different feeder
> types I have live plus...
much better ;)
Michael Gröne
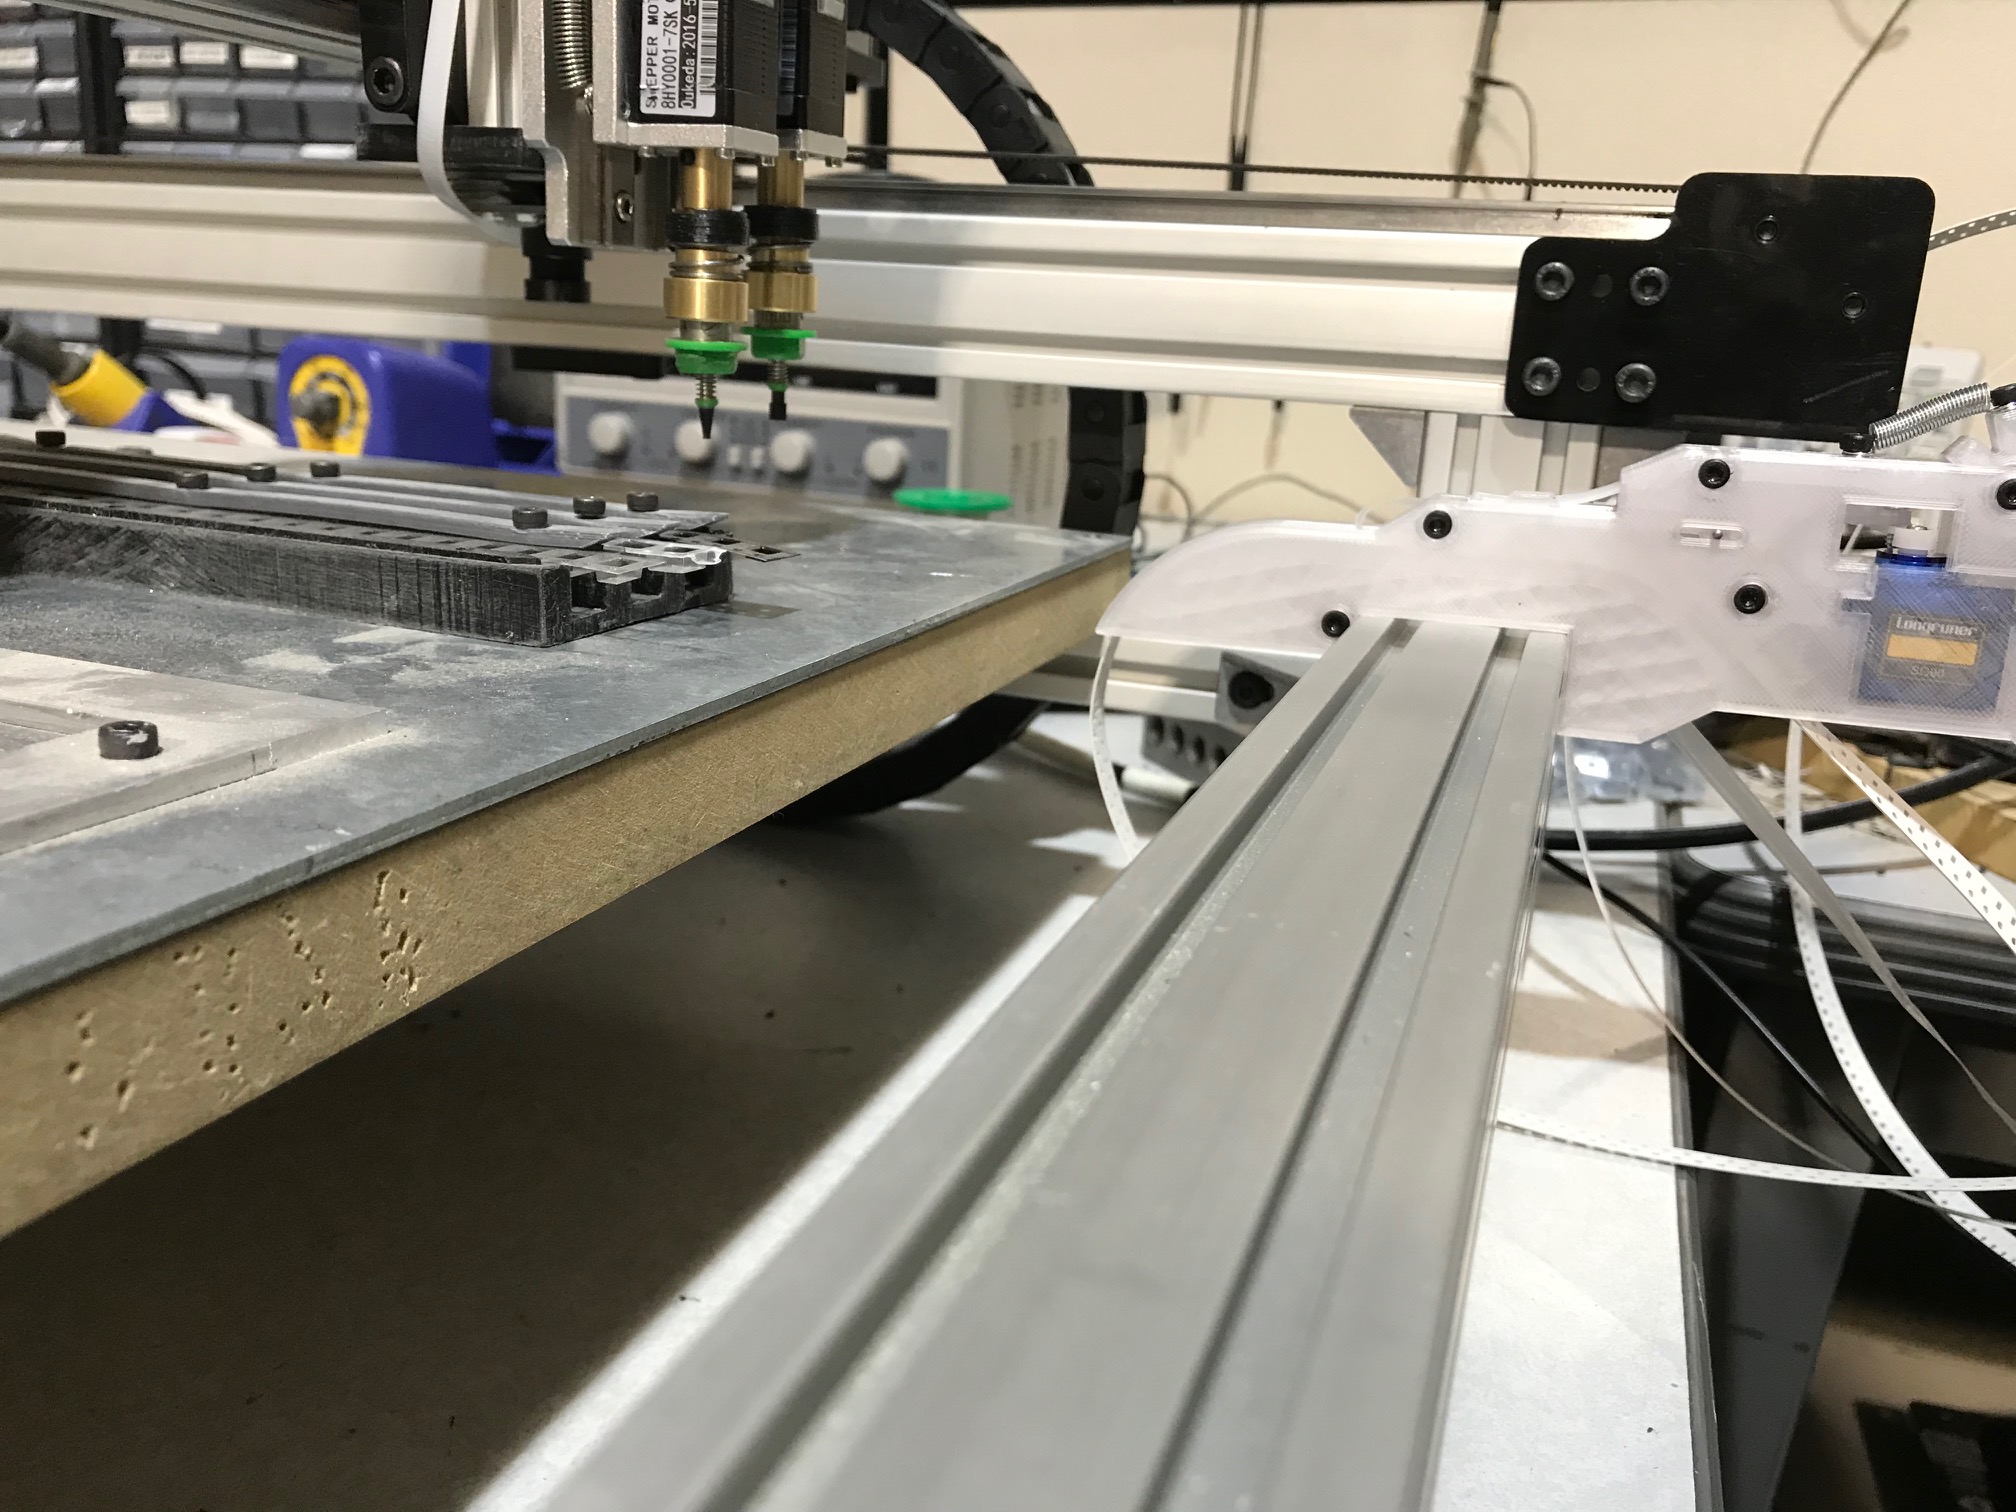
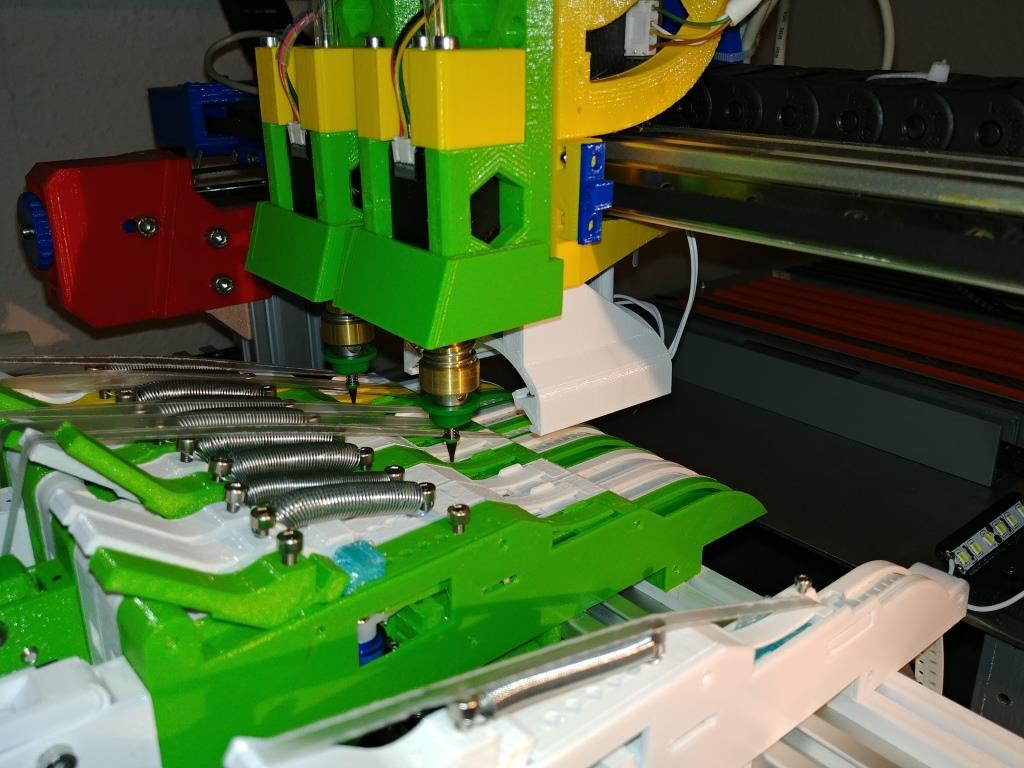
a little "podest" below the feeder to have them a little higher than the
machine table. camera can reach the pick location
Am 16.12.2017 um 17:30 schrieb Anthony Webb:
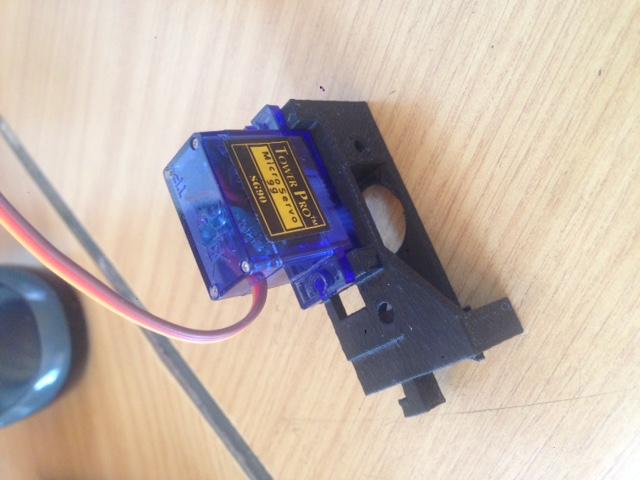
> Bernd, you are correct about the feeder height above the pick spot. I am
> attaching a photo of the issue. You can see that in my design if I try
> to put the down facing camera over the part, the nozzles collide with
> the feeder. Easy fix on my case was to move he feeders to the rear,
> problem solved.
>
>> https://groups.google.com/d/msgid/openpnp/ee9ba15b-1c88-4627-bf7a-3904acf9283c%40googlegroups.com
> --
> You received this message because you are subscribed to a topic in the
> Google Groups "OpenPnP" group.
> To unsubscribe from this topic, visit
> https://groups.google.com/d/topic/openpnp/0ZMk60x51tw/unsubscribe.
> To unsubscribe from this group and all its topics, send an email to
> openpnp+u...@googlegroups.com
> <mailto:openpnp+u...@googlegroups.com>.
> <https://groups.google.com/d/msgid/openpnp/C8D5B0B9-D25F-465E-A318-37F32420B69E%40gmail.com?utm_medium=email&utm_source=footer>.
Michael G.
the feedback line would be left out then (state of microswitch is checked on a fourth line, to check whether tape is tensioned properly).
Bernd Walter
On Saturday, December 16, 2017 at 5:33:52 PM UTC+1, Michael G. wrote:
Am 16.12.2017 um 17:20 schrieb Bernd Walter:
> Looks nice.
> What width are they?
> Both the pneumatic Yamaha as well as the Siplace use ~32mm for 12/16mm
> and ~16mm for a 8mm lane, modern feeder designs are slimmer.
overall width of one feeder at 8mm tape → 13.5mm, 12mm tape → 16mm, 16 →
20mm
That's a slim design.
> Even after looking on your design page, I still don't understand the
> adjustable spring tensioner.
the spring next to the servo motor is just to keep the tape in place by
adding some friction. The lane height is adjusted at the position, where
the cover tape peels off. you can insert a small M2 screw to screw down
the lever arm a bit to lower the lane's height. not optimal but better
than nothing.
Ah
> It pushes the tape down?
no, the bottom of the tape is always the same. but the upper bound of
the lane will get lower.
> Almost all commercial design pushes the tape up against the pick opening
> frame to have a consistent pick height.
wanted to do that first, but I didn't get such small features below the
tape printed well. maybe in future releases it could be revised.
Ah - ok, yes that's difficult to print.
> What I don't like with your design is that has parts much higher than
> the pick location.
> This can be a real pain with stuffed pick heads, which I already have
> with the CL feeders.
> I can't locate the camera over the pick location without ramming my
> nozzles into the feeder.
jeah, thats annoying, you're right. for my machine it is possible to
reach the pick location by camera but one must take care not to drive
sidewards.
I'm in need of more 12mm feeders, but only the front side has the nozzles first.
That is where my pneumatic feeders are and I also intend to put some siplace on the front.
The back side is already full with siplace.
And the sides can only hold short and flat feeders, since that's the moving area for the head.
And with 4 nozzles in a row they also need some freedom.
But to add to my problems: the side rail structure is lower than the pick height, so I can't use long feeders on the side either.
Right now I have a drag block on the left side within the movement area, the rest is on the outside.
> As a side note:
> I've noticed your reel holder.
> The siplace feeders don't have a reel holder, so this would come handy
> for me.
> What type of rods to you use?
I used 10mm aluminium rods from Hornbach in one version and in another
version I used 8mm stell rods, nothing special...
Oh - I should have looked at your files first.
You have different versions for 8, 10 and 12mm.
I will definitively print one.
8mm steel rods is something I have on stock, as well as 12mm, but I don't like to use
the expensive 12mm for that.
The length is about 1m for 48 reels - with 8mm I will have to use more of the mounts, but this should be possible.
> Btw:. If you are ever near Moers and like to see the different feeder
> types I have live plus...
seeing a working feeder in real life would have made the design probably
much better ;)
I know it is not very near to where you live.
But it is also very hard to show some of the design patterns on camera.
Anthony Webb
--
You received this message because you are subscribed to the Google Groups "OpenPnP" group.
To unsubscribe from this group and stop receiving emails from it, send an email to openpnp+unsubscribe@googlegroups.com.
To post to this group, send email to ope...@googlegroups.com.
To view this discussion on the web visit https://groups.google.com/d/msgid/openpnp/65c44d39-462e-489b-8809-f4fa607c470d%40googlegroups.com.
Michael G.
I got the feeder version 1.6 working with paper tapes as well as with plastic tapes flawlessly (with that little screw inserted).
hope it works now for you, too?
To unsubscribe from this group and stop receiving emails from it, send an email to openpnp+u...@googlegroups.com.
To post to this group, send email to ope...@googlegroups.com.
Anthony Webb
To unsubscribe from this group and stop receiving emails from it, send an email to openpnp+unsubscribe@googlegroups.com.
To post to this group, send email to ope...@googlegroups.com.
To view this discussion on the web visit https://groups.google.com/d/msgid/openpnp/07a6f40f-616b-4f95-9dc5-552147e2d5d6%40googlegroups.com.
Michael G.
-michael

Trampas Stern

Trampas Stern
Michael G.
I love the design with the feeder finger: https://www.youtube.com/watch?v=9qJp1j-rdVU
but it's patented recently, so I don't know how to handle that... and whether it can be printed?
Trampas Stern
Bernd Walter
On Thursday, December 21, 2017 at 12:18:47 PM UTC+1, Trampas Stern wrote:
The image above is a design I was working on, however the ratchet system on the bottom was a pain to get working. Therefore I was going to look at using a clutch bearing:The Yamaha CL feeders use clutch bearings for the tape system and it works well. The basic idea is that the the spring (red in image above) pulls the take up wheel and the amount of tension on the spring sets the cover take up tension. Then using clutch bearing and pinch roller like the CL feeders would be a great addition to your feeder.
Some older Siplace feeders use the same.
They use a reel to pickup, which I don't like, but the transmission is clutch bearing for the 8m as well as the 12/16mm feeders and motor driven on anything wider than that.
The transport motor pushed a rod to the back and this tensions a spring loaded system, which rotates the roller via a clutch bearing.
The 8mm feeders even are way more clever, they use a single motor for 2 tapes.
Each direction has a clutch bearing to drive a single side, so depending on the motor direction either the left or the right line is driven.
Michael G.

Arie Lashansky
Michael G.
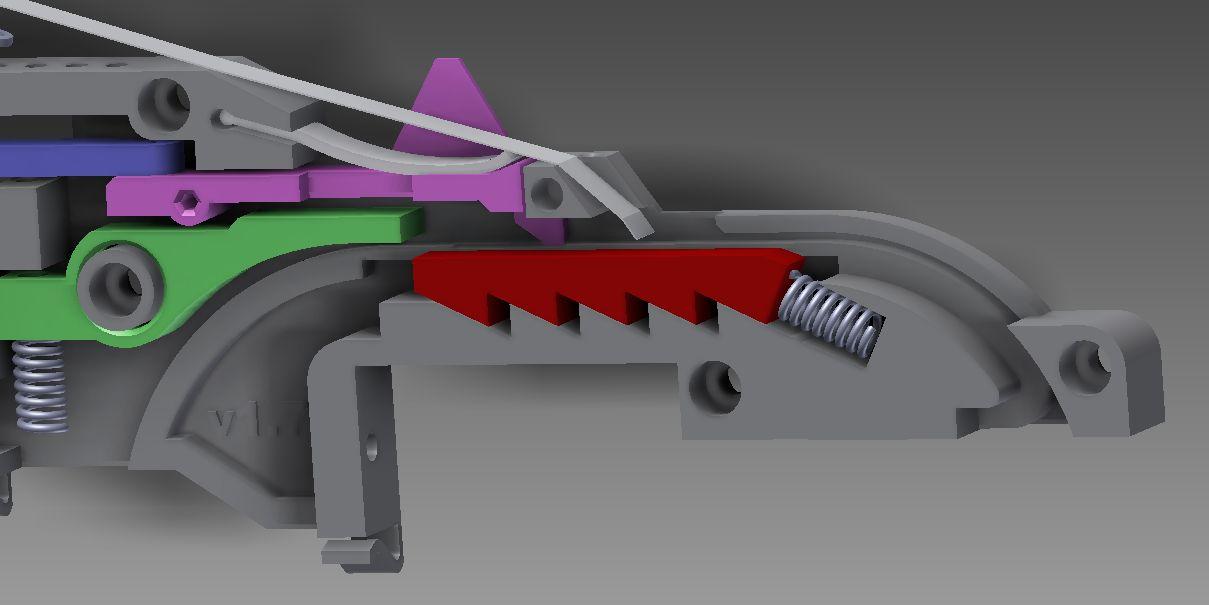
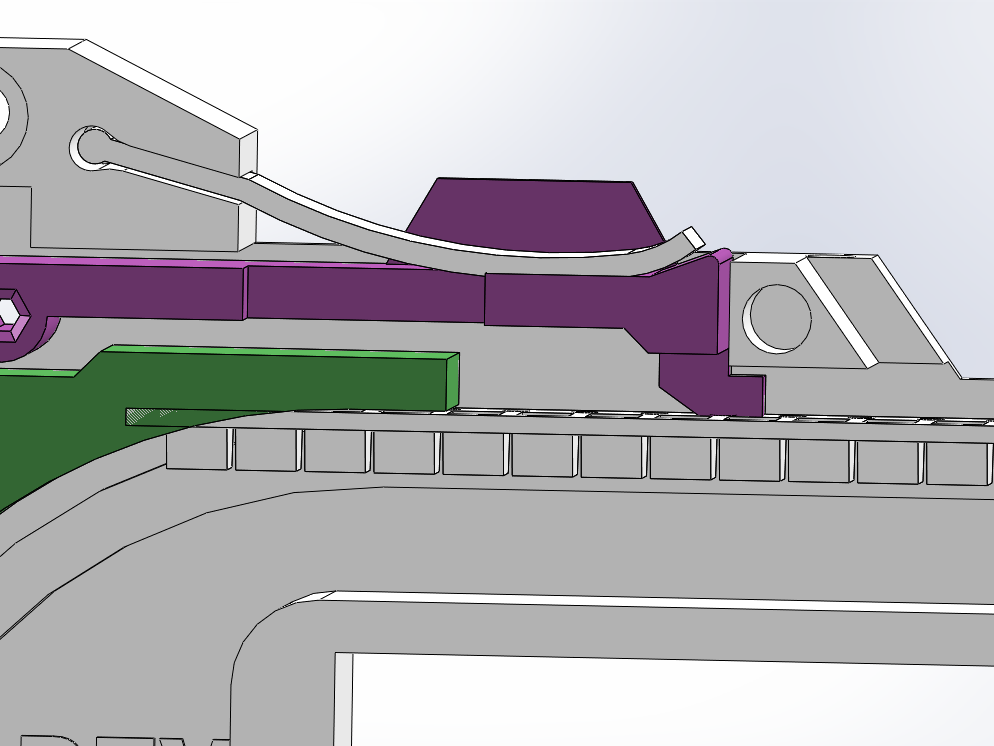
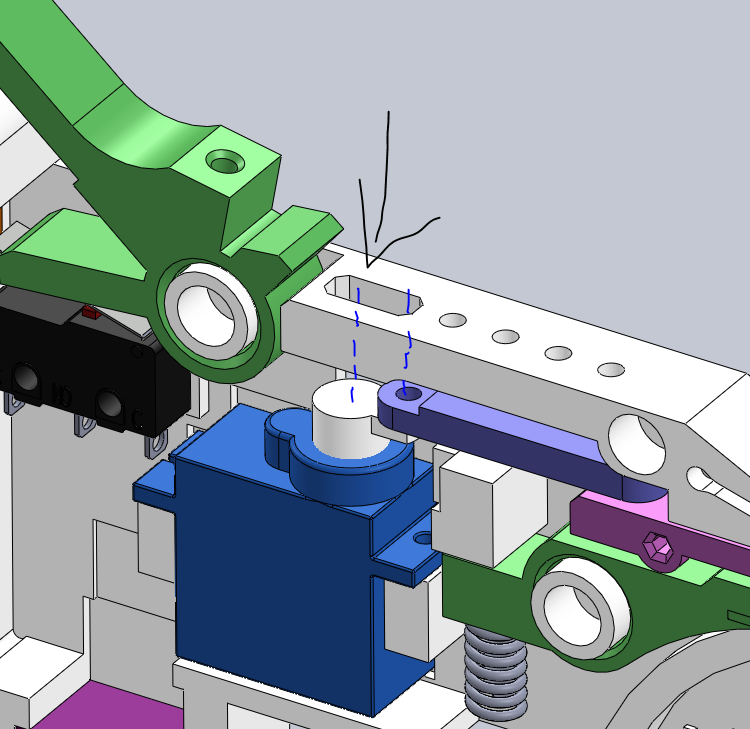
there were only minor improvements addressing an issue anthony had, see attached.
the pushdown pin and the advancing lever have now another form, to help finding the hole better, but not giving too much force on the tape from above in full advanced state.
another one is that the gap was shrinked where the cover tape is peeled off.
would suggest to leave everything as is with the feeder you have in 1.6 and preferrably use these with paper tapes.
version 1.7 might work better for plastic tapes if one had issues with 1.6 previously.
if you would really like to upgrade from 1.6 to 1.7 you can reprint the little spring and the advancing lever. the other parts don't matter.
you could use the "split"function in slic3r to do so.

Michael G.
https://github.com/mgrl/0816-feeder-firmware
michael
Michael G.
nothing else changed. interface between cover tape removal unit and feeder remains the same, so there is no problem to mix newly printed parts with older parts...

Olyozz
On Friday, 15 December 2017 22:41:20 UTC, Michael G. wrote:
Hi!
Just had success with my updated feeders on plastic tapes. It seems a small feature after cover tape peeling does the trick to prevent parts from jumping out. Will experiment further and test whether it works at least 99% reliable ;) Paper tapes don't have the problem of jumping parts with this feeder design.
I uploaded the currentmost version as SolidWorks, STL and STEP-files to my page: https://docs.mgrl.de/maschine:pickandplace:feeder:automaticfeeders
Most of the documentation was updated to correspond to the current version already, some parts will be updated soon.
Anthony built one feeder (older version) already and we made a BOM for the US which I will check again and add to the page soon for easier sourcing.
Going to start to build some more feeder of the latest version now... If anybody would like to start these feeder, too, don't hesitate to contact me if you're missing details.
-michael
Anthony Webb
--
You received this message because you are subscribed to the Google Groups "OpenPnP" group.
To unsubscribe from this group and stop receiving emails from it, send an email to openpnp+unsubscribe@googlegroups.com.
To post to this group, send email to ope...@googlegroups.com.
To view this discussion on the web visit https://groups.google.com/d/msgid/openpnp/01ff03f0-8078-4729-aa8d-dd49e1ee6209%40googlegroups.com.

Roger Gipson

Patricio Cohen Sch.
Michael G.
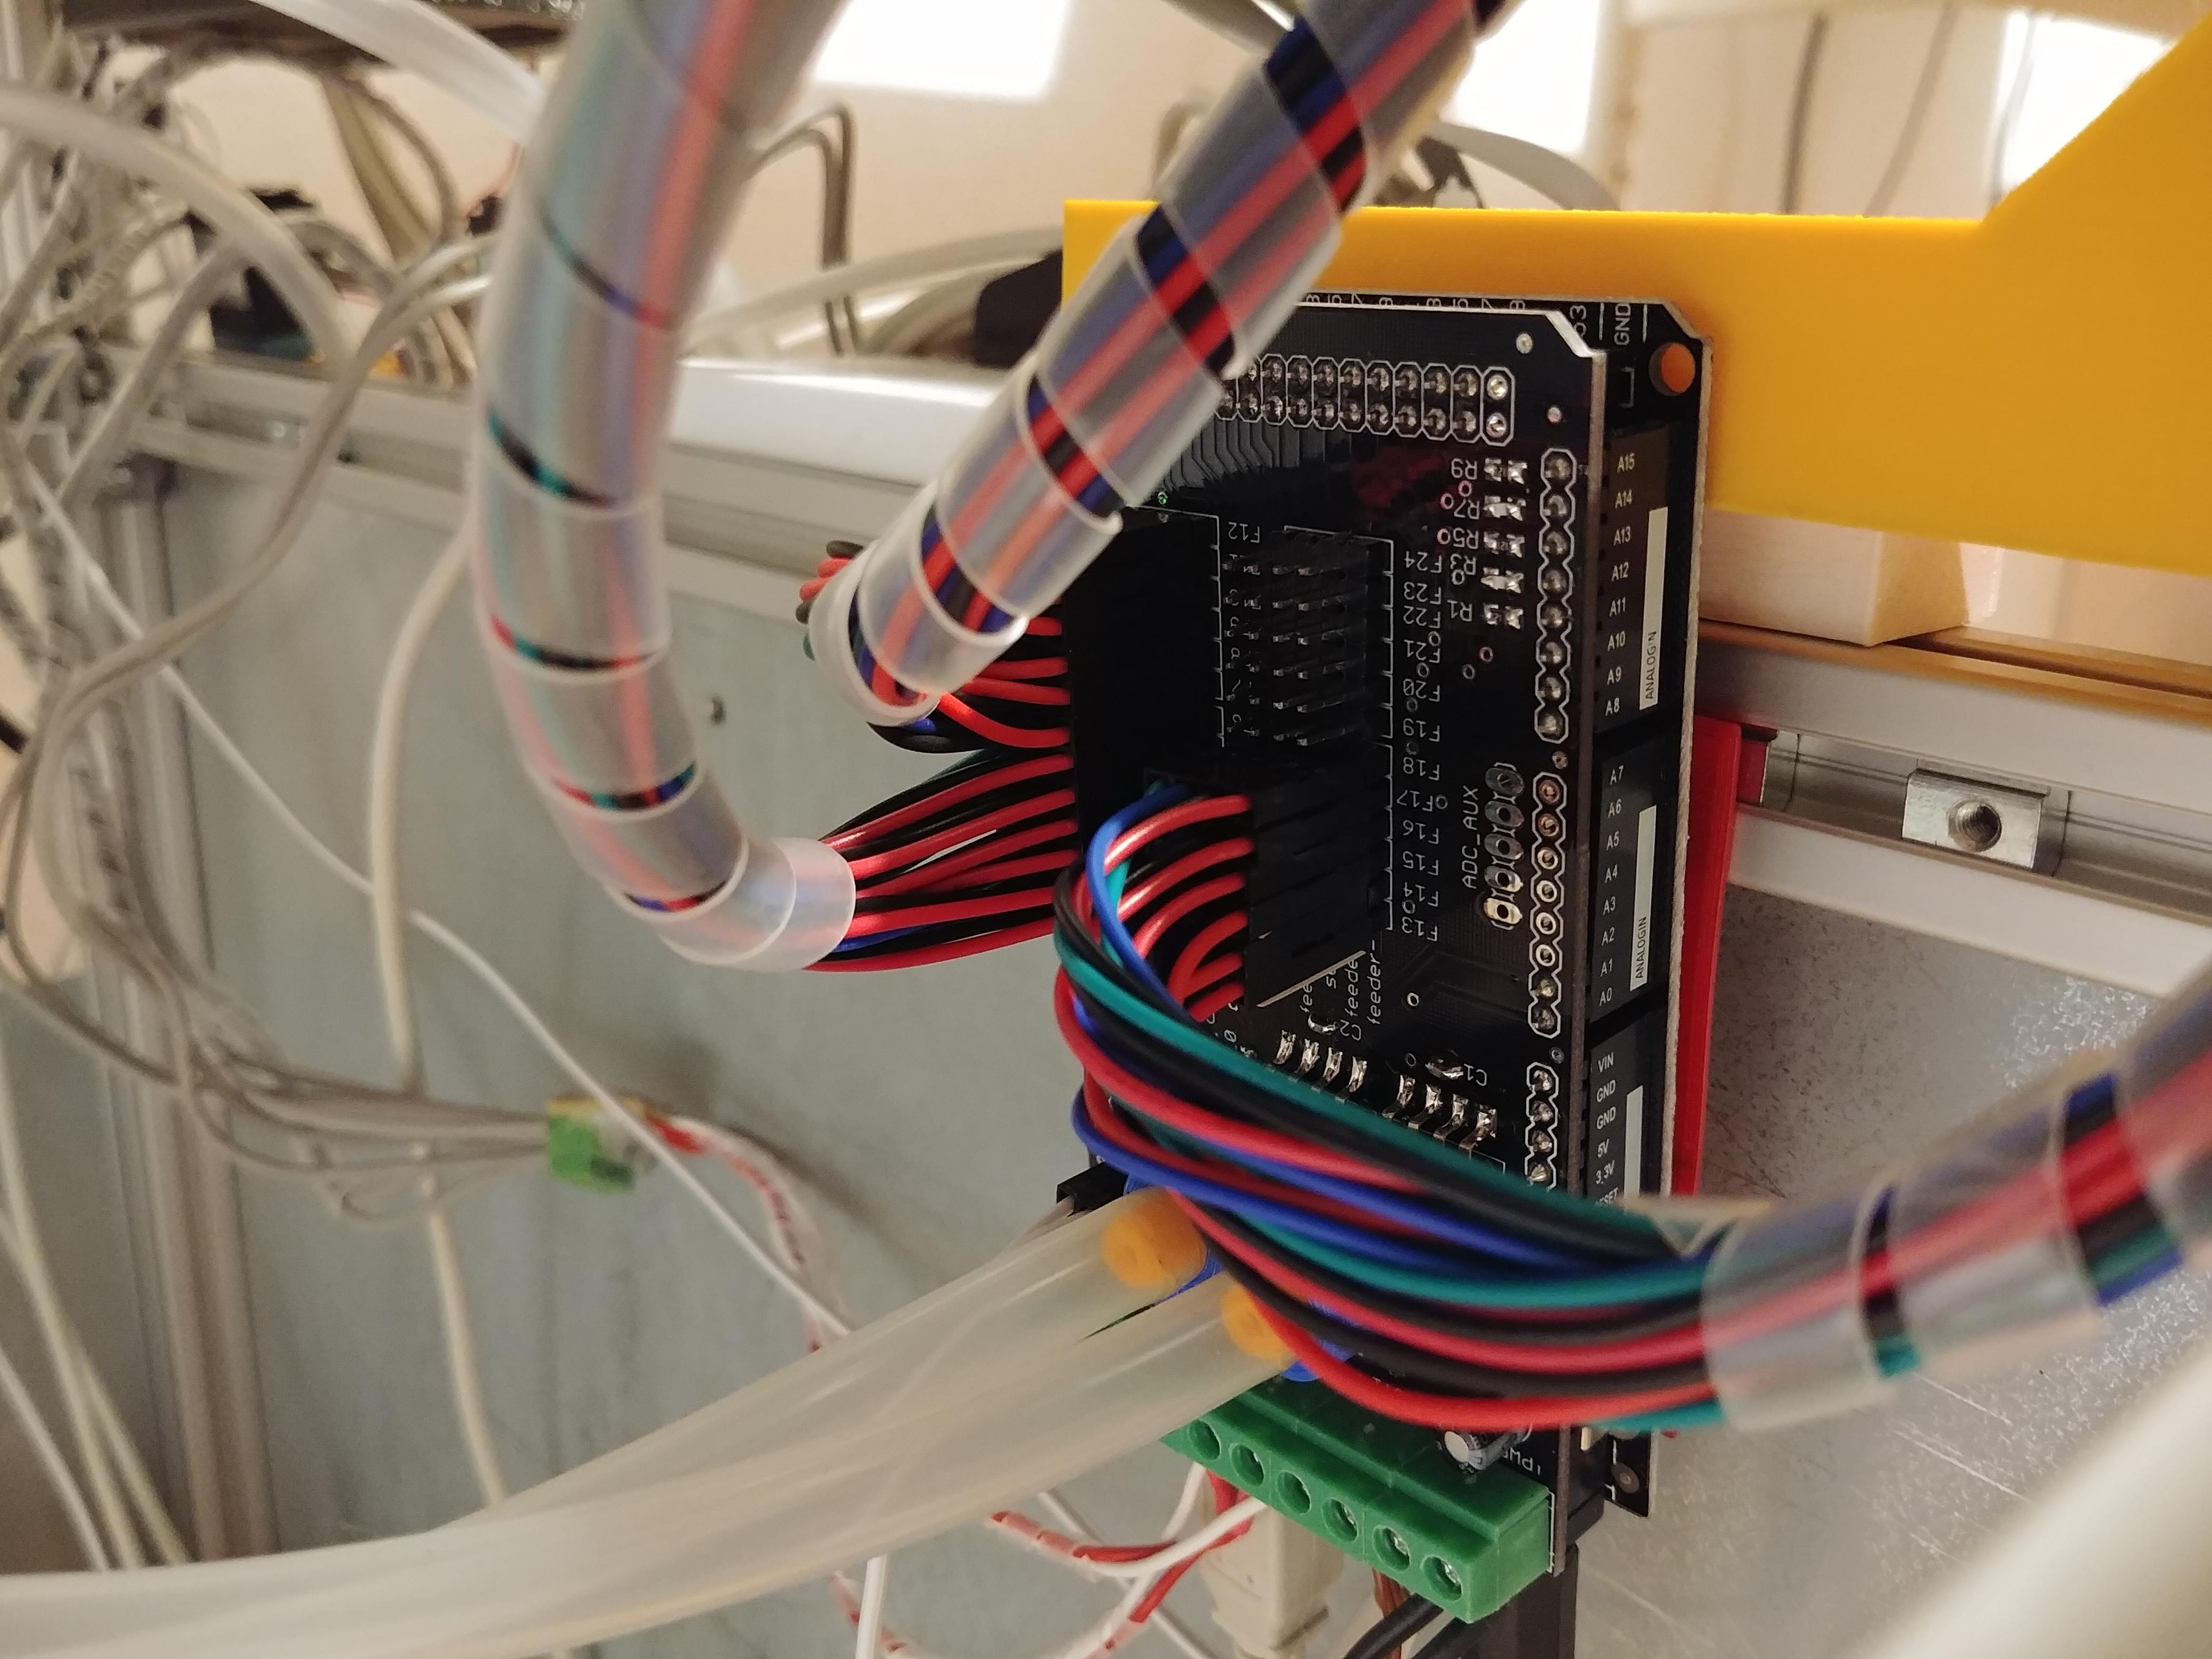
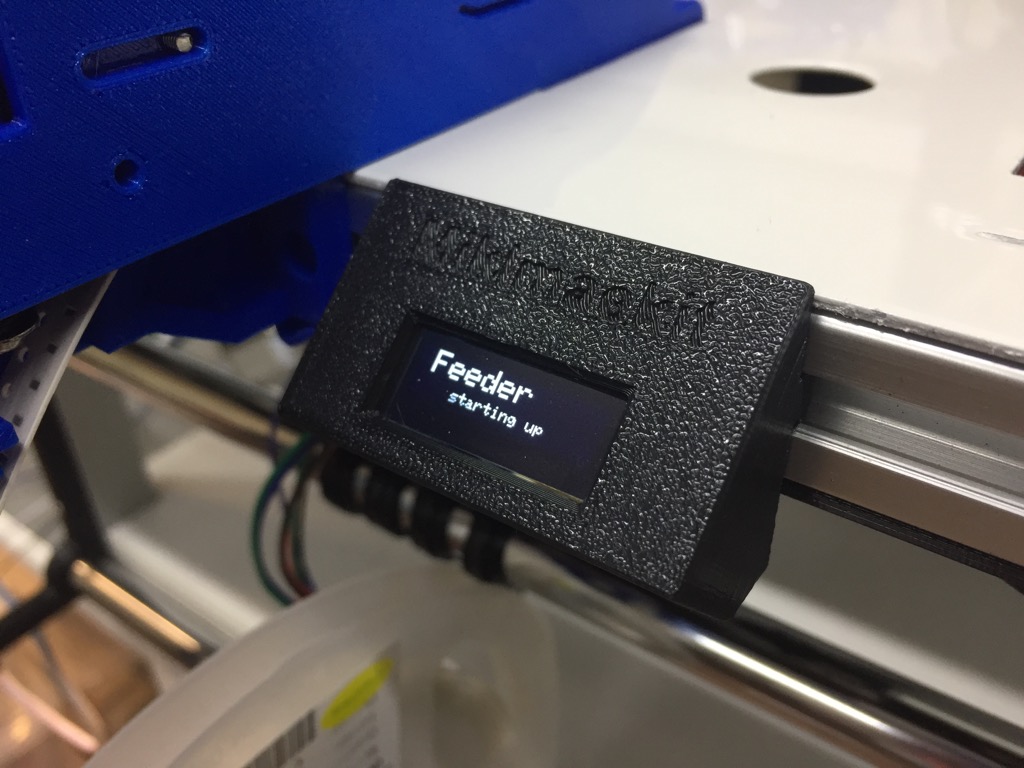
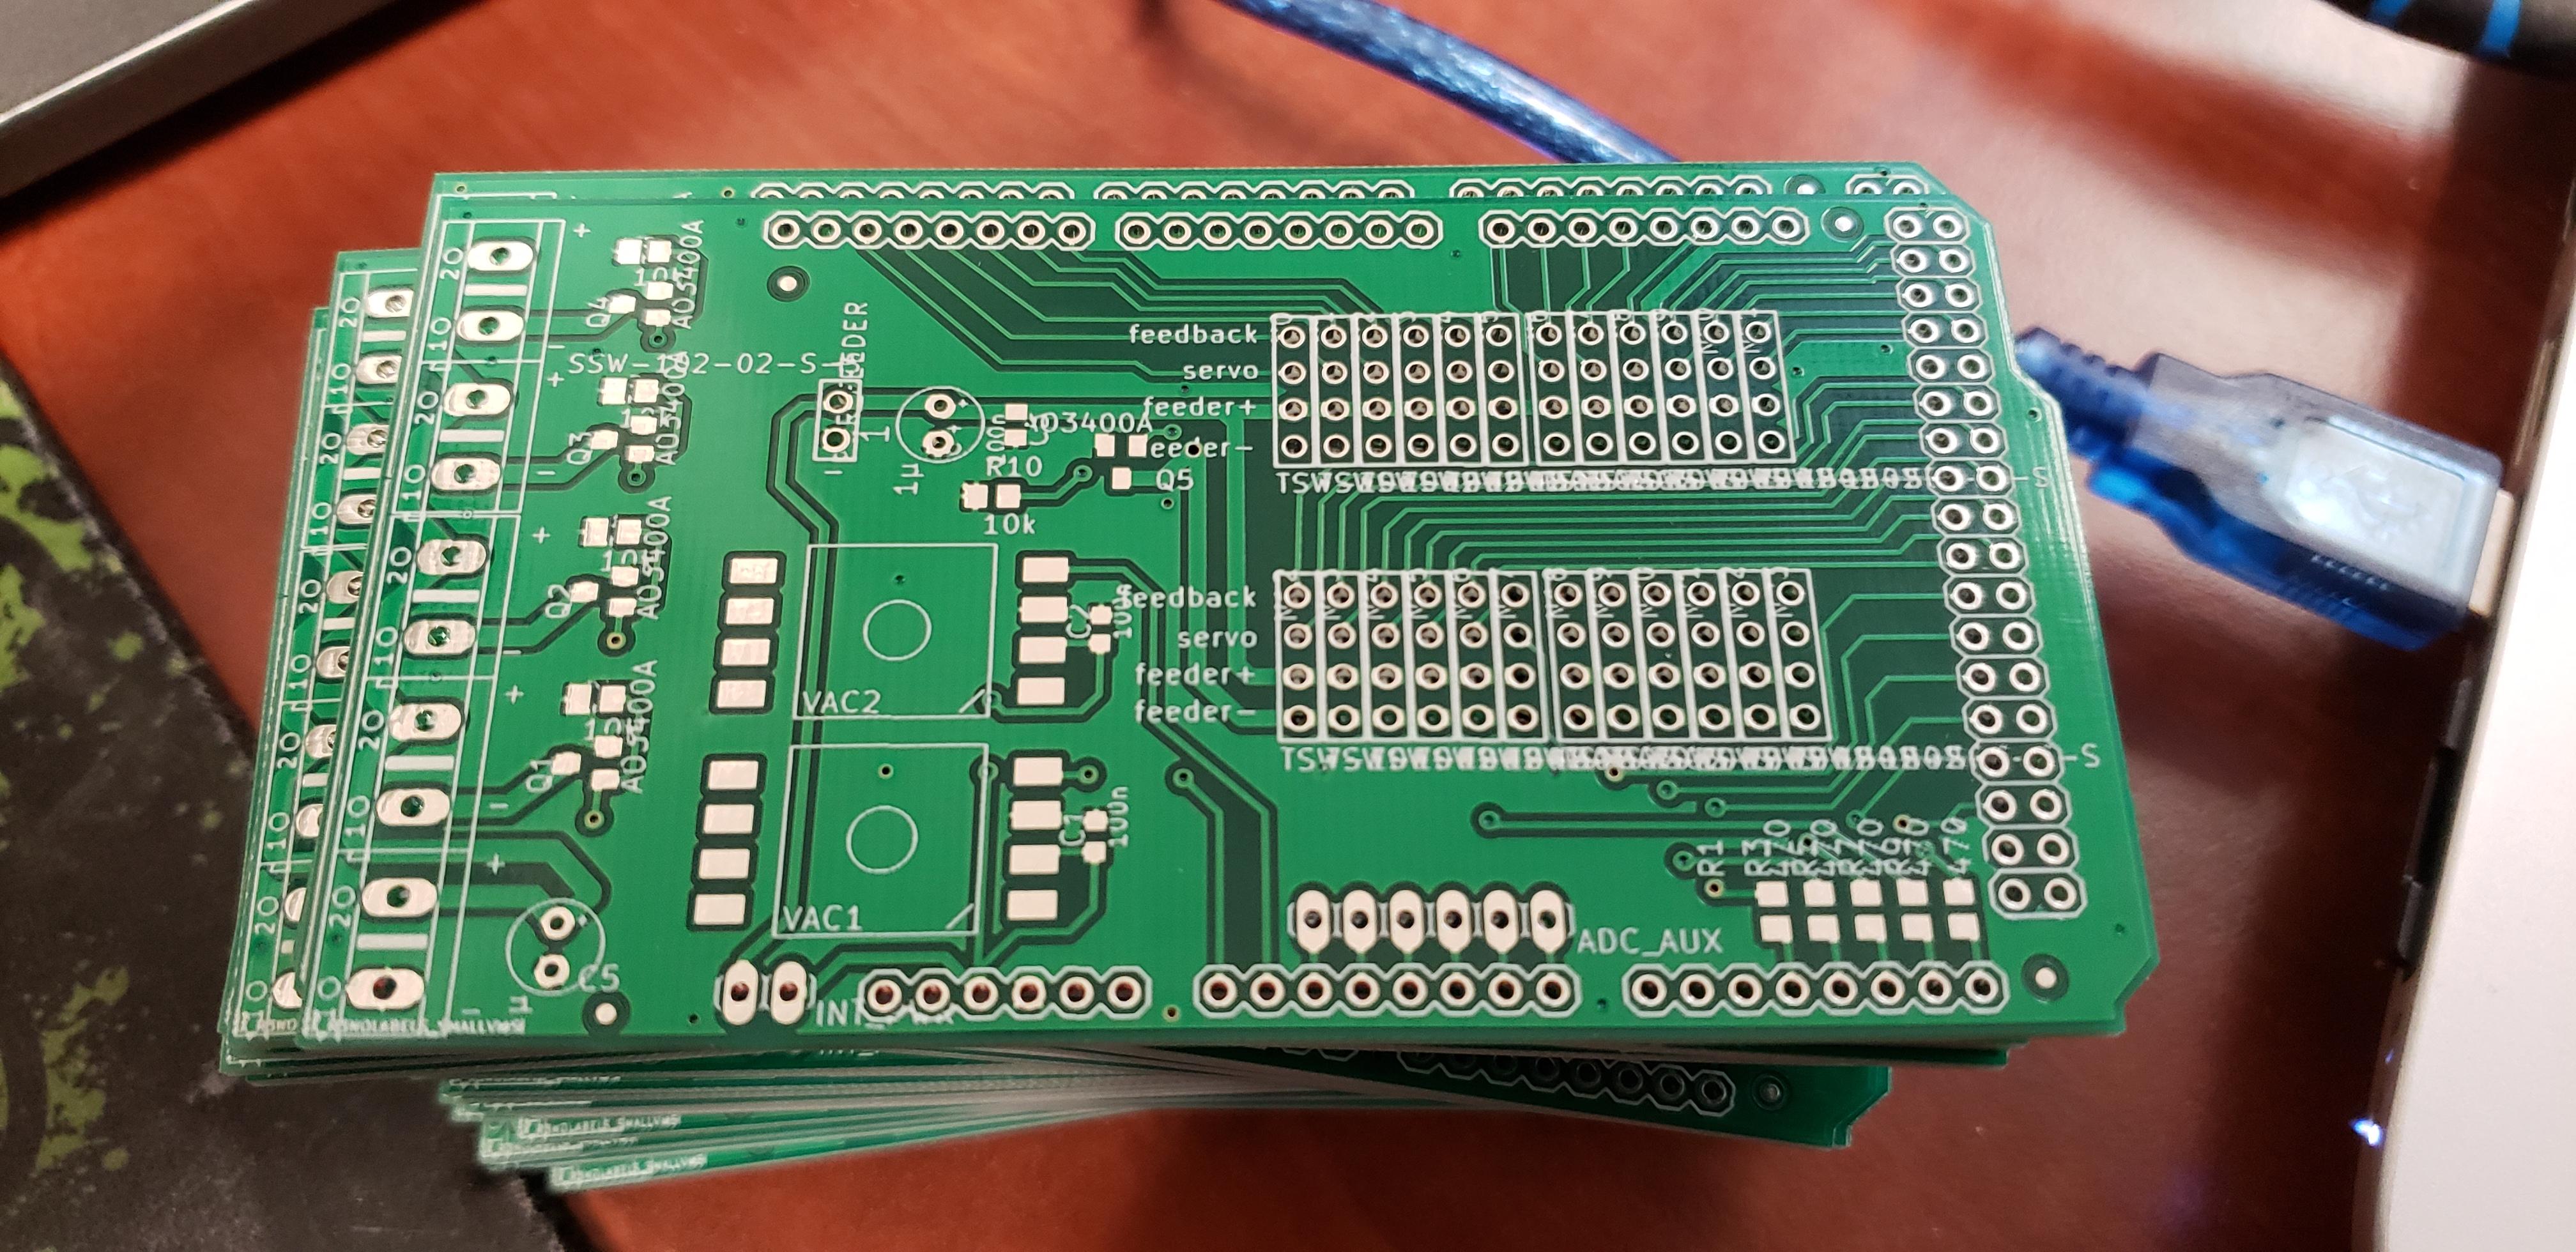
the feeder has it's own controller. it's independent from the motion controller. in openpnp you add just another subdriver to the g-code-driver for the feeder as described here: https://docs.mgrl.de/maschine:pickandplace:feeder:0816feeder:controller#setup_controller_in_openpnp
Michael G.
you mean the models of the machine itself? these are available as stp-file here: https://docs.mgrl.de/maschine:pickandplace
tecfacet

You received this message because you are subscribed to a topic in the Google Groups "OpenPnP" group.
To unsubscribe from this topic, visit https://groups.google.com/d/topic/openpnp/0ZMk60x51tw/unsubscribe.
To unsubscribe from this group and all its topics, send an email to openpnp+u...@googlegroups.com.

Paul Jones
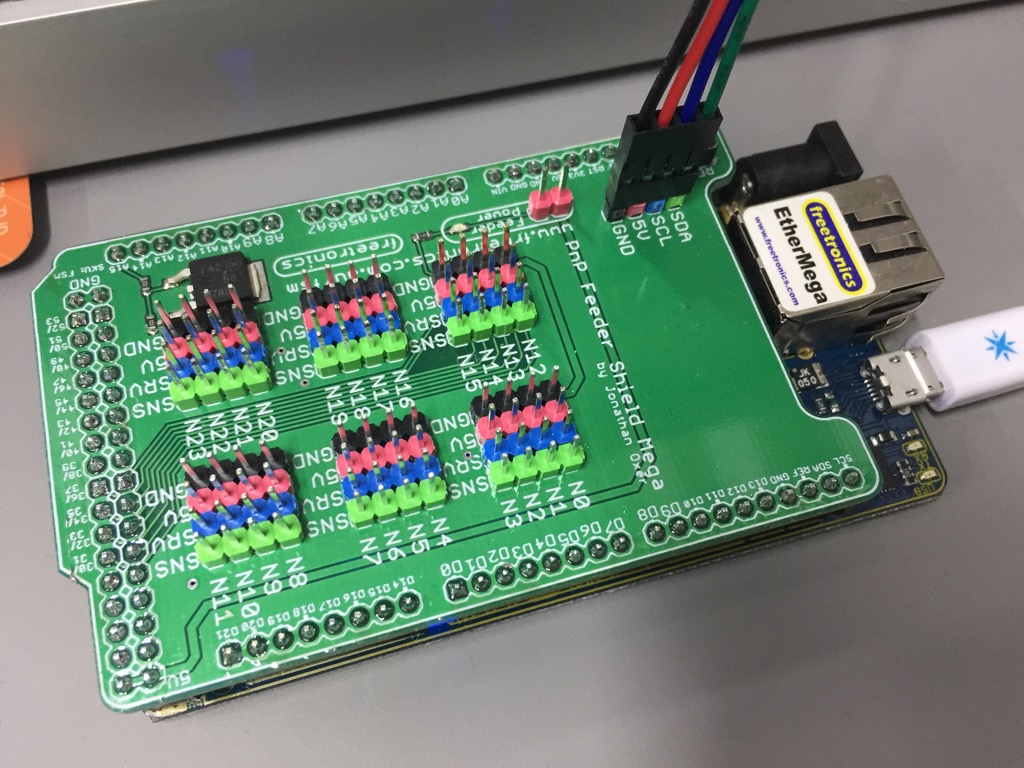
FYI I’ve been working on a connection board which would take the place of your native shield to remove the need for the feeder pcb and associated tedious/bulky wiring. It’s basically a 35cm ruler with 25 x 6 pin headers evenly spread along it’s length, connected to I2C IO expanders and PWM drivers. This way the servos can plug in directly without cutting and soldering the cables, and the switch and motor only need to be soldered on one end.
I’ll likely connected the I2C to the RPI I use for network cameras as it’s right next to it on my machine, and then I can operate the feeders via ethernet (my whole machine uses ethernet).
I’ll put the kicad files on github when I’m finished.
Ps. Your mechanical design for the feeders is genius!
Paul.
--
You received this message because you are subscribed to the Google Groups "OpenPnP" group.
To unsubscribe from this group and stop receiving emails from it, send an email to openpnp+u...@googlegroups.com.
To post to this group, send email to ope...@googlegroups.com.
To view this discussion on the web visit https://groups.google.com/d/msgid/openpnp/efad9f0a-6316-4d22-aba6-8587598f4fbf%40googlegroups.com.
Michael G.

Marek T.
Patricio Cohen Sch.
--
You received this message because you are subscribed to a topic in the Google Groups "OpenPnP" group.
To unsubscribe from this topic, visit https://groups.google.com/d/topic/openpnp/0ZMk60x51tw/unsubscribe.
To unsubscribe from this group and all its topics, send an email to openpnp+unsubscribe@googlegroups.com.
To post to this group, send email to ope...@googlegroups.com.

Peter Betz
On Friday, December 15, 2017 at 10:09:44 PM UTC-8, Anthony Webb wrote:
My 11 year old son has offered to put together an easy bag of parts for those of you who are looking for an easy way out to source the exact parts needed at one stop :) I'll try and post up a tindie link in the coming days. Additionally, we have the spreadsheet with the amazon links and such for the different parts we bought that I think will be coming to Michaels instructions as well.
Parenting win!! Getting him involved with business is awesome and this would be such a great way to do it! I'm still trying to get my feeder working (close now!) but I would certainly buy parts for a few of these ones if there was a parts kit to buy.
Peter.

Jason von Nieda
--
You received this message because you are subscribed to the Google Groups "OpenPnP" group.
To unsubscribe from this group and stop receiving emails from it, send an email to openpnp+u...@googlegroups.com.
To post to this group, send email to ope...@googlegroups.com.
To view this discussion on the web visit https://groups.google.com/d/msgid/openpnp/c6ec4a94-bb15-4a47-9bf9-acc34ed210e8%40googlegroups.com.

yu yf


Michael Gröne
--
You received this message because you are subscribed to a topic in the Google Groups "OpenPnP" group.
To unsubscribe from this topic, visit https://groups.google.com/d/topic/openpnp/0ZMk60x51tw/unsubscribe.
To unsubscribe from this group and all its topics, send an email to openpnp+u...@googlegroups.com.
To post to this group, send email to ope...@googlegroups.com.
To view this discussion on the web visit https://groups.google.com/d/msgid/openpnp/8bc64d38-bfb9-4603-a6b5-6ed60407564f%40googlegroups.com.
Michael G.
<command head-mountable-id="ACT1501948780856" type="ACTUATOR_READ_COMMAND">
<text><![CDATA[M144 A0]]></text>
</command>
<command head-mountable-id="ACT1501948802499" type="ACTUATOR_READ_COMMAND">
<text><![CDATA[M144 A1]]></text>
</command>
<command head-mountable-id="ACT1501948802499" type="ACTUATOR_READ_REGEX">
<text><![CDATA[value:(?<Value>-?\d+\.{0,1}\d*)]]></text>
</command>
<command head-mountable-id="ACT1501948780856" type="ACTUATOR_READ_REGEX">
<text><![CDATA[value:(?<Value>-?\d+\.{0,1}\d*)]]></text>
</command>
yu yf

Marius Liebenberg
Michael G.
Anthony Webb
Can someone tell me what is the size of the extrusion that the feeder fits unto. I cannot open the design in Solidworks as mine is very old.
--
You received this message because you are subscribed to the Google Groups "OpenPnP" group.
To unsubscribe from this group and stop receiving emails from it, send an email to openpnp+unsubscribe@googlegroups.com.
To post to this group, send email to ope...@googlegroups.com.
To view this discussion on the web visit https://groups.google.com/d/msgid/openpnp/ab568b28-b840-45e2-bf56-7842de0f9787%40googlegroups.com.
Marius Liebenberg
Marius Liebenberg
On Wednesday, April 18, 2018 at 8:22:20 PM UTC+2, Anthony Webb wrote:
I believe 20x40 works
On Wed, Apr 18, 2018 at 8:40 AM, Marius Liebenberg <mdlca...@gmail.com> wrote:
Can someone tell me what is the size of the extrusion that the feeder fits unto. I cannot open the design in Solidworks as mine is very old.
--
You received this message because you are subscribed to the Google Groups "OpenPnP" group.
To unsubscribe from this group and stop receiving emails from it, send an email to openpnp+u...@googlegroups.com.
To post to this group, send email to ope...@googlegroups.com.
Michael G.
It has some functions to analyze the model and it is very intuitive to use...
Marius Liebenberg

Олександр Киричук
Michael G.
Олександр Киричук
понеділок, 23 липня 2018 р. 16:23:46 UTC+3 користувач Michael G. написав:

X Y
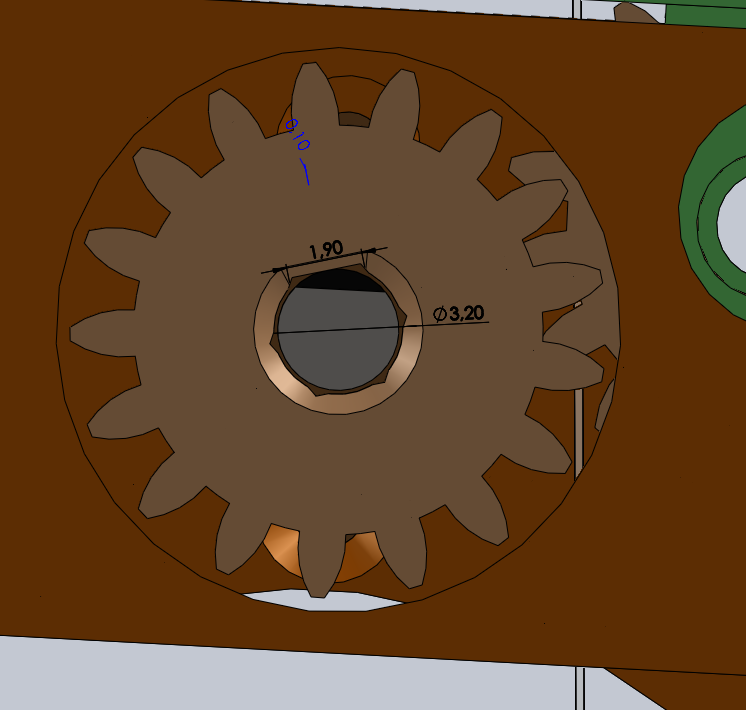
Hello, I want to make one for testing it, but am not sure how the cover tape removal unit is assembled.
Is there a pin needed to hold the ball bearing? How is the gear wheel fixed to the motor axis?
Michael G.
Marius Liebenberg
X Y
I got the STEP-files and they open up in Inventor 2013 perfectly. So I can tweak it now. Great work!
This is a really amazing design, and I am sure it will work perfect. Thank you very much for your work, this will solve a huge problem for me.

Jonathan Oxer
--
You received this message because you are subscribed to the Google Groups "OpenPnP" group.
To unsubscribe from this group and stop receiving emails from it, send an email to openpnp+u...@googlegroups.com.
To post to this group, send email to ope...@googlegroups.com.
To view this discussion on the web visit https://groups.google.com/d/msgid/openpnp/44c495fb-a51a-407a-a259-73d91e120cb3%40googlegroups.com.
Michael G.

Олег Перевышин
понедельник, 27 августа 2018 г., 14:53:28 UTC+3 пользователь Jonathan Oxer написал:
X Y
Michael G.
X Y
Marius Liebenberg
X Y
Marius Liebenberg
Jonathan Oxer
--
You received this message because you are subscribed to the Google Groups "OpenPnP" group.
To unsubscribe from this group and stop receiving emails from it, send an email to openpnp+u...@googlegroups.com.
To post to this group, send email to ope...@googlegroups.com.
To view this discussion on the web visit https://groups.google.com/d/msgid/openpnp/0c7e3156-e2b1-4adf-8257-63403a3f57ef%40googlegroups.com.

carl....@alumni.ubc.ca
carl....@alumni.ubc.ca
Robert Waters

Friedrich Mäckle
Paul Jones
I’m in the process of building a few of these myself. I changed all the screws to be M3 as that’s what I’ve got in stock, and I use a thread tap to thread all the holes. I even run the tap through the microswitch so I don’t need any nuts.
Paul.
--
You received this message because you are subscribed to the Google Groups "OpenPnP" group.
To unsubscribe from this group and stop receiving emails from it, send an email to
openpnp+u...@googlegroups.com.
To post to this group, send email to ope...@googlegroups.com.
To view this discussion on the web visit https://groups.google.com/d/msgid/openpnp/6ff3c04c-8b8e-47c9-905a-60f7aa8f480b%40googlegroups.com.
Marius Liebenberg
Michael G.
Michael G.

Balázs buglyó
Balázs buglyó
I know that this is not a right place , but can you share you PNP machine design files too?
Your head is very cool and i would like to build my own pnp too.
I found a step file on the blog, but i think it is not the same as you show on your blog.
The head jpg and the step file are different.
Thanks for your help
Balazs
Michael G.
Balázs buglyó
https://docs.mgrl.de/_detail/maschine:pickandplace:openpnp-head.png?id=maschine%3Apickandplace and the https://docs.mgrl.de/_media/maschine:pickandplace:full-machine-assembly.zip is not the same.
I think this is not a problem just i want to get every info about it. The gear is different.
By the way your design is really cool i have many parts at home i plan to build a pnp.
If i have question about the vacum system can i ask it on an another forum or private ? :)