"Getting the band back together"
195 views
Skip to first unread message

bob cousins
May 3, 2014, 1:01:09 PM5/3/14
to ope...@googlegroups.com
So I was about to strip down my Rapman 3.1 and reuse parts for other projects, but then I thought the frame is basically ok apart from extruder and acrylic failing, shame to not make use of it.
I've put in Chylld's corners (awesome design work!), replacement rod clamps, a new X carriage I am working on for Greg's extruder and E3D hotend. I think I can find replacement parts for all but a few acrylic pieces, notably the cross-braces and X motor plate.
I will also change endstop positions, and put in a 200x300 24V heatbed. I have already switched to Arduino Due + RAMPS-FD.
I might put together all the RP parts as a collection somewhere, I'll call it "Rapman RP edition".
I also might change the X carriage to use 8mm rods with 50mm spacing, maybe lighter and faster, and compatible with standard Reprap carriages.
If anyone has the STL or DXF for the X motor plate (left side) which is part 10024 I think, I would love a copy!

Unfold
May 6, 2014, 9:36:38 PM5/6/14
to ope...@googlegroups.com
Bob
Great job!
I have the entire rapman (except extruder) as a 3d OBJ file. I ripped it from the 3d PDF years ago using 3D Ripper DX. Those rips are never 1:1, they lack proper scaling and are skewed so I had to de-skew and rescale to original dimensions based on measurements on the machine. So don't expect 100% perfection, but I managed to get it extremely close to what it should be and so far haven't found any issues when using this. You can use the 3d files to extract 2d profiles for laser cutting.
The file is on my dropbox, I can't attach it here, too big: https://www.dropbox.com/s/6llv047lshetq0g/rapman.obj.zip
Please not that the content of that PDF is most certainly copyright protected as it was never released under some CC or open source license... (Although it should have been). So it's your own responsibility if you use it.
Happy Rapman reviving!
Best,
Dries (unfold)
Dries (unfold)
bob cousins
May 7, 2014, 6:34:36 PM5/7/14
to ope...@googlegroups.com
Thanks! That will help a lot!
I am planning to recreate parts using OpenSCAD, that's as far as my 3D skills go :) Ideally I would like to have a GPL licensed work, but some of the upgrades I am using are CC-BY-NC.
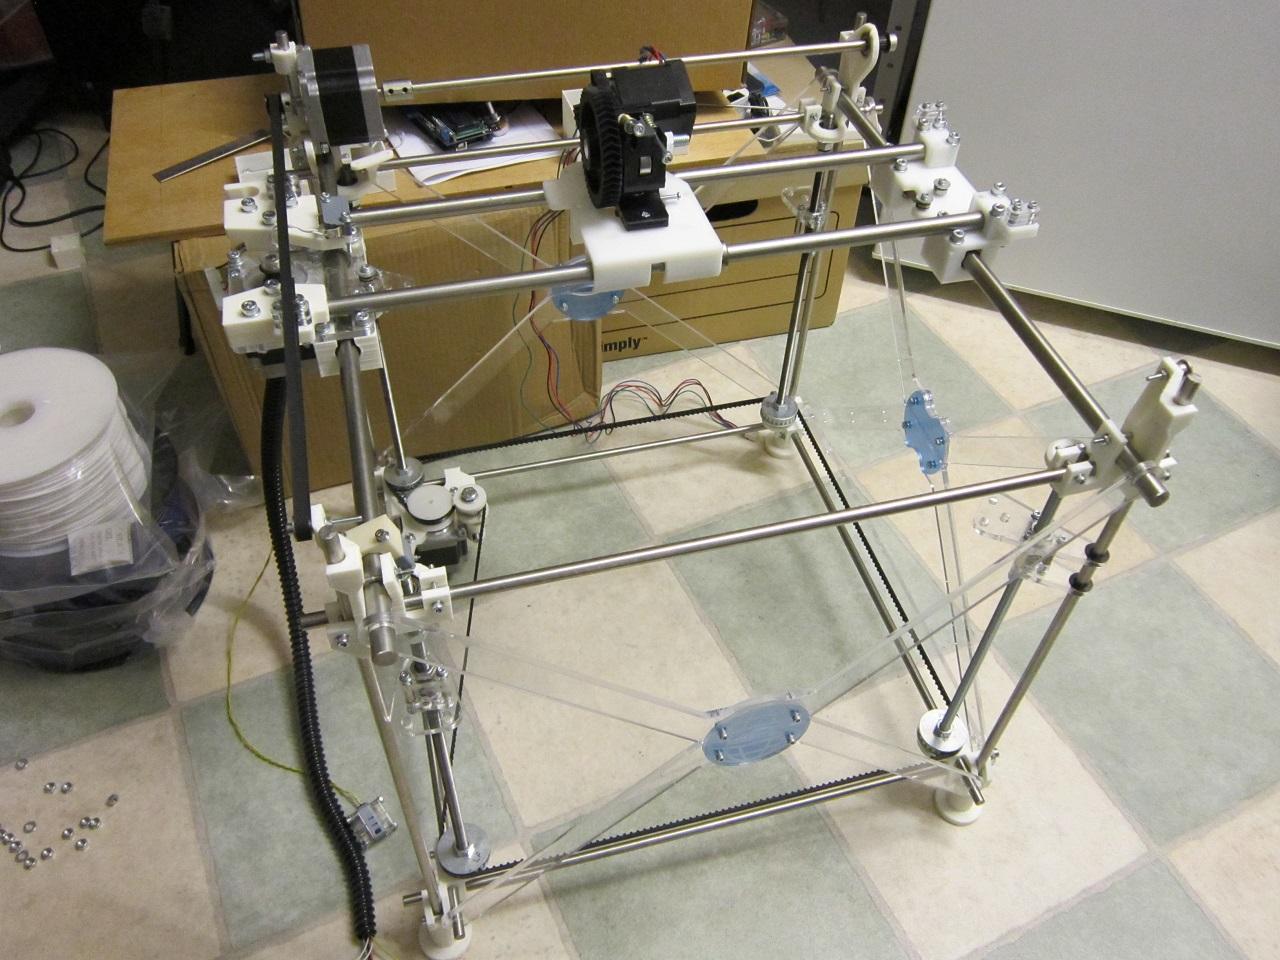
Here is a pic of progress to date. I've got Chylld corners in, all new X idler assembly, a prototype X carriage for Gregs extruder with E3D hot end. Next up is the X motor end, followed by bed some anti wobble bed corners. After that there are some minor acrylic parts to replace, not sure what to do with the cross braces. Maybe use threaded rod like original Darwin? I might experiment with dowel.
I made some minor mods for the Gregs extruder, but it's about 98% compatible with Rapman original. I am going to decouple the end stops from each other, so the axes can home independently.
Then I will look at putting 8mm rods with 50mm spacing compatible with Mendels, and swap in a Nema17 mounted horizontally for the X axis, the idea being to reduce moving mass and maximize build volume.
Alternatively, I will look at replacing the whole XY with H bot or CoreXY type mechanism.
I am planning to recreate parts using OpenSCAD, that's as far as my 3D skills go :) Ideally I would like to have a GPL licensed work, but some of the upgrades I am using are CC-BY-NC.
Here is a pic of progress to date. I've got Chylld corners in, all new X idler assembly, a prototype X carriage for Gregs extruder with E3D hot end. Next up is the X motor end, followed by bed some anti wobble bed corners. After that there are some minor acrylic parts to replace, not sure what to do with the cross braces. Maybe use threaded rod like original Darwin? I might experiment with dowel.
I made some minor mods for the Gregs extruder, but it's about 98% compatible with Rapman original. I am going to decouple the end stops from each other, so the axes can home independently.
Then I will look at putting 8mm rods with 50mm spacing compatible with Mendels, and swap in a Nema17 mounted horizontally for the X axis, the idea being to reduce moving mass and maximize build volume.
Alternatively, I will look at replacing the whole XY with H bot or CoreXY type mechanism.
Unfold
Jun 23, 2014, 6:01:26 AM6/23/14
to ope...@googlegroups.com
You're welcome Bob, hope it helped.
Would be fantastic if you could upload the whole kit somewhere and document your process in the future.
My original Rapman 3 has threaded rod diagonals, much more sturdy but was also a lot more work to install. All the horizontal smooth rods where longer though, this to have enough protruding rod-end to attach the diagonal threaded rods to. If you want a picture or documentation of that, let me know. I think that just square sheets of wood/acrylic are a good alternative, also very sturdy and square + they create a more closed box that stays warm.
bob cousins
Jun 23, 2014, 6:42:15 AM6/23/14
to ope...@googlegroups.com
I made a start on documenting, I got a bit bogged down with anti-wobble bed holders, haven't made much progress since :) I think I will leave that for now and come back to it later.
I've now got my #2 printer fairly well dialled in, so I should be better able to print new parts.
I like the idea of enclosing the printer, I will look into that.
I've now got my #2 printer fairly well dialled in, so I should be better able to print new parts.
I like the idea of enclosing the printer, I will look into that.
Unfold
Jun 23, 2014, 9:03:34 AM6/23/14
to ope...@googlegroups.com
You document online somewhere?
bob cousins
Jun 23, 2014, 9:08:51 AM6/23/14
to ope...@googlegroups.com
Not yet!
Reply all
Reply to author
Forward
0 new messages