
christop...@dalkiafroidsolutions.com
Bonjour,
Je revient vers vous sur le meme sujet : https://groups.google.com/d/msgid/mitappinventortest/fb1a9325-5472-4644-b41f-17eb72ceb718%40googlegroups.com
sauf que maintenant je souhaiterai faire une recherche via Google sheets avec des chiffre et des lettre ex :"MAT-00272".
Es que cela est possible ? Si oui pourriez vous m'aider à le realiser ?
Merci de l'aide précieuse que vous pouvais m'apporter.
Christophe.

TimAI2
TimAI2
Chrisss59
Pas de soucis pour toute ces question ces déjà gentil de votre par de m'aider à réaliser ce projet
En faite je ne vais pas le saisir mais le scanner en QR Code.
Pour l'ID il va en avoir beaucoup je serais pas vous dire le nombres pour le moment.
Ensuite pour la table il y aura a peut près 10000 enregistrement.
Merci pour votre aide.
TimAI2
TimAI2
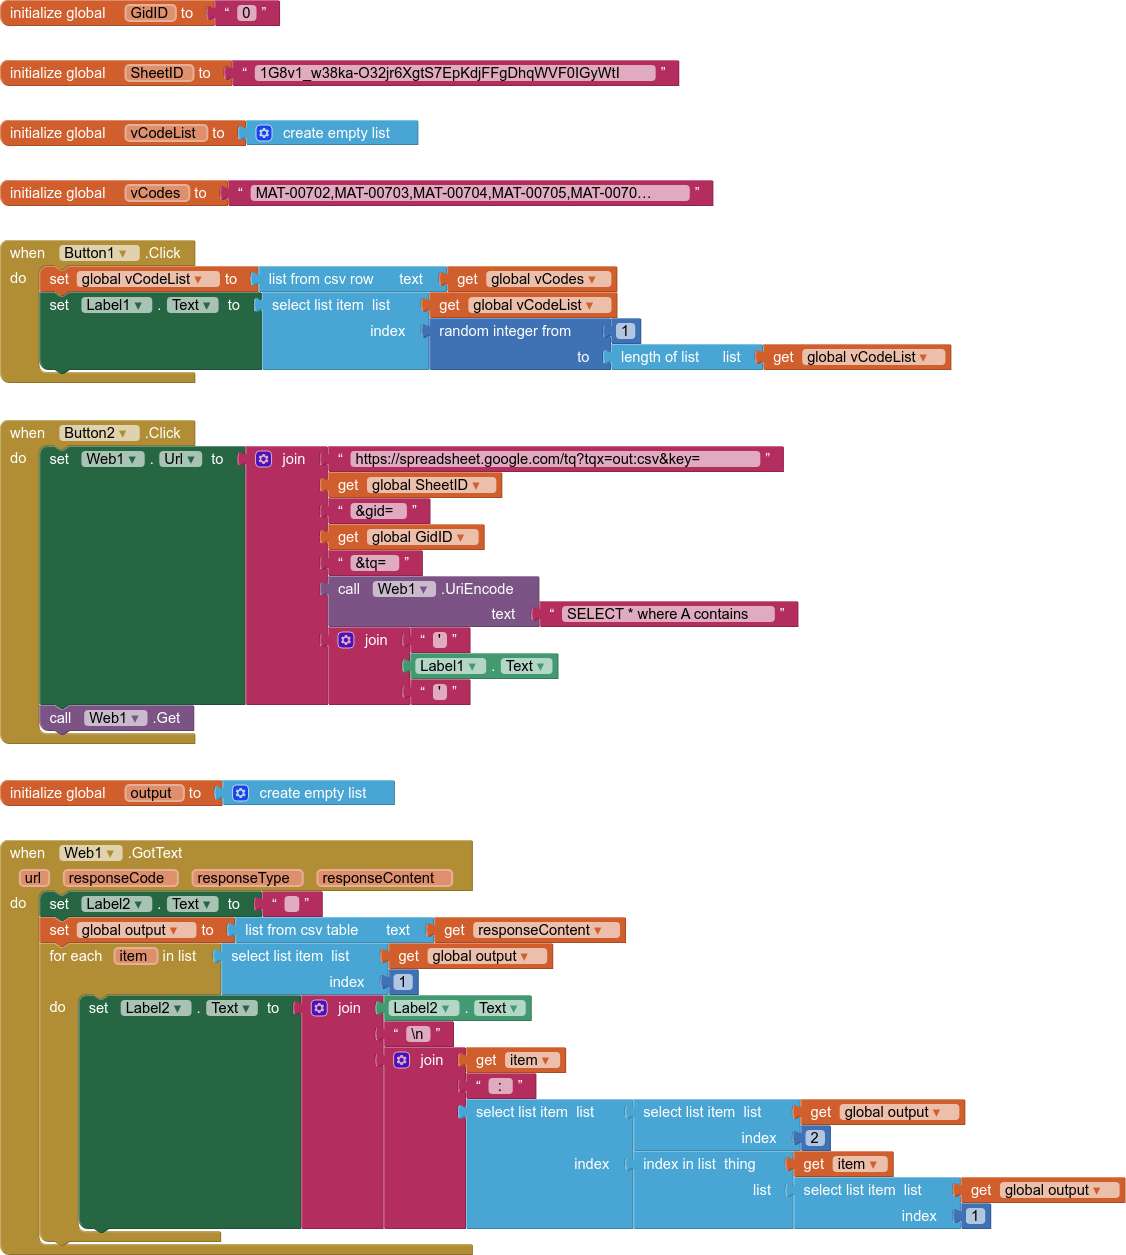
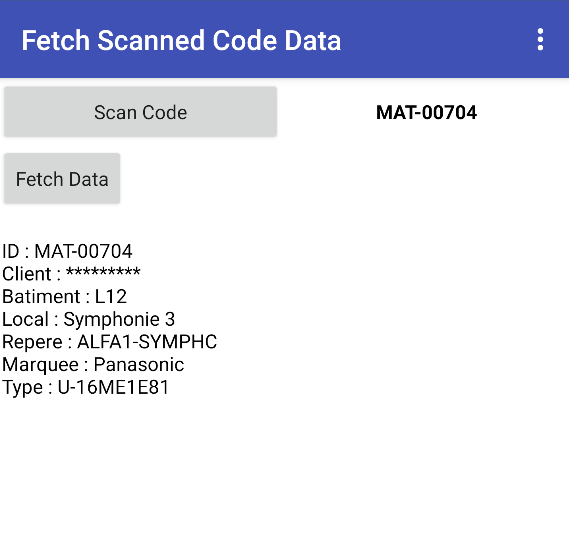
The "Scan Code" button is replicating a scanned code, using a list of the codes in the spreadsheet
You would replace this with blocks and components for your scanner, and feed the result to the Web1.Get
Chrisss59
Par contre c'est pas grave si l'ID je ne les pas a l'avance sur la table car il rentre au fur à mesure via un formulaire odk!!
Aussi pour créer un code avec feuille privé il faut créer une page connexion Google via mail?
Si c'est le cas je vais devoir partagé la feuille de données au utilisateurs ??
Je ne voudrais pas la partagé au utilisateurs.
Merci beaucoup pour votre aide
TimAI2
Chrisss59
Je vais rester sur le partage de lien.
Par contre au niveau du vCode je suis obligé de renseigné toute mes ID, car dans ma table je ne l'ai pas toute car elle vont ce remplir automatiquement via un formulaire Odk collect.
TimAI2
Chrisss59
Une autre petite question:
Au début de mon apk j'ai créer un Mot de passe à 4 chiffre qui vient récupéré le nom du client via une table google, ensuite maintenant je voudrais que chaque client est seulement accès à leurs lignes quand il vont scanner l'ID
Ex: si client A est qu'il scanne un ID d'un client B ça ne fonctionne pas.
Pensez vous que c'est possible ??
Car je voudrais travaillez sur une seul table est pas sur plusieurs avec des tri sur chaque table.
Merci.
https://docs.google.com/spreadsheets/d/1e6mCYnFhypTmmHWgY9PiYYx9HSsv_0J4W1ZU_ll3ACw/edit?usp=drivesdk
TimAI2
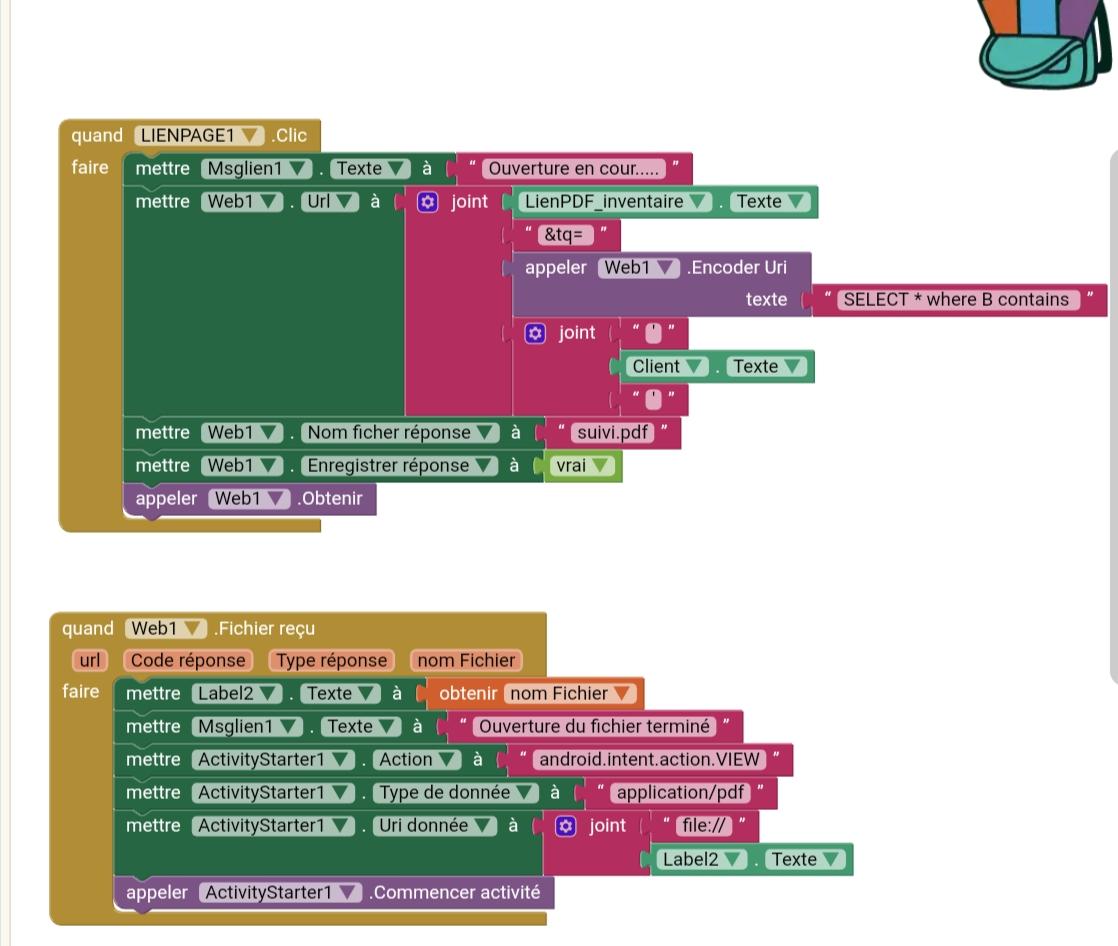
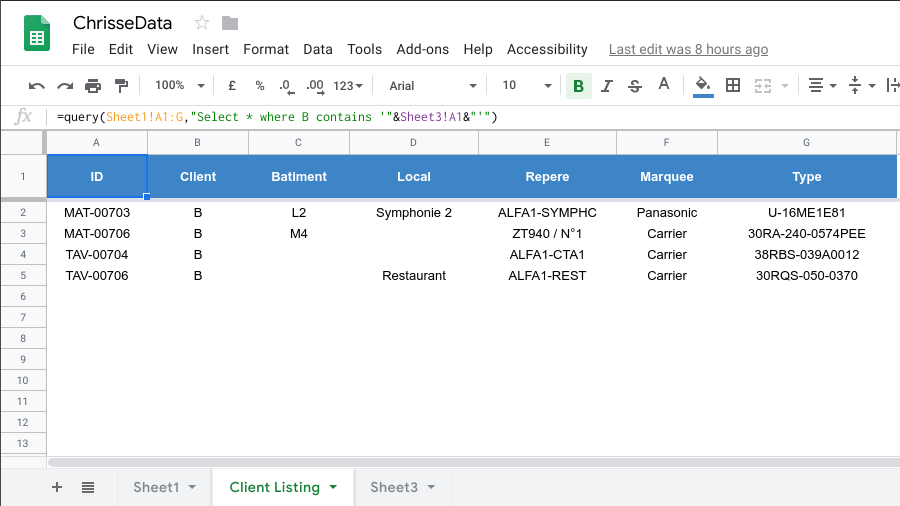
SELECT * where A contains 'textbox1.text' and B contains 'textbox2.text'Chrisss59
Je vous remercie ça fonctionne,
Pourriez vous me dire comment intégrer le code ci dessous a votre code.
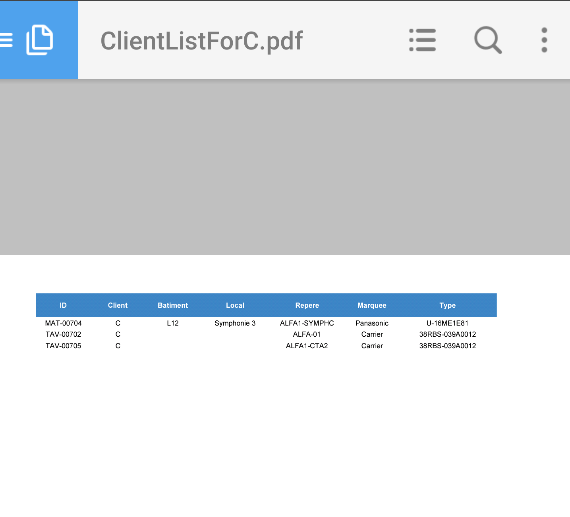
Je voudrais pouvoir télécharger un fichier PDF en triant ma colonne B
Ex télécharger un PDF juste avec le client "A"
LienPDF_inventaire :
https://docs.google.com/spreadsheets/d/1e6mCYnFhypTmmHWgY9PiYYx9HSsv_0J4W1ZU_ll3ACw/export?format=pdf&size=0&fzr=true&portrait=false&gid=0
Merci
TimAI2
- Create a google web app with some google apps scripting that generates the data required on the sheet in a new tab and then returns the download
- Download the data to the app, then use Chrome and a javascript library to generate a pdf table (there is a free extension available for this, but your clients would need to have Chrome installed on their devices)
Chrisss59
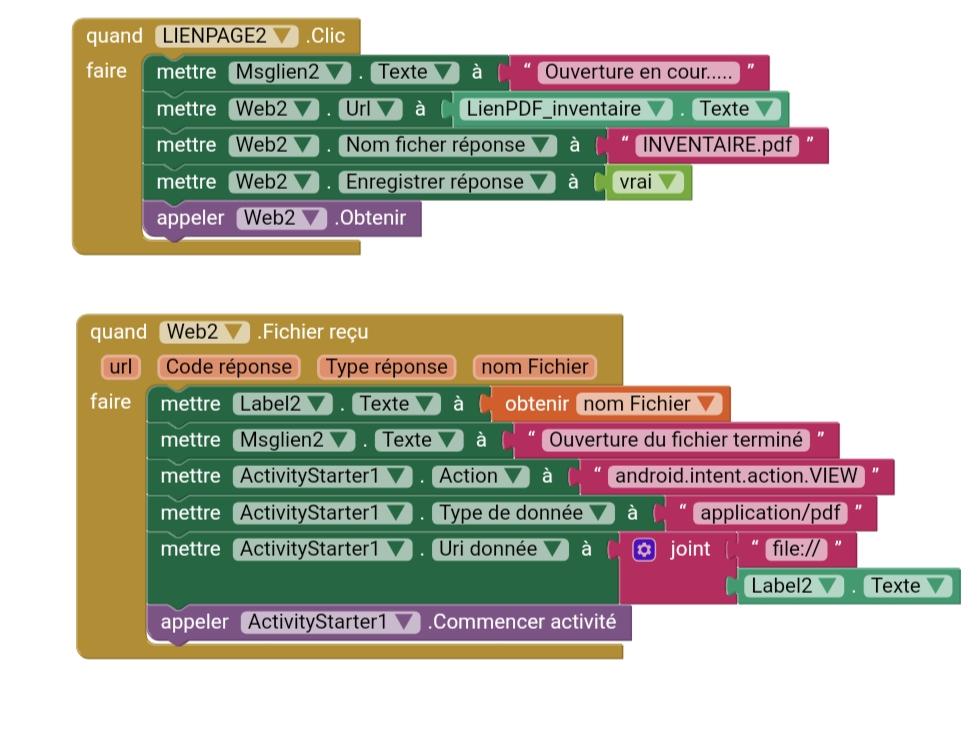
Je voudrais faire le même principe, croyais vous que c'est possible ?
Si oui pourriez vous m'aider ?
Dans le code le "LienPDF_inventaire" correspond a ça :
https://docs.google.com/spreadsheets/d/1e6mCYnFhypTmmHWgY9PiYYx9HSsv_0J4W1ZU_ll3ACw/export?format=pdf&size=0&fzr=true&portrait=false&gid=0
Merci
TimAI2
Chrisss59
Je préfèrerais sur l'application.
TimAI2
TimAI2
TimAI2
- Set up spreadsheet
- Write web app
- Blocks and components for app
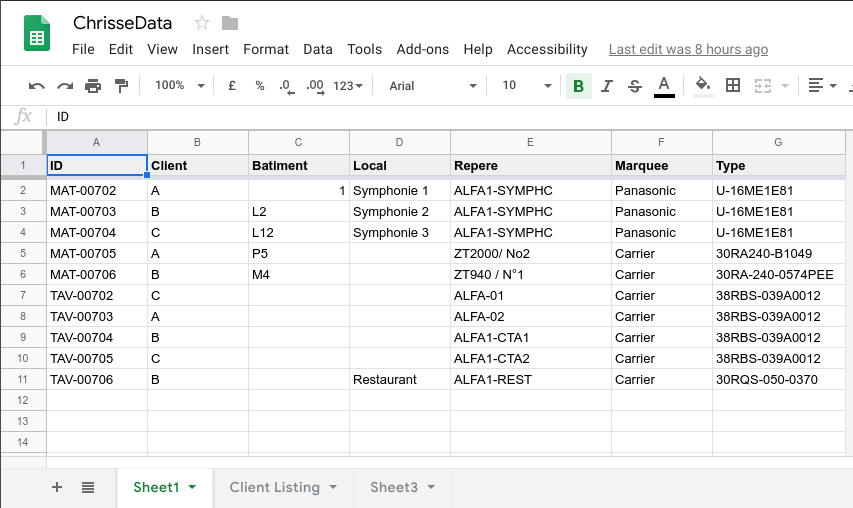
This way you have full and easy control over the layout and format of the output sheet. I have frozen row 1, this ensures that this row is displayed on all pages.
You will see the query equation (copy this to your spreadsheet) pulls in the value from Sheet3 to carry out the query. It is this value we will update using the webapp
2. Web App
Use a bound script (so go to Tools > Script Editor to create a new project)
A variation on code used a lot for adding data to spreadsheets from AI2
Just needed to clear the contents of the sheet each time to ensure the value is replaced and not added
and to provide a responseContent of the query value back to the AI2 app
//for testing with PC browserfunction doGet(e) { var ss = SpreadsheetApp.getActive(); var sheet = ss.getSheets()[2]; var id = e.parameter.id ; sheet.clearContents(); sheet.appendRow([id]); var output = sheet.getDataRange().getDisplayValues(); return ContentService.createTextOutput(output[0][0]);}//for use with AI2function doPost(e) { var ss = SpreadsheetApp.getActive(); var sheet = ss.getSheets()[2]; var id = e.parameter.id ; sheet.clearContents(); sheet.appendRow([id]); var output = sheet.getDataRange().getDisplayValues(); return ContentService.createTextOutput(output[0][0]);}
The script needs to be saved as a web app, run by the owner of the spreadsheet, but accessible to "anyone, even anonymous". You will need to give permissions to run the script
Once published get the url to the script for your AI2 app
The reason for the doGet AND the doPost is because if you submit via a PC browser this preforms a "get", whilst in AI2 this performs a "post"
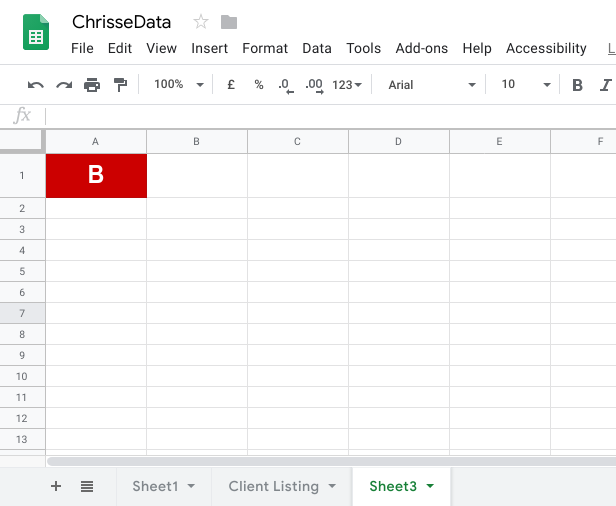
You can test in PC browser to make sure it works with a url like this:
This should return a white html page with a "B" on it, and if you look at the spreadsheet, Sheet3, you will see it has a "B" on it
Right, that is all the non AI2 work done!
3. AI2 App Components and Blocks
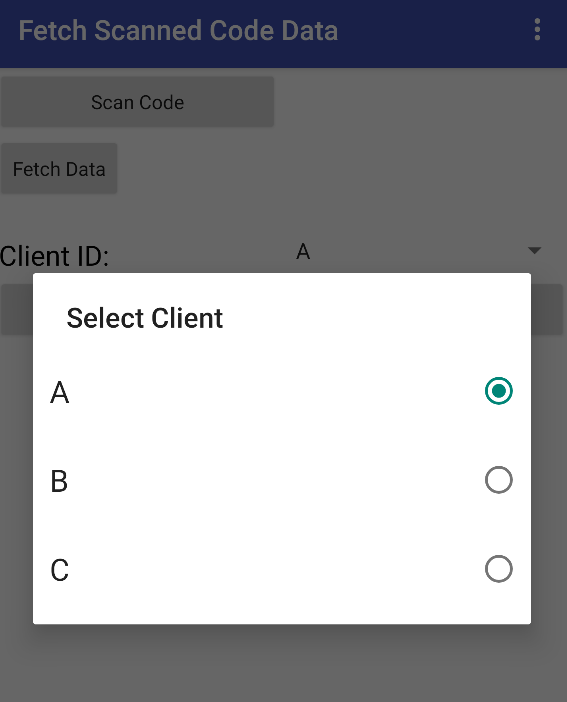
For my example, I used a spinner that contained the client IDs i.e. A,B,C
Your app will apply this ID based on their login to the app
For testing i simply select a client ID, then press the button to Download the PDF
We need to add two more web components, one for the call to the web app, the other to call the pdf
BLOCKS
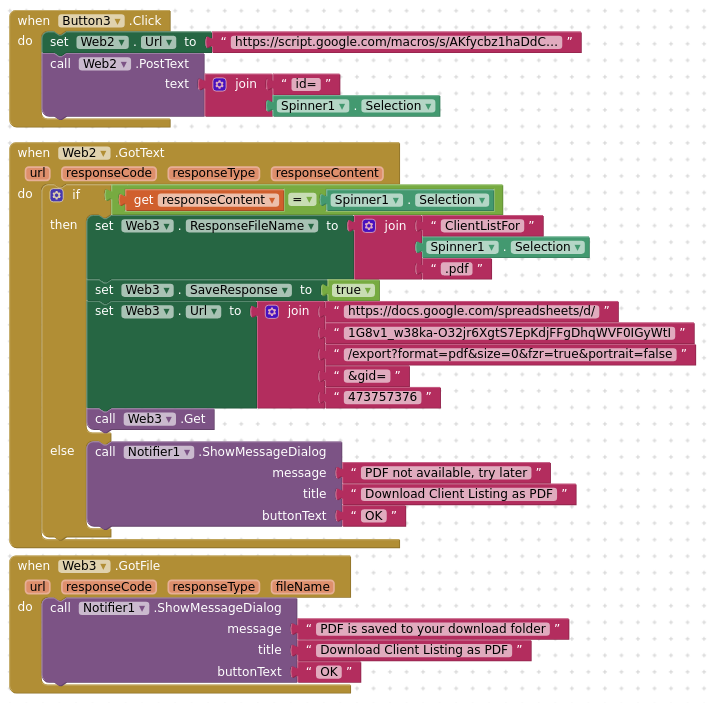
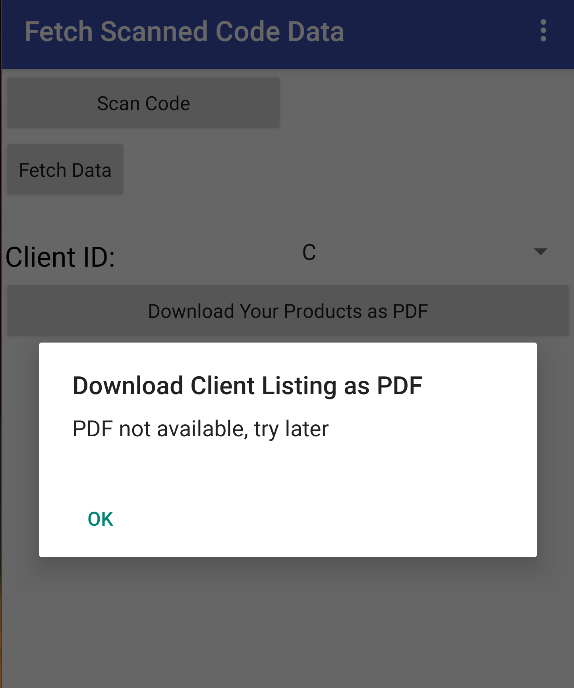
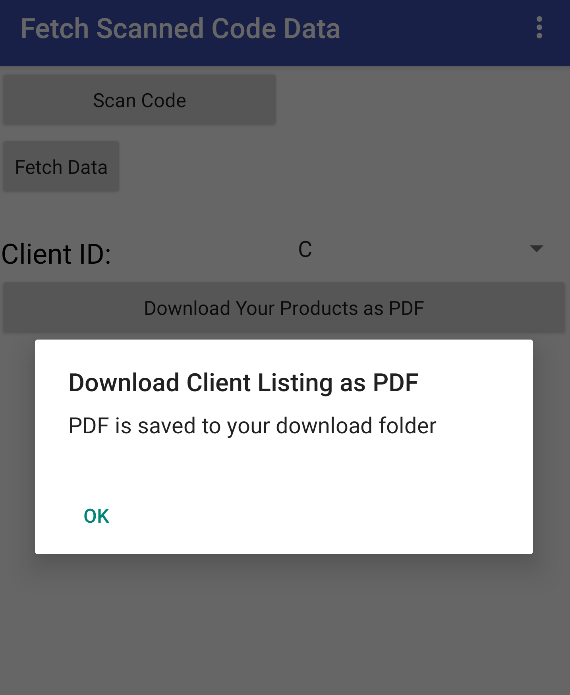
When the webapp has worked, it will report the value of the cell in Sheet3 e.g. A,B,C
and compare this with the value selected in the spinner.
If these are the same then it will initiate Web3 to download a pdf of the filtered results
if not, then to display a message
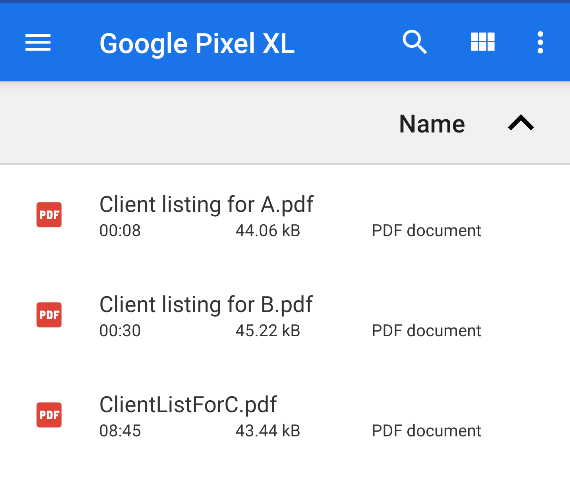
Files in this example as saving to the root folder of the sdcard
note: if the webResponseFileName is the same as a file that already exists, it will overwrite that file.
SCREENS
That is it ! Enjoy
Chrisss59
Je te remercie beaucoup pour ton aide est pour c'est code, c'est excellent.
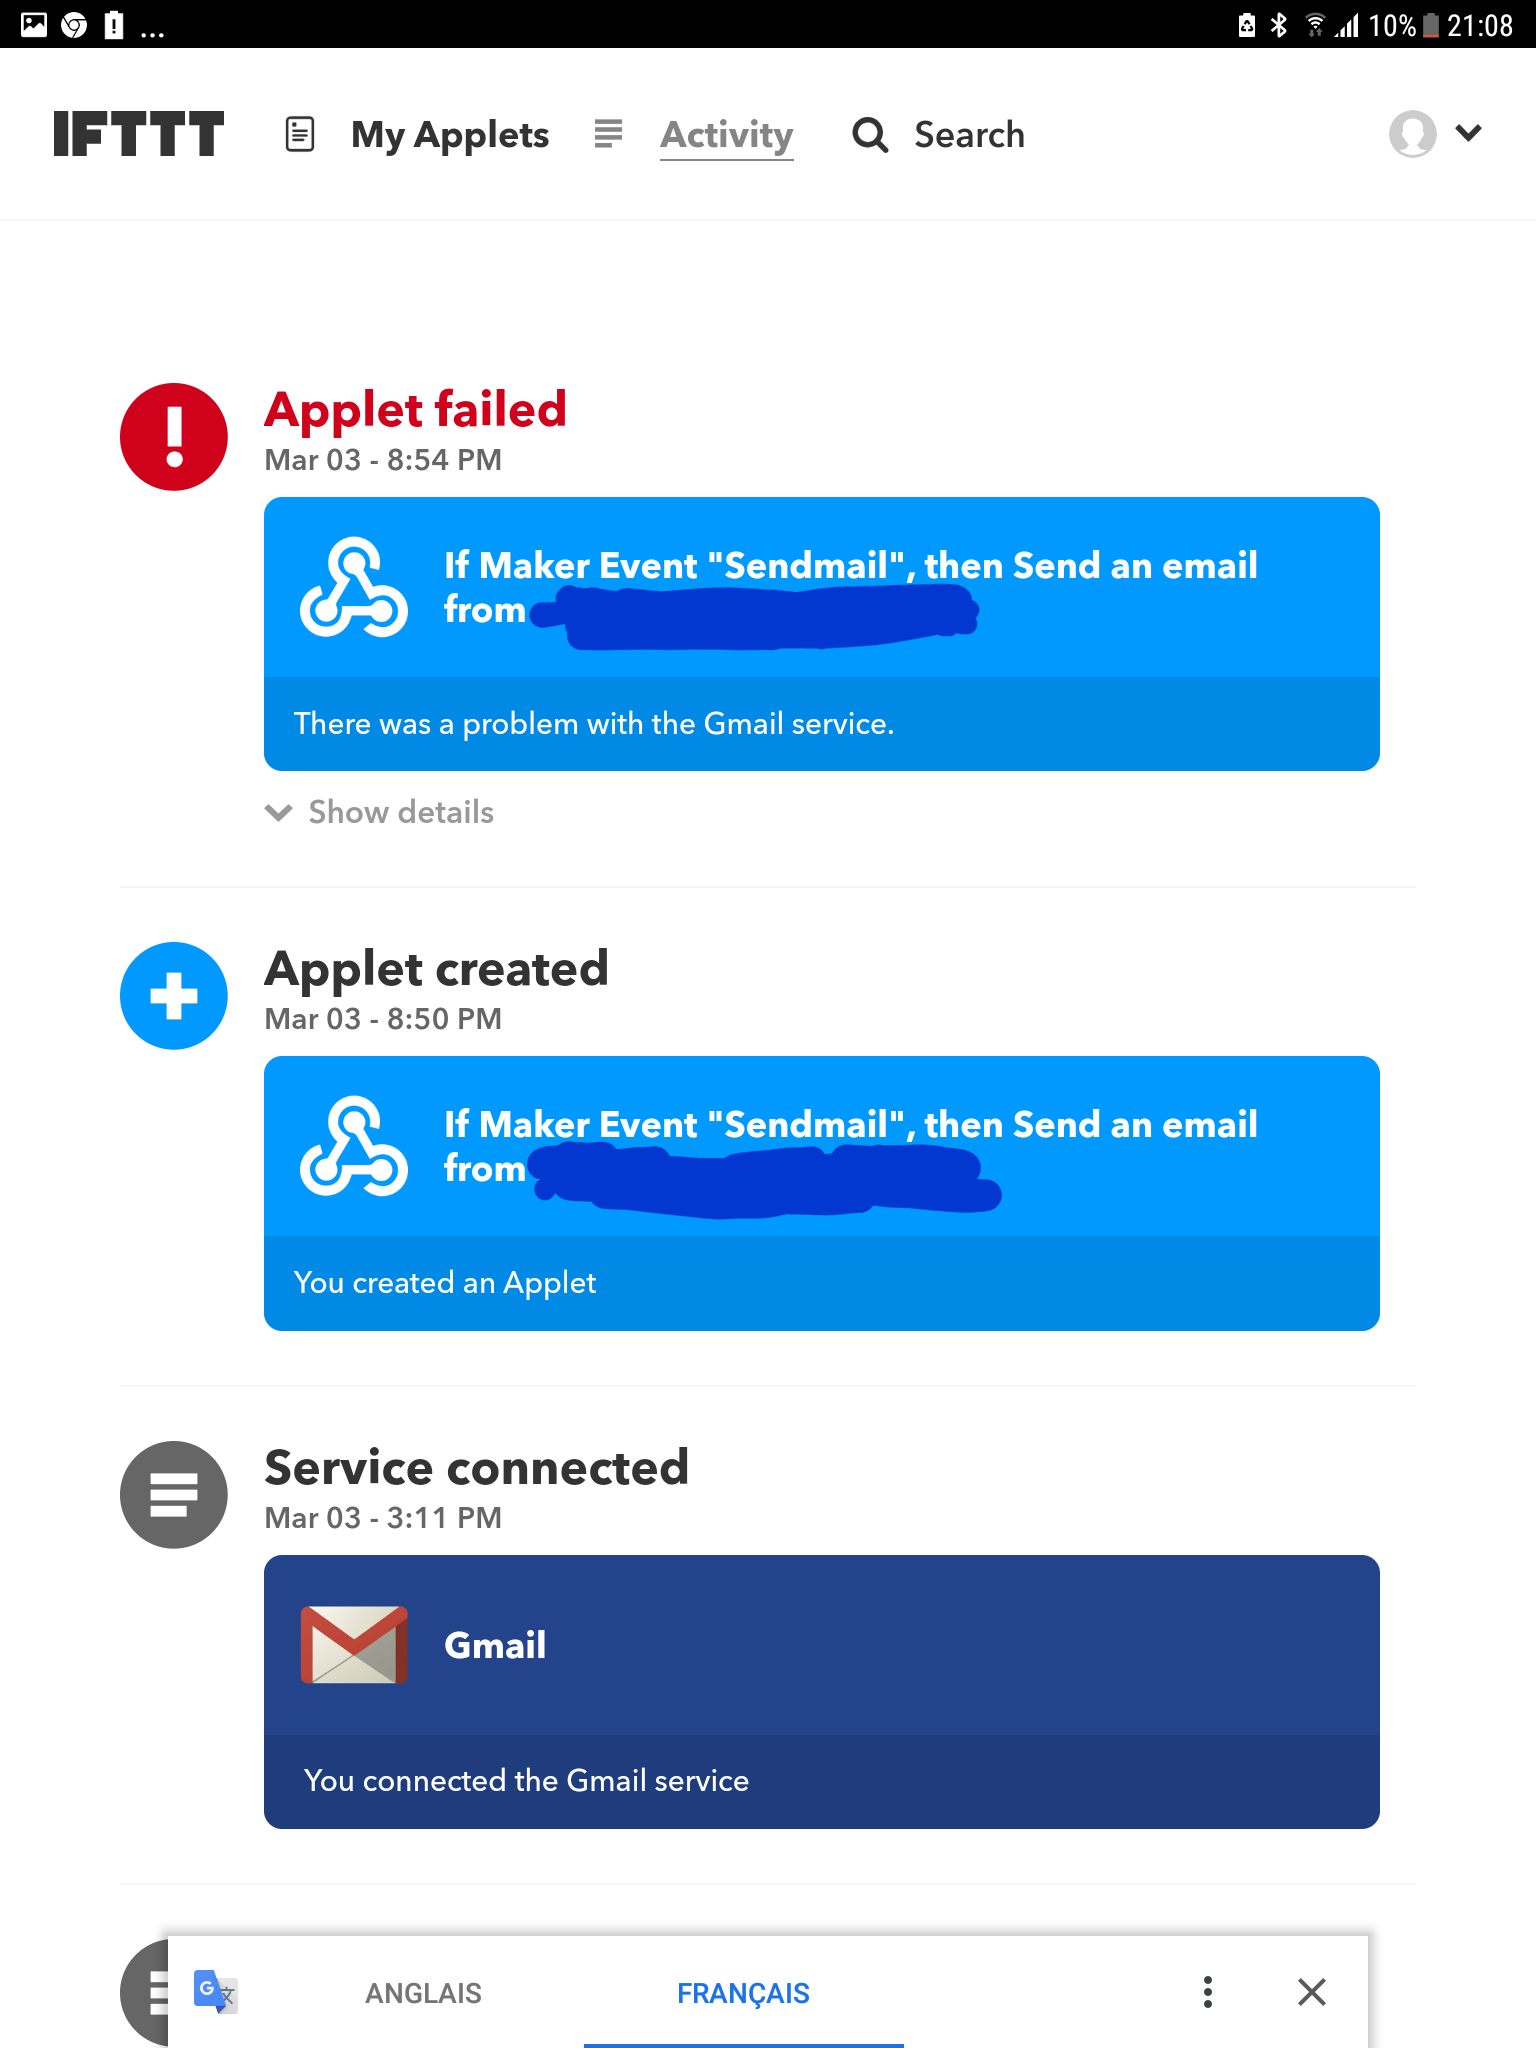
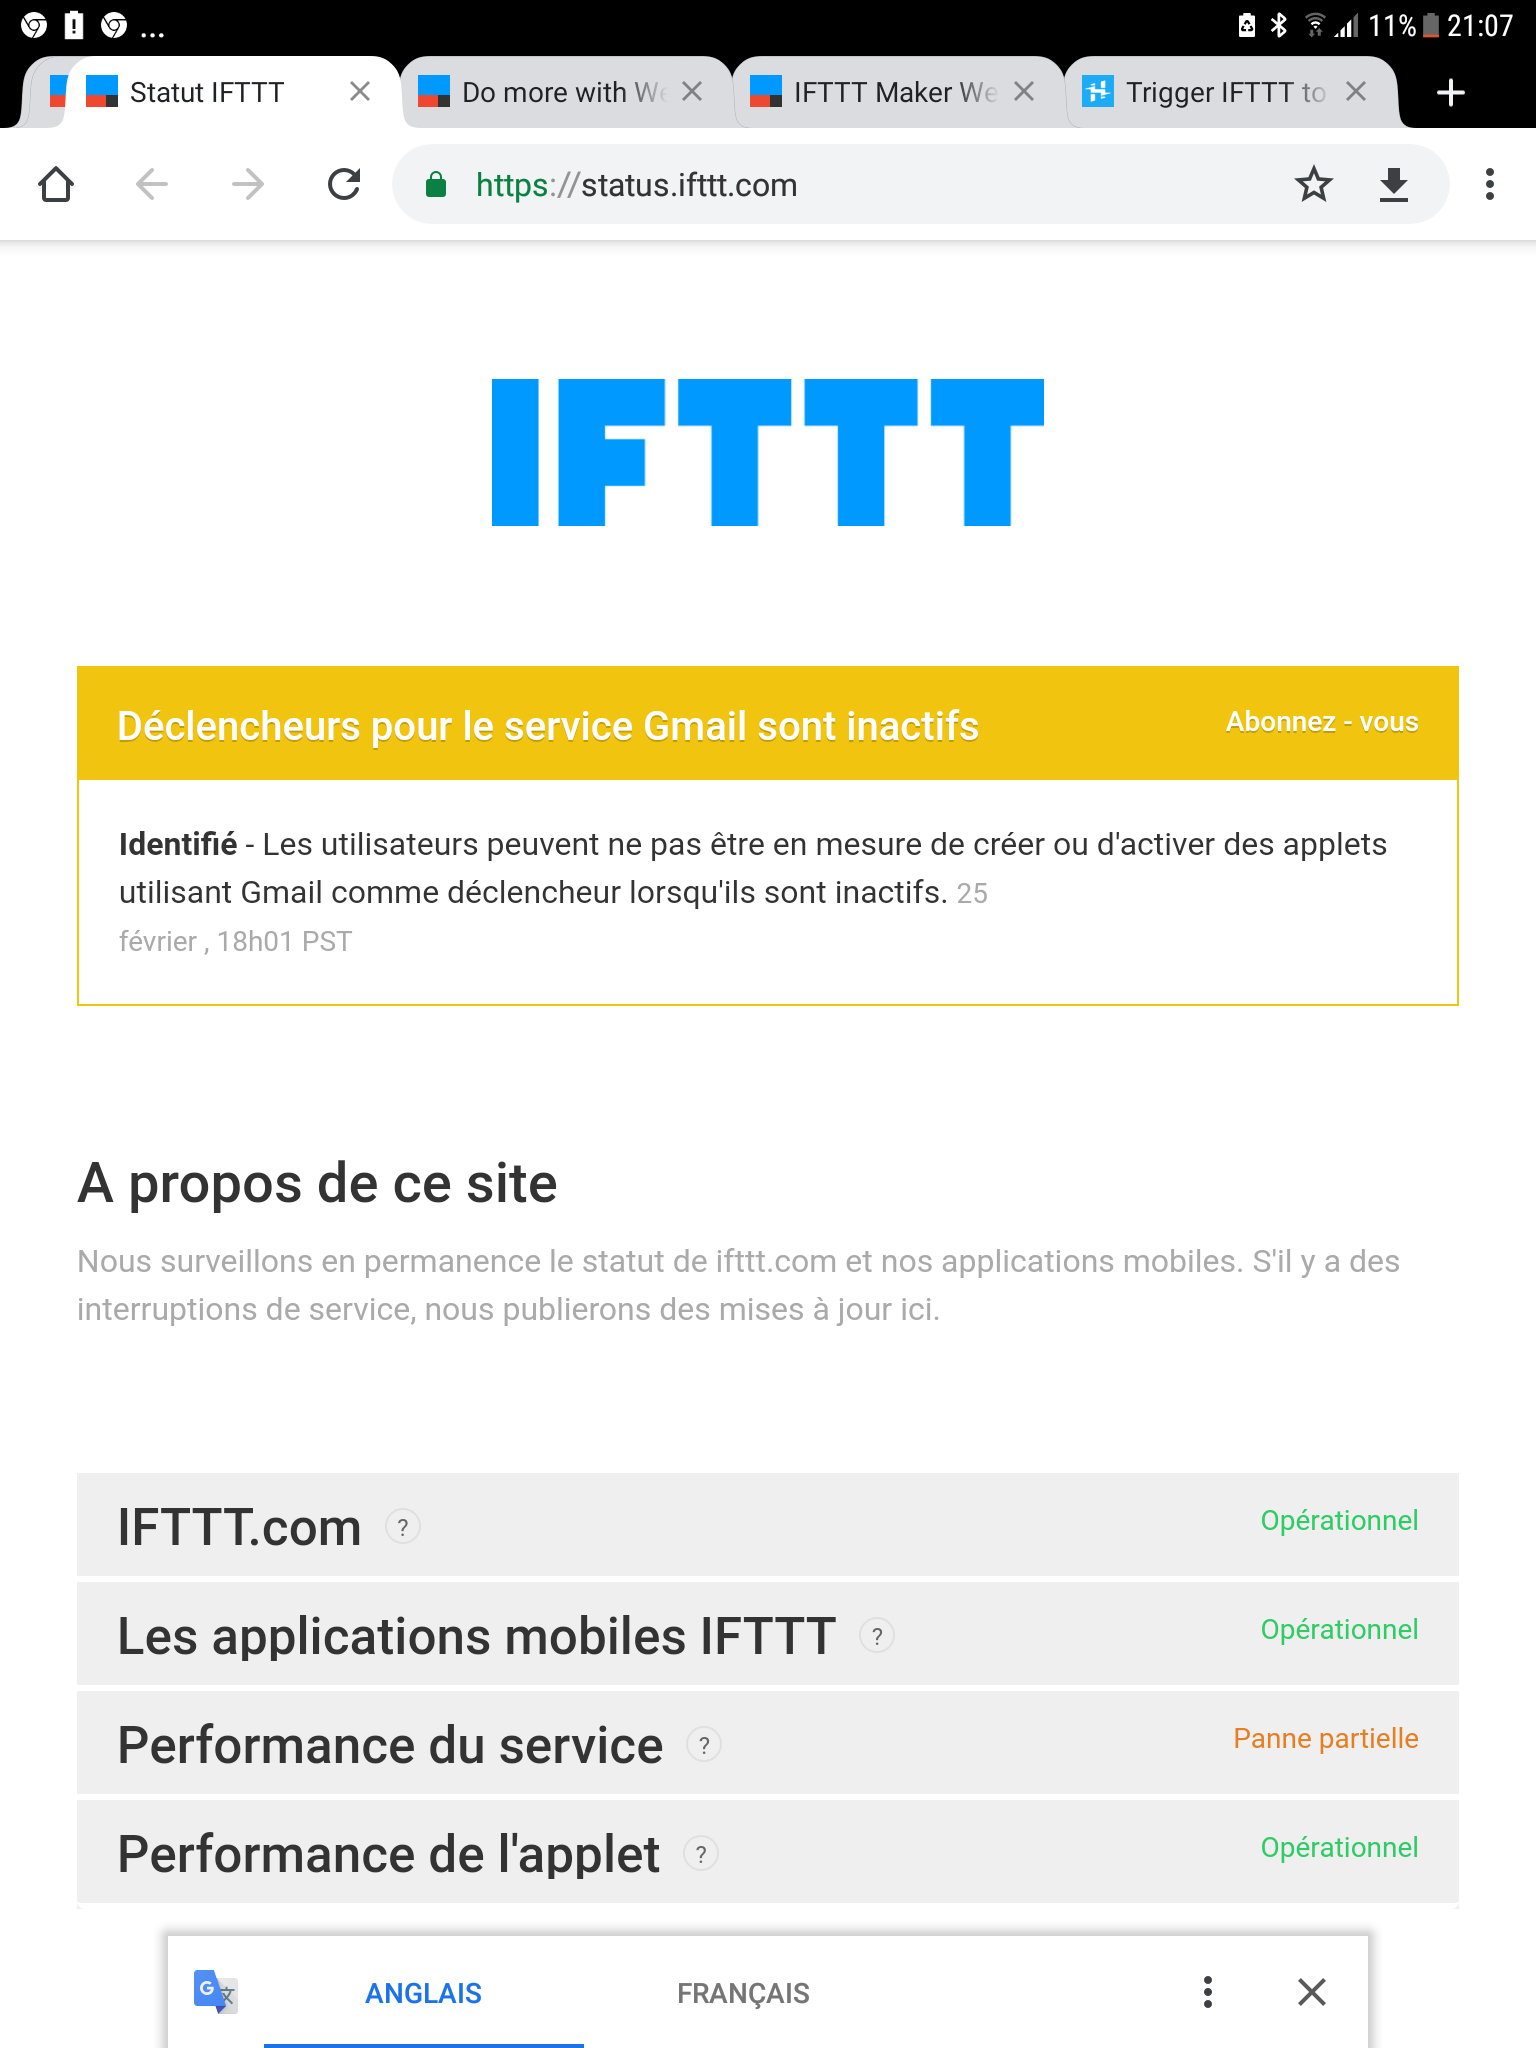
J'ai une autre petite question, j'ai essayé le tuto https://www.hackster.io/taifun/trigger-ifttt-to-send-an-email-using-app-inventor-9df505.
Mais je n'y arrive pas, problème provenant de Gmail voir capture écran.
Serais-tu me dire d'où vient le problème ?
Merci