acetone vapor smoothing for ABS
360 views
Skip to first unread message

Jin Choi
Mar 13, 2014, 12:37:48 PM3/13/14
to make...@googlegroups.com
This is a widely known technique and discussed in depth elsewhere, but I thought I'd report on my recent experiments on doing it on the M2.
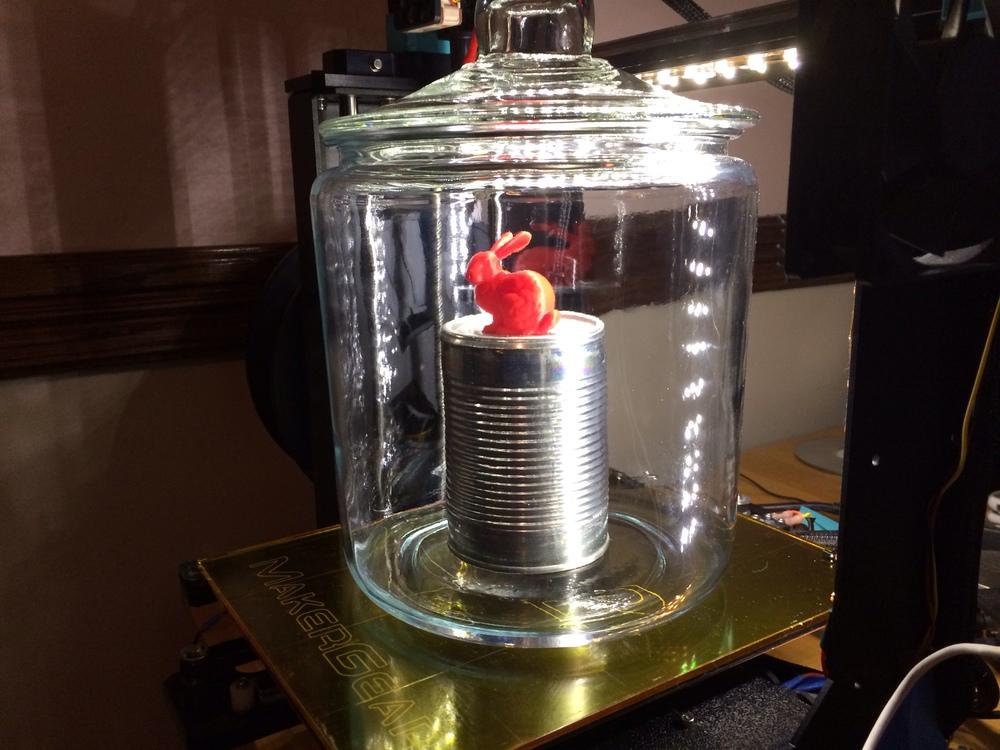
Having a temperature controlled heated bed is very handy. I bought a large glass jar with lid at Target for $7. Placed on heated bed, cranked the bed to 100C, and provided a platform for the print. Watch the vapor line rise up the jar and turn the heat down if it threatens to spill out, although I was having more trouble getting it to go high enough than the reverse. Watch the results carefully as you don't want to melt the print too much.
The hard part is finding a suitable platform of the proper height. The can in the setup photo is both too high, and the rimmed bottom surface collects condensate in a pool around the model, which is not good. Getting the object in and out is also tricky. You don't want to start with the object in the jar as the lower parts will get much more exposure to the vapor as it heats. I ended up reaching in, but I don't recommend it. The vapor is hot, though not enough to burn, and it's probably not good for your skin. In the future, I may try to rig a suspended platform in PLA that can be lowered and secured.
Needless to say, acetone vapor is highly flammable, not good for you, all information provided herein is for entertainment purposes only and is not intended as a model to be followed, yada yada.
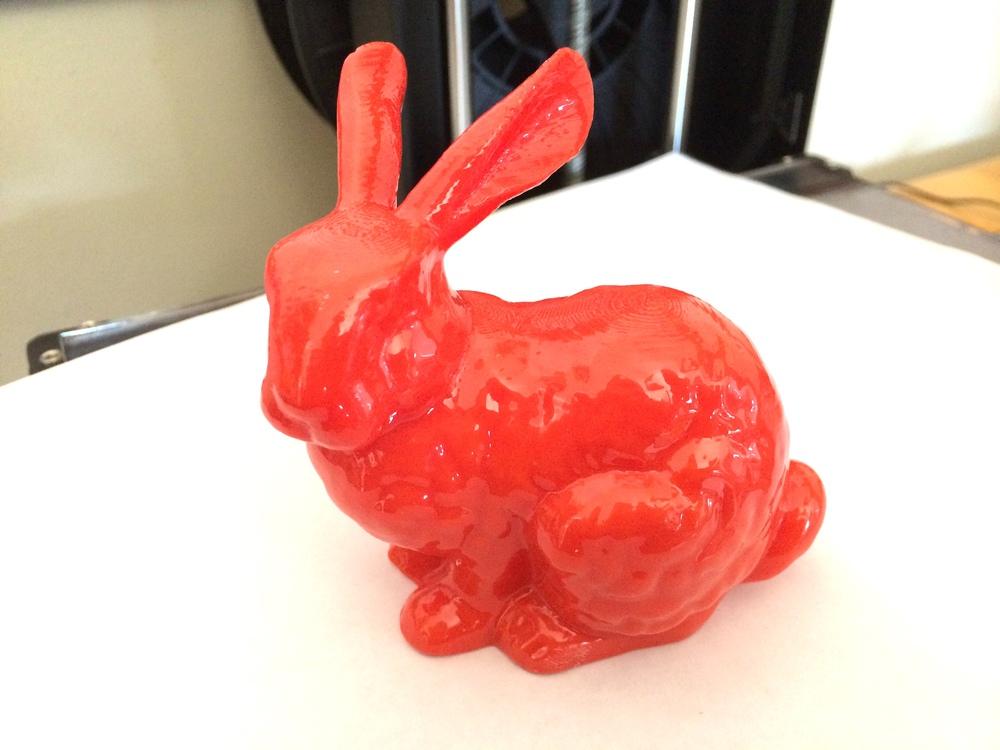
(The bunnies in the two photos are not the same object, the close up is full scale while the test bunny was half scale.)

A. Elias
Mar 13, 2014, 12:53:23 PM3/13/14
to make...@googlegroups.com
I wonder if a rigid mesh screen would work well with some wire you could slip over the opening and hold in place with the lid.
It would allow the vapor to rise up and you could adjust the height of the part to the acetone with the wires, kinda of like an elevator.
My thought isn't fully refined, but it could work.
ADam
Jin Choi
Mar 13, 2014, 1:13:44 PM3/13/14
to make...@googlegroups.com
That is along the lines of my thinking as well. I hadn't considered a mesh screen. You don't really want to vapor your base, though, as it might weld to the platform mesh.
My first inclination is to print a PLA platform with integrated tie points, then use some thread and clever rigging. I recently stumbled across the "picavet" self leveling platform concept used by aerial kite photographers, which seems intriguing but the model would have to go under the picavet for that to work.

Mark Gordon
Mar 13, 2014, 2:36:19 PM3/13/14
to make...@googlegroups.com
Couple of questions:
How long did it take for the jar to heat up and the vapor rise?
How long did you leave the item in the vapors?
Did the ABS model feel just as hard after the vapor bath as before, or is there a slight softening?
I have seen this in many demonstrations, specifically using an electric wok and a low, flat but slightly rounded dish. It turns out that the acetone all evaporated very soon after lifting the lid, so there was no clean up. (Garage or outside entalation needed.).
On Thursday, March 13, 2014 12:37:48 PM UTC-4, Jin Choi wrote:

jimc
Mar 13, 2014, 2:55:12 PM3/13/14
to make...@googlegroups.com
yes on just a safety not, acetone is crazy flammable and the vapors are explosive. this should really be done outside. i know someone who almost died in an acetone explosion on a boat. someone was just wiping down a spot in the engine room floor on a boat at the company i used to work for. someone walked on the boat and simply turned the engine room fans on. it was bad. please be careful with that stuff.
abs will return to its original hardness once all the acetone flashes off and works its way out of the plastic. it could take hours or maybe even day or two. all depends
Jin Choi
Mar 13, 2014, 3:16:02 PM3/13/14
to make...@googlegroups.com
On Thursday, March 13, 2014 2:36:19 PM UTC-4, Mark Gordon wrote:
Couple of questions:How long did it take for the jar to heat up and the vapor rise?
A while? Most of the time was waiting for the heated bed to get to 100 with a large jar on top of it. I didn't really time it. It's on the order of waiting for a print startup.
How long did you leave the item in the vapors?
A few minutes. You can watch it start to "melt" and stop it before it turns into the scene from Indiana Jones.
Did the ABS model feel just as hard after the vapor bath as before, or is there a slight softening?
It is slightly tacky as it comes out, and you don't want to touch it as it will mar the finish. After the surface acetone flashes off, it looks the same but is hard and smooth.
I have seen this in many demonstrations, specifically using an electric wok and a low, flat but slightly rounded dish. It turns out that the acetone all evaporated very soon after lifting the lid, so there was no clean up. (Garage or outside entalation needed.).
With my lidded jar (not airtight and only there to block drafts), and acetone vapor being heavier than air, I can not smell any acetone through the entire process. I recovered most of it afterwards, losing some as vapor only because I didn't wait for it to recondense fully. Indeed, I would not want even the small amount of acetone I used hanging around indoors as vapor, so if you're going to do it that way outside is better.

david b
Mar 13, 2014, 4:07:54 PM3/13/14
to make...@googlegroups.com


Tony Shulthise
Mar 13, 2014, 4:50:59 PM3/13/14
to make...@googlegroups.com
Vapor polishing is great but its about as tricky as printing. small diameter long features can sag before the thick features get well polished. One way around that is to dip the part into the vapor for a short time then pull it out until the acetone flashes off then repeat. That gives better control but takes longer.
Another method is to use a beaker with a cork in the top and a rubber tube (rated for acetone vapors) for the vapors to come out. You boil the acetone in the beaker and the vapors are forced out the hose at a pretty high flow rate. You can use the end of the hose like a paintbrush and selectively polish areas with very good precision. This, of course, requires ventilation since you are pushing vapors into the ambient air. You also have to keep the hose relatively short (the one I used was less than 12" long) so the vapors don't cool and condense too much in the tube. If they do then it will spit liquid acetone out causing spots on your part.
These methods work using methane chloride on Polycarbonate and Acrylic also. You can vapor polish a sanded edge of plastic sheet and make it look nearly glass smooth and transparent.
Both acetone and methylene chloride are hazardous to your health and flammable. Acetone is used for paint cleanup and fingernail polish remover so its not highly toxic. Methylene Chloride is more toxic. I recommend ventilation, goggles and nitrile gloves for MC if you use it. I saw a video of someone who threw a match into a setup just like yours and it flashed a little then just burned gently. If you get a large amount of vapor in a confined space (like an enclosed boat hull) with some available oxygen, then you have a bomb on your hands.
One other thing to think about... if you use a metal can and insulate the the outside walls up about 4" or so but leave the rest exposed then you can get enough temperature gradient to make the vapor much easier to contain.
Another method, which I haven't tried yet, is to...
1. Line a one gallon paint can with paper towels using magnets
2. Soak the paper towels with acetone
3. Put the paint can lid upside down on a table
4. Set your part on the lid
5. Turn the paint can with soaked paper towels upside down over your part onto the lid
6. Leave it for ??? minutes (no heat required)
7. Remove the can and check your part.
A glass jar with a lid may work even better so you can see your part so you don't lose any acetone vapors until you are ready to take it out. Just don't totally seal the lid to the jar or it will pressurize as the acetone vaporizes.
Hope that's helpful,
Tony
Tony Shulthise
Mar 13, 2014, 5:07:36 PM3/13/14
to make...@googlegroups.com
I forgot to mention...
The thermal conductivity of glass is around 1.0 W/m*K
The thermal conductivity of steel is around 43 W/m*K, or Stainless Steel 16 W/m*K
That means under ideal conditions, for a fixed temperature delta and wall thickness, steel will conduct 43x as much energy as glass.
If you use a steel or stainless steel interface to the heated build platform then it will heat up the acetone inside MUCH faster than a glass one.
Reply all
Reply to author
Forward
0 new messages