Simplify3D Creator slicing: benefits over Slic3r?
2,874 views
Skip to first unread message

Jin Choi
Feb 6, 2014, 5:14:26 PM2/6/14
to make...@googlegroups.com
I have been using Repetier Host and Slic3r with my M2 so far. I am tempted to try Creator, and have been reading some about it, but I would like to get the opinion of anyone who has used both Slic3r and Creator on what tangible benefits it brings to the table.
Just to be clear, I am not interested in any of the user interface or workflow improvements of Creator. And I am aware that Creator is faster in terms of slicing. Both of these things are clearly good things, but not enough to get me to switch. What I am looking for is someone to tell me "I switched from Slic3r to Creator and the quality of my prints went up threefold!" Besides just making things easier, does it make anything better?

Brian Rumburg
Feb 6, 2014, 5:55:00 PM2/6/14
to make...@googlegroups.com
I've had my M2 for less than a month and I've been using Creator for a couple weeks, now. Before, I was using Repetier/Slic3r. I also dabbled with Cura for a few days.
I am a happy owner of Creator. It isn't perfect, but I feel it was well worth the money spent. I haven't felt the need to go back to Repetier/Slic3r or Cura for anything.
Cura was a much better experience for me overall. It slices fast and updates the tool paths as you are changing the settings which was helpful in learning what the setting actually does. It makes better decisions out of the box than Slic3r, but may not give you quite the control you want if you are super finicky (like myself).
Here is my relatively naive take on the current landscape with regard to slicers. Slic3r has a bunch of buttons, but doesn't always make good tool path decisions. I worked with it for days straight, but couldn't for the life of me get the thing tuned in for anything more than simple prints. Very frustrating. That being said, I was (and still am) pretty green.
Cura was a much better experience for me overall. It slices fast and updates the tool paths as you are changing the settings which was helpful in learning what the setting actually does. It makes better decisions out of the box than Slic3r, but may not give you quite the control you want if you are super finicky (like myself).
Creator hit a good middle ground for me. It had all the buttons I was looking for, made pretty good decisions out of the box, and the interface was pretty good. There was a decent profile for the M2 that got me up and running in no time. After a bit of digging I started to realize that if I had an idea for improving print quality, there was already a setting for it. Neat.
I only have minor annoyances with the product which are mainly UI related. There are times when the workflow is a bit annoying and slicer settings could be grouped a little better. That being said, the slicer itself is solid. I have yet to say, "Now, why did it decide to do that!?"
I haven't tested their support process yet, but I got a really quick response from the sales team early on a Sunday morning. I suspect they take good care of their customers.
I hope this helped. Happy printing!
Jin Choi
Feb 6, 2014, 9:45:15 PM2/6/14
to make...@googlegroups.com
Okay, I'm almost sold. One last worry: in one of their forums, someone (named Drew?) reported that there was a toolpath issue where x/y rapid travel was happening before z-lift to start a new layer, possibly ending up knocking bits off the current layer. As I recall, this thread was fairly recent, late 2013 sometime. Have you noticed this happening, or has it been fixed already?

jimc
Feb 6, 2014, 10:08:39 PM2/6/14
to make...@googlegroups.com
jin, i believe that was fixed in the latest update. however in the 6 mos i have been using creator, whatever order it did all that in i never had it knock over or hit anything. remember everything is printed on one layer so it shouldnt matter what order it all happens in. it should not hit. there are 2 things that will cause that to happen, over-extrusion or your print is curling off the bed. putting out too much plastic makes it build up higher than the nozzle. curling.....well thats an obvious problem. i have not used slic3r but i can offer another reason to get it and thats because the majority of the m2 community uses it. when you have an issue its much easier for anyone to help you. we often share printing profiles for different materials. i know i have put a ton of time into fine tuning for certain ones and will give anyone a fff file to get them goin. in the 6mos i have had it creator has come a long way. pre v2.0 had some issues but once 2.0 came along the software made major leaps. the nice thing about it is with it being paid software i think they are making advances faster than other slicers out there. always being improved. i do wish they would monitor and post in their forum more though. if you need an answer though support or clayton always responds quickly.

Tony Shulthise
Feb 7, 2014, 12:22:09 AM2/7/14
to make...@googlegroups.com
I'm not sure if any of the free slicers do this but S3D allows you to...
-Build and modify custom supports
-Define different settings for different layers. This is helpful if you want to print down to 0.05 mm layers since you can print the first layer at 0.15 mm without having to have your bed PERFECTLY level. Then set the following layers to as low as 0.05 mm without worries of the nozzle clogging. You still have to get your filament diameter set nearly perfectly though.
I posted more details here... http://www.forum.simplify3d.com/viewtopic.php?f=8&t=601&p=2026#p2026
Jin Choi
Feb 7, 2014, 12:29:37 AM2/7/14
to make...@googlegroups.com
Okay, I've put in my order. While I'm waiting for it to be processed, do you have a tuned FFF for the MakerGear black PLA that ships with the printer? I know there is a default one that Creator comes with....
jimc
Feb 7, 2014, 12:35:27 AM2/7/14
to make...@googlegroups.com
ill tell ya, right out of the box the built in pla settings in creator were a real nice start.
jimc
Feb 7, 2014, 12:37:01 AM2/7/14
to make...@googlegroups.com
when the time comes if you mess with abs, nylon, pet or some of the flexible stuff i got settings for those. i never print with pla. still have half the roll my m2 came with.
Tony Shulthise
Feb 7, 2014, 12:57:24 AM2/7/14
to make...@googlegroups.com
You may need to tweak the filament diameter on the last tab but this one works well for me. Jim may have some comments about what to tweak to make it better. When I get a really nice print I save the .fff with a descriptive name and reuse it with minor tweaks for different prints if they are needed.
Jim, would you consider posting .fff files that have worked for you with each named per the associated material????

Dave K
Feb 7, 2014, 1:17:52 AM2/7/14
to make...@googlegroups.com
Jim - This is a bit off-topic, but why have you switched to other materials in preference to PLA? I've been printing with PLA mostly, because I understand it's the easiest to work with and I wanted to become comfortable with one material under different conditions before working with another. I've recently started working with the flexible filaments (Ninjaflex specifically). But anyway, I'm curious why you prefer other materials than PLA. I've got a roll of ABS and a roll of 618 nylon waiting to be used.

Brian Rumburg
Feb 7, 2014, 12:36:23 AM2/7/14
to make...@googlegroups.com
Agreed. I usually end up starting there and tweak it on a print-by-print basis.
--
You received this message because you are subscribed to a topic in the Google Groups "MakerGear - Make Today, Change Tomorrow" group.
To unsubscribe from this topic, visit https://groups.google.com/d/topic/makergear/Jt-yWYmPkfQ/unsubscribe.
To unsubscribe from this group and all its topics, send an email to makergear+...@googlegroups.com.
For more options, visit https://groups.google.com/groups/opt_out.
Brian Rumburg
Feb 7, 2014, 12:40:08 AM2/7/14
to make...@googlegroups.com
Thanks for the offer!
I just cracked open my first spool of ABS this week. I'm impressed with the strength, but I'm having trouble with uneven cooling causing (taller) parts to warp and disconnect from the build platform. I've had a couple of prints I would consider successful, but I'm seriously thinking about building an enclosure to control the temperature a little better.
--

Toby
Feb 7, 2014, 2:37:04 AM2/7/14
to make...@googlegroups.com
In my case using the demo S3D (v 1.1.5) that came with the M2, the default temp settings for PLA weren't right for my hot end (v3B I think since I just got it). I changed it from 190 to 210 when printing with black PLA and the print came out much better than when I hadn't changed it. But maybe this is fixed with the latest version of S3D.
On Thursday, February 6, 2014 4:14:26 PM UTC-6, Jin Choi wrote:
jimc
Feb 7, 2014, 7:42:18 AM2/7/14
to make...@googlegroups.com
Dave, for me pla is a out useless unless its a little toy for my kids or something that sits on a shelf in my house. The problem i have with it is temp. All it has to do is get just a little warm and it will deform and warp. I like abs be ause it wont do that. Anything in abs will take the heat of the summer sun or a hot interior on a car. It also solvent bonds easily. Yes it can warp and i have to deal with that but i can always manage it unless its a really tall and big box or something. Nylon i need for stuff thats chemical resistant. I make some parts for these old military generators that i need nylon for. I also printed my m2 filament drive in solid nylon. Its great for mechanical parts. There is a recent thred on here where me and dale did some testing on pet. That stuff is my favorite since its as easy or easier to print than pla but also has heat resistance closer to abs. Its tough, durable and has some flex to it.
jimc
Feb 7, 2014, 7:48:57 AM2/7/14
to make...@googlegroups.com
Tony i will share some files for the stuff a little later tonight when i get on the computer.
Toby, the default setting are just there to get you in the ballpark and will always need tweaking. Even with the fff files ill post later, they may need some adjustment for your material and machine.
Message has been deleted
Message has been deleted
Jin Choi
Feb 7, 2014, 3:10:54 PM2/7/14
to make...@googlegroups.com
My license came today, so I'm trying it out. My impression so far is that Brian's review above is pretty accurate. Some things I noticed:
Out of the box, with the included M2 default (except for the temperature settings for the V3b hot end, and the extruder fan start code for the 24V machines) for PLA, the print quality is much better than my previous attempts at tuning Slic3r. There is little to no blobbing/stringing on my prints so far. Some effort has been made to dial the settings in. It will be interesting to take these settings and replicate them in Slic3r and see if it works there as well.
The support generation is really very good. Comes away very easily.
One nit pick: the default settings do not specify a z-lift on level change, so when it rapid travels to the start of a new layer, it drags a visible line through the infill or top top layer. Normally, this would get hidden on the inside, but if you have a part with bits that extend above the top surface layer, you will get ugly travel lines through your nice top surface.
Brian Rumburg
Feb 7, 2014, 3:22:28 PM2/7/14
to make...@googlegroups.com
I recall that drag line with the default profile as well, now that you mention it. It was one of the first things I changed, too. I think this is likely caused by the weird ordering of XY rapids before Z lift you picked up on at the start of this thread.
I'm content with the workaround, but it might be worth mentioning it to the support team. The behavior does seem to have a real-world consequence.
--

Dale Reed
Feb 7, 2014, 4:26:05 PM2/7/14
to make...@googlegroups.com, br...@rumburg.org
All,
I started the discussion about the sequence of G-code ops on layer change and have followed it along. Here's the skinny:
* In early version of Creator (before about 1.1.4), the sequence of G-codes for Z-lift on retraction for rapids within a layer was incorrect. The filament would retract, Z would lift, then Z would drop, then X/Y would move the rapid, then filament would return. This was fixed (1.1.4 or 1.1.5) so that the X/Y rapid move would take place between the Z lift and the Z drop.
* In versions of Creator around 1.1.5 and 2.0.0, the sequence of G-codes for Z-increment to the next layer was incorrect (IMHO). If there was no Z-lift for normal X/Y rapids, the sequence was something like this: The filament would retract, the X/Y rapid would take place, Z would index up to the next layer, then the filament would return. I have confirmed that this was fixed (again, my opinion that it was wrong) in 2.0.1 (current version) to have the Z increment up to the next layer take place before the X/Y rapid, to minimize the amount of bumping into the (now previous) layer on the rapid move. Jimc is correct that this clonking was really caused by over-extrusion or (especially) lifting of corners of the part from the bed. But indexing Z up before doing the rapid just makes more sense (to me) to minimize dragging the nozzle in the layer just finished or knocking over some isolated structure (like the end of the arch in the MAKE Magazine torture test object).
Dale
Brian Rumburg
Feb 7, 2014, 4:50:38 PM2/7/14
to make...@googlegroups.com
Hi Dale,
Thanks for the update. I am running version 2.0.1 (on OS X) and I'm still seeing the XY rapid occurring prior to raising the Z in my output.
; layer 24, Z = 5.9
G0 X91.584 Y119.132 F15000
G0 Z5.9 F2000
G92 E0
G1 X91.125 Y119.45 E0.019 F1148
If I turn on Z lift during retract and force retract between layers, I'm able to mitigate the outcome.
G0 X76.678 Y117.458 F1170
G0 Z6.15 F2000
; layer 24, Z = 5.9
G0 X76.717 Y117.728 F15000
G0 Z5.9 F2000
G1 E0 F4000
G92 E0
G1 X77.11 Y118.11 E0.0186 F1148
Dale Reed
Feb 7, 2014, 10:45:47 PM2/7/14
to make...@googlegroups.com, br...@rumburg.org
Brian,
Dang. My memory must've been a bit fuzzy. Perhaps I had Z-lift enabled for layer-to-layer. I knew they fixed the case I was using, which I see now was the second one. Sorry about that. You are correct that in the first case, the G0 Z5.9 F2000 line should come BEFORE the rapid. I'd be grateful if you would please send what you posted here to S3D support....
Thanks for the correction!
Dale
Brian Rumburg
Feb 8, 2014, 12:23:55 AM2/8/14
to make...@googlegroups.com
Awesome. Thanks for sharing!
If you would, talk to me about your experiences with nylon. I notice you are running the hot end at 260 for the first layer. Are you running an all metal hot end perhaps? If not, have you noticed any softening of your PEEK insulator?
Would you mind sharing a pic or two of your results with each of these profiles (realizing just now that I am completely derailing this thread...)
Maybe a new thread is in order if you feel like sharing?
On Fri, Feb 7, 2014 at 11:16 PM, jimc <xtremekr...@gmail.com> wrote:
here are a few fff's for you guys. my temps are set for the v3b hot end. i have nothing worth while for pla. dale is the pla guy :)
jimc
Feb 8, 2014, 11:30:47 AM2/8/14
to make...@googlegroups.com, br...@rumburg.org
no im using the v3b hot end. remember 260 is actually about 240 and im only doing that for one layer then its lowered a bit. i have never seen any problems with the peek. i have put a temp probe on my nozzle and confirmed my temp though to be sure its not over what i think it is. for the nylon i can get the setting right in creator but its a funny plastic to deal with. it will stick to the bed one time to the point i take pieces out of my garolite to get it off and the very next time it will curl so bad and pop right off. i try to do only small items with it. here is something i normally print with it.
Brian Rumburg
Feb 8, 2014, 11:56:41 AM2/8/14
to make...@googlegroups.com
Good deal. I'll have to give it a try, then. After seeing what you've done there, my mind instantly filled with ideas about custom servo arms and linkages... very nice work!
On Sat, Feb 8, 2014 at 10:30 AM, jimc <xtremekr...@gmail.com> wrote:
no im using the v3b hot end. remember 260 is actually about 240 and im only doing that for one layer then its lowered a bit. i have never seen any problems with the peek. i have put a temp probe on my nozzle and confirmed my temp though to be sure its not over what i think it is. for the nylon i can get the setting right in creator but its a funny plastic to deal with. it will stick to the bed one time to the point i take pieces out of my garolite to get it off and the very next time it will curl so bad and pop right off. i try to do only small items with it. here is something i normally print with it.
jimc
Feb 8, 2014, 12:32:35 PM2/8/14
to make...@googlegroups.com
Well if you dont need the chemical resistance of the nylon then the madesolid pet+ seems to be very similar in properties to the taulman 618 and way easier to print. Flexibility is about the same.
Jin Choi
Feb 8, 2014, 9:08:06 PM2/8/14
to make...@googlegroups.com
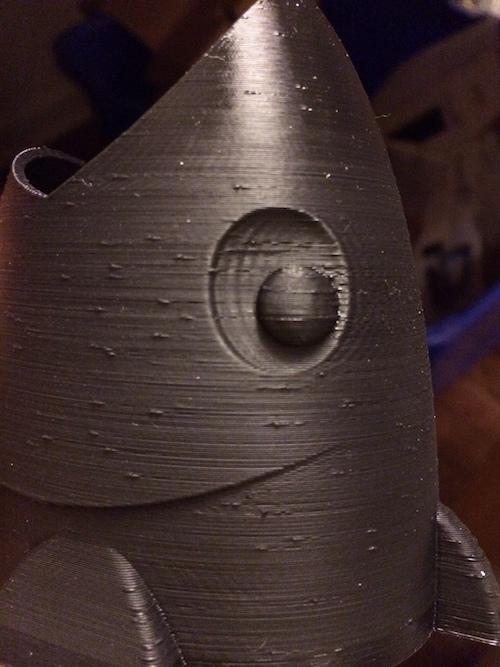
Anyone have some PLA tuning advice for Creator? I'm trying to print this Fish Pen Pot (http://www.thingiverse.com/thing:237692). I'm using the M2 default medium PLA setting, with retraction, coast, and supports turned on, and the bridging settings tweaked a little.
I really am fairly pleased with the results. It is better looking in person than the pictures show, because they are taken very close in, with a raking light to highlight the surface defects. And after dealing with Slic3r created supports, the supports from Creator are so much easier to remove; they just pop right off with hardly a trace.
My first desire is to reduce the surface zits. Secondly, there is some visible "ringing" artifacts around the eyes and other vertical features. The zits seem like I should be able to reduce them with some slicer tweaks, while the ringing seems like it would be a mechanical issue. Any suggestions as to what to try next?
jimc
Feb 8, 2014, 9:39:49 PM2/8/14
to make...@googlegroups.com
jin, the zits are all just a matter of tuning your ooze controls. first turn coasting is on .2. turn that up to 1.4 maybe for a start point. same with retraction. print it and see what happens. give it like 20 layers and see if its still doing it. if so cancel and turn the coasting up to 2mm. try again. that should help but if its still there then turn your cost back down to 1.4 and the extra restart distance to -.02.... yes thats negative. dont go beyond -.02 on that. if its still there then slowly work the coasting up .02 at a time. over extrusion can lead to excessive zits as well. if your lines are printing too wide and overlapping each other too much then your extrusion multiplier needs to come down a little. take care of the zits first and see what the ringing looks like after those tweaks. you will always get some ringing like that from resonance on the bed during a change in direction. you wont get rid of it completely.
Brian Rumburg
Feb 8, 2014, 9:25:49 PM2/8/14
to make...@googlegroups.com
I'm not an expert by any means, but if it were me, I would do the following.
-Bump the extruder temperature up a few degrees for a more even luster.
-Drop the flow rate a bit by reduce the extrusion multiplier by .05 or .10. I think this might help with the zits.
-Slow down your print by 20% or so ("Other" tab, "Default Printing Speed"). I think this could help with the ringing you are seeing which I suspect is caused by vibrations during rapid changes in direction of the print head.
Again, not an expert, but this is where I would start. I'd love to see your next print! (c:
--
Jin Choi
Feb 8, 2014, 11:10:28 PM2/8/14
to make...@googlegroups.com
Thanks, Jim and Brian. I'll try all your suggestions shortly.
Brian, the nose is shiny because of the reduced cooling time due to the smaller layers up there. I don't care about finish on this particular print because I am going to use it as a testbed to try priming/sanding.
Jin Choi
Feb 9, 2014, 3:16:45 AM2/9/14
to make...@googlegroups.com
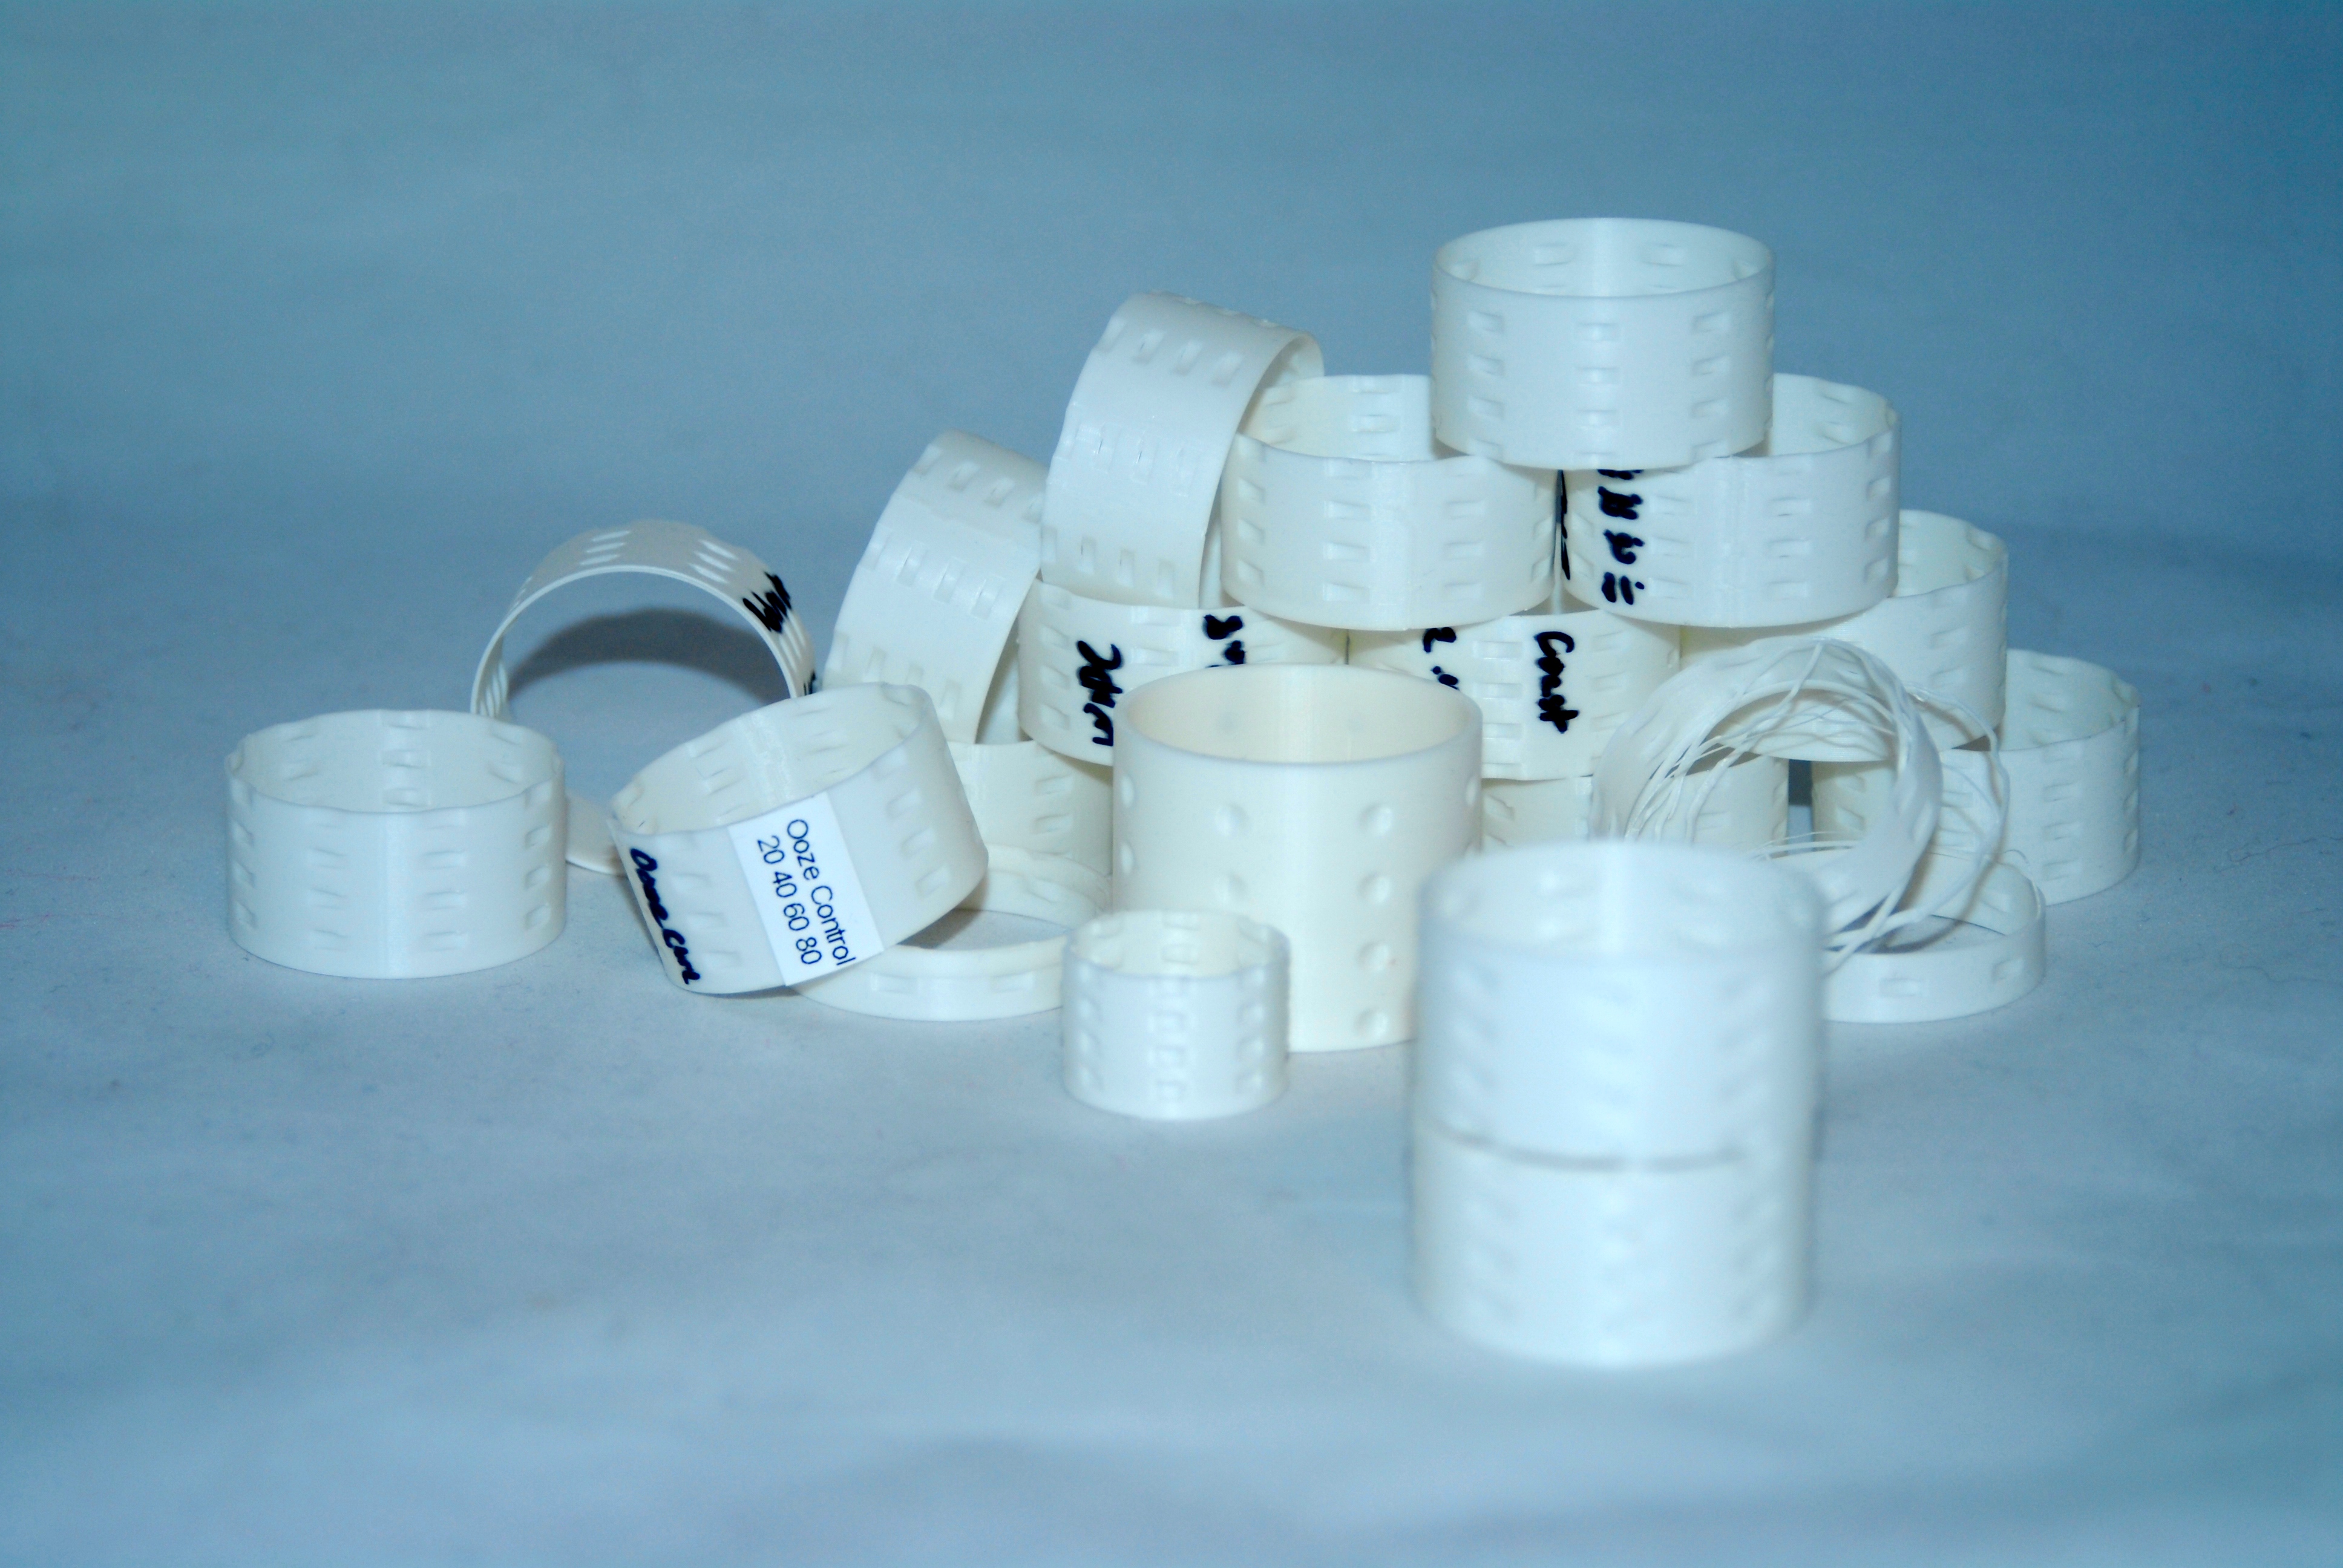
Here's the results so far. I created a test object that is a hollow 3mm thick cylinder that has 1mm deep spherical indentations punched around it. Each indentation is 4mm (16 layers) tall. There's an extra 3 layers on top and bottom. I threw it into Creator with 8 processes, one for each section (process 1 from 0 to 4.75mm, process 2 from 4.75 to 8.75, etc. until section 8 is 28.75 to the top) . I followed jimc's protocol; from bottom to top:
1. my previous settings, as a control (retraction 1, coast .2)
adding retraction 1.4:
2. coast 1.4
3. coast 2.0
adding extra restart -.02
4. coast 1.4
5. coast 1.6
6. coast 1.8
7. coast 2.0
8. retraction 1, coast .2, extrusion multiplier .8 (down from .9)
Black PLA is difficult to photograph. You can see where each section starts by the indentations, and because the fan turned off at the start of each process, the start of each section is also marked by a glossy layer. None of the settings so far is flawless, and it is really hard to tell which is the best. I think turning off the random layer start points may help with that, so that they aren't distributed around the cylinder. From careful inspection, I would say that maybe section 2 is the best so far (second from the bottom). Clearly, more testing is required, though.
In case anyone would like to try this out for themselves, I've attached the STL file and the OpenSCAD source used to generate it. It is a fairly quick print, and Creator makes it easy to test out a bunch of settings on a single model.
Jin Choi
Feb 9, 2014, 10:51:20 PM2/9/14
to make...@googlegroups.com
After printing several of these cylinders, and having no change I made to retraction or coast settings have any visible effect, I carefully studied the print as it was happening and verified my suspicions with gcode.ws. It appears I have uncovered a class of non-retraction-related zits.
What is happening is that the zit is forming at the start of laying down the outermost perimeter, not at the end, which is what would be affected by tweaking retraction settings. The sequence when printing my thin walled cylinder object with two perimeters is:
- the inner perimeter of the outside surface is laid down,
- the inner, then outer perimeter of the inside surface is laid down,
- there is rapid travel to lay down the outer perimeter of the outside surface, and
- infill occurs.
It is at step 3 that the zit occurs. The rapid travel to the outside layer overshoots a tiny amount, pushing out the zit. This will happen any time the skin is approached in rapid travel without a previous z lift occuring.
jimc
Feb 9, 2014, 11:14:44 PM2/9/14
to make...@googlegroups.com
jin, yes that is where they usually occur. almost always at the start of the line. in the fff's i posted above. use my abs profile and adjust the temps for pla and see if that does it for ya. those ooze control setting in that profile are a little more extreme. remember if your running a tad too hot it will add to the problem. you want the temp as low as you can get it while still getting good layer adhesion.
Brian Rumburg
Feb 11, 2014, 12:03:35 PM2/11/14
to make...@googlegroups.com
I have been messing with some test prints on this end and I have been able to reduce the ringing Jin was seeing by lowering the XY max acceleration. My firmware default was set to 9000 for X and Y. You can actually feel the build platform vibrate during direction changes while printing. Dropping the acceleration to 1000 for XY moves cured the vibration and ringing effect in my test print.
You can modify the max acceleration by using M201 (ex: M201 X1000 Y1000) or by altering the default in the EEPROM. You can also use Repetier-host to easily modify the EEPROM settings so you don't have to remember to set the acceleration during your initializing gcode.
I suspect this may have other side affects. I'm particularly interested to know if Marlin alters the extrusion flow rate during acceleration. If it doesn't, you could potentially see over extrusion during those time periods. Food for thought. More testing...
On Sun, Feb 9, 2014 at 10:14 PM, jimc <xtremekr...@gmail.com> wrote:
jin, yes that is where they usually occur. almost always at the start of the line. in the fff's i posted above. use my abs profile and adjust the temps for pla and see if that does it for ya. those ooze control setting in that profile are a little more extreme. remember if your running a tad too hot it will add to the problem. you want the temp as low as you can get it while still getting good layer adhesion.
--

A. Elias
Feb 11, 2014, 12:57:09 PM2/11/14
to make...@googlegroups.com, br...@rumburg.org
You can commit the changed to EEPROM using the M500. You can also, if you have a tall test print change the acceleration a few times during the test print by typing in the same G-code you have below and then see the changes between layers. I did this between 9000mm/s2 and 1000mm/s2 and the results were visible. I have pictures captured from my testing, but I need to carve out some time and post them.......
I've been able to get the ringing down by reducing the acceleration and perimeter print speed, still pretty fast for infill and support. I'm at a point where I can't get any better using that combination without upgrading the linear slide.
Jin Choi
Feb 11, 2014, 1:44:04 PM2/11/14
to make...@googlegroups.com, br...@rumburg.org
On Tuesday, February 11, 2014 12:57:09 PM UTC-5, A. Elias wrote:
I've been able to get the ringing down by reducing the acceleration and perimeter print speed, still pretty fast for infill and support. I'm at a point where I can't get any better using that combination without upgrading the linear slide.
Thanks, Brian and Elias! Good news.
Since both of you have already been running tests, and I am out of filament for a brief period, could you report what settings had the best results, and if there was a point of diminishing returns, what setting had acceptable results? How much does it increase the print time? I wish slic3r or Creator let you insert custom g-code to bracket the perimeters only.

Bryan Boettcher
Feb 11, 2014, 2:42:25 PM2/11/14
to make...@googlegroups.com, br...@rumburg.org
Alexjr is very responsive to design changes for slic3r. Put together a good proposal and file it in the Github. I bet you'd see it sooner than you'd expect. I could see slic3r putting an "acceleration" box next to each speed setting in the Speeds category.
A. Elias
Feb 11, 2014, 2:47:21 PM2/11/14
to make...@googlegroups.com, br...@rumburg.org
Your last statement there is dead on! That would be a good feature addition. :-)
I wonder if you could use a Macro on the g-code text file to manually change it. notepad++ and a regular expression should do it.
I'll try to get to it tonight. My test part has threads in it so it really gets the bed oscillating as it comes out of the hole. KISSlicer provides print time estimates based off acceleration. I could provide a table changing the acceleration parameters there.
Brian,
I read that the jerk settings can help with the corners.. I might see about a design of experiments on this one. Jerk, acceleration and speed as my factors.
Adam
Jerk Acceleration Speed
25 1000 30
25 9000 120
25 9000 30
25 1000 120
10 1000 120
10 9000 120
10 1000 30
10 9000 30
Jin Choi
Feb 11, 2014, 4:15:52 PM2/11/14
to make...@googlegroups.com, br...@rumburg.org
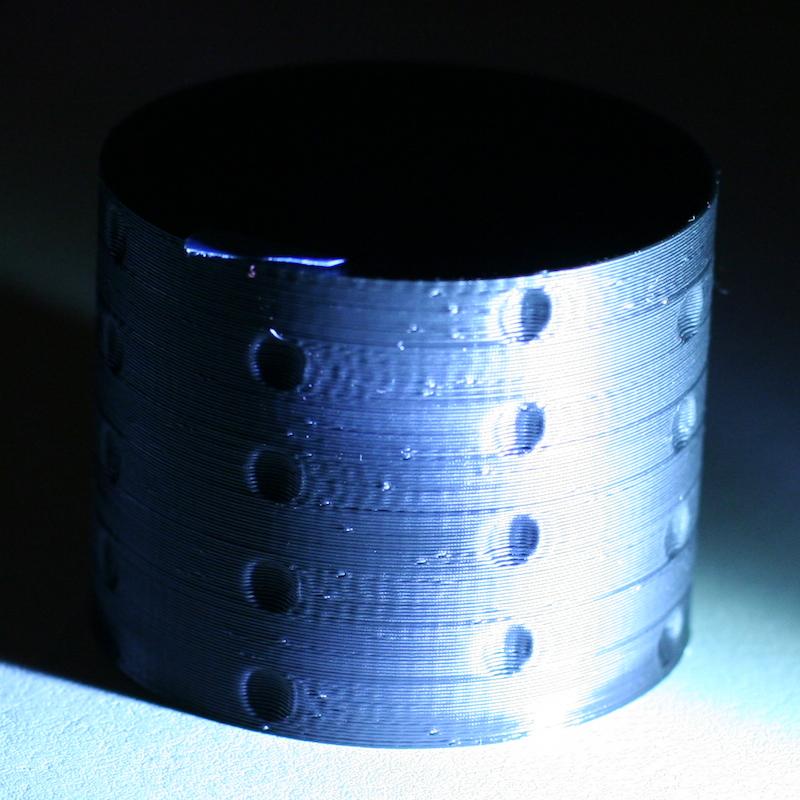
I just uploaded my dimpled test cylinder to Thingiverse: http://www.thingiverse.com/thing:247162
I have found it useful for investigating ringing. You can use it with Customizer to adjust the dimples, dimensions, etc.
jimc
Feb 11, 2014, 9:02:06 PM2/11/14
to make...@googlegroups.com, br...@rumburg.org
i was printing some parts last night that i have done probably 70 of so far. i have had my acceleration set to 2000 and jerk to 15 for a long time which made a big difference. this time during the print i started readjusting both jerk and accel during the print. i can not only see the difference but i can hear it as well. i dropped it down to 1000 and the jerk to 10. a definite improvement. the default from the factory is 3000 so it does slow things down a bit but i increased speed to 5600mm sec to make some of the difference up.
i have posted this link before but here it is again. fyi M202 in the link does not apply to marlin.
A. Elias
Feb 11, 2014, 10:17:30 PM2/11/14
to make...@googlegroups.com, br...@rumburg.org
I kicked off the experiment this evening. My first is a slow perimeter at 15mm/s with jerk or 25 for the first half, and jerk of 5 for the latter half. Acceleration set to 1000mm/s^2. I hope to have it all done tonight as the suspense kills me!
I use the M201 and M205 g-code. Tweak the X value in M205 for the jerk. I think or at least from what I've read.
ADam
A. Elias
Feb 11, 2014, 11:30:04 PM2/11/14
to make...@googlegroups.com, br...@rumburg.org
So using M503 will read back the current memory values (not EEPROM) of the M201 and M205 and another few M2xx numbers.
My second is a slow perimeter at 15mm/s with jerk or 25 for the first half, and jerk of 5 for the latter half. Acceleration set to 9000mm/s^2. To be honest I don't see much a difference between the different jerk settings, 5 and 25. The slow perimeter makes the exterior look fantastic regardless.
I'll see how the higher perimeter speeds go as it's humming away printing at 80mm/s for the perimeters. Going from 9000mm/s^2 to 1000mm/s^2 increased the print time by 7 minutes. From 20 minutes to 27 minutes for this setting. With the 15mm/s perimeters it was 32 minutes for 1000mm/s^2 and 22 minutes for 9000mm/s^2.
jimc
Feb 11, 2014, 11:45:09 PM2/11/14
to make...@googlegroups.com, br...@rumburg.org
i agree, while my print was running i set the jerk all over the place and couldnt tell a difference
A. Elias
Feb 12, 2014, 12:39:09 AM2/12/14
to make...@googlegroups.com, br...@rumburg.org
Results attached. Jerk effect is barely visible.
Looks like a 80mm/s perimeter with 1000mm/s^2 produces a nice finish for my printer. I'm going to expand this experiment to include higher perimeter speed (up to 120mm/s, maybe higher?) and incremental changes in acceleration. Nice thing is that you can dynamically change the acceleration while it's printing so this experiment will only be a few hour time investment. :-)
On Tuesday, February 11, 2014 11:45:09 PM UTC-5, jimc wrote:
i agree, while my print was running i set the jerk all over the place and couldnt tell a difference
Jin Choi
Feb 12, 2014, 1:22:04 AM2/12/14
to make...@googlegroups.com
Jim, I tried as you suggested and just took your "high quality abs" profile and adjusted a few things like the temperature. It came out great! Well, not perfect, the aggressive coast setting caused gaps at the layer change. But no zits whatsoever! Now to get rid of the ringing with jerk settings.
jimc
Feb 12, 2014, 7:12:59 AM2/12/14
to make...@googlegroups.com
Jinok what you need to do is orint it again and take notice of where thats happening. Are the spaces being made at the end of the line or the beginning? If at the end then that the coast. Reduce it little by little until it goes away. If that is at the beginning of the line then its the neg restart distance and youll want to bring that back to 0.
Brian Rumburg
Feb 11, 2014, 11:52:42 PM2/11/14
to jimc, make...@googlegroups.com
I'm having the same experience over here. I can't seem to tell a difference no matter what jerk setting I use. I'm at 5 right now...
I haven't reviewed the source code, but the best description I have found online is that it has nothing to do with mathematical jerk. If your next move is below the jerk speed, no acceleration will be calculated. It will just jump to the specified speed of the move. I set it to 1 for gins, and things got... weird. It was hesitating and stuttering during every move.
Right now I'm at 800 max accel and 5 jerk. I'm pleased. Hope to post some results at some point, but too obsessed with tuning at the moment. (c: Still tweaking little bits.
Brian Rumburg
Feb 12, 2014, 11:46:29 AM2/12/14
to make...@googlegroups.com
Hey all,
The change that made the most difference was bumping down the XY acceleration. I ended up leaving it 800. No more ringing.
I'm happy with the results thus far. The only trouble I ran into was when the extruder started over an overhang (see the hole and tiny blobs on the underside of the dimples). I can live with that. Suggestions welcome.
--------------------------------------------------------------------------------
Printed using Octave White ABS on the MakerGear M2.
Send: M503
Recv: echo:Steps per unit:
Recv: echo:  M92 X88.88 Y88.88 Z400.00 E508.00
Recv: echo:Maximum feedrates (mm/s):
Recv: echo:  M203 X500.00 Y500.00 Z250.00 E200000.00
Recv: echo:Maximum Acceleration (mm/s2):
Recv: echo:  M201 X800 Y800 Z200 E10000
Recv: echo:Acceleration: S=acceleration, T=retract acceleration
Recv: echo:  M204 S3000.00 T3000.00
Recv: echo:Advanced variables: S=Min feedrate (mm/s), T=Min travel feedrate (mm/s), B=minimum segment time (ms), X=maximum xY jerk (mm/s),  Z=maximum Z jerk (mm/s)
Recv: echo:  M205 S0.00 T0.00 B20000 X5.00 Z0.40 E5.00
Recv: echo:PID settings:
Recv: echo:   M301 P25.89 I1.94 D86.53
Recv: ok
Source Files:

On Wed, Feb 12, 2014 at 6:12 AM, jimc <xtremekr...@gmail.com> wrote:
Jinok what you need to do is orint it again and take notice of where thats happening. Are the spaces being made at the end of the line or the beginning? If at the end then that the coast. Reduce it little by little until it goes away. If that is at the beginning of the line then its the neg restart distance and youll want to bring that back to 0.

Bret Allen
Feb 12, 2014, 8:18:42 PM2/12/14
to make...@googlegroups.com, br...@rumburg.org
Just printed a couple of parts in abs I've been struggling a little with getting good prints using your high quality abs factory file, Nice optimization! No blobbing at all! Very neat and clean. I like the cool down code at the end. Reminded me of a car wash dry cycle. :) Only changes I made was to cooling fan parameters and extruder temp. to match my black abs roll (235c). (small parts so I used some cooling fan) and I don't like using M108 S0 at the end because I'll inevitably leave the fan off and preheat the extruder on the next print lol. Nice job! Thanks for sharing!
On Friday, February 7, 2014 10:16:47 PM UTC-7, jimc wrote:
On Friday, February 7, 2014 10:16:47 PM UTC-7, jimc wrote:
here are a few fff's for you guys. my temps are set for the v3b hot end. i have nothing worth while for pla. dale is the pla guy :)
jimc
Feb 12, 2014, 8:39:56 PM2/12/14
to make...@googlegroups.com, br...@rumburg.org
no problem bret. yeah i just use the m108 command because i do alot of prints that end in the middle of the night. i am used to it and its just routine to automatically turn that back on first thing do.
Jin Choi
Feb 14, 2014, 3:44:13 AM2/14/14
to make...@googlegroups.com
While playing around with Slic3r again, I noticed it has acceleration settings, with perimeters as a separately controllable situation. You can set perimeters to 800 and leave the default at 9000, say. Seems useful.
A. Elias
Feb 14, 2014, 8:25:17 AM2/14/14
to make...@googlegroups.com
I haven't looked at Slic3r in a while. Mostly KISSlicer. Though that could be useful...
Jin Choi
Feb 15, 2014, 1:04:57 AM2/15/14
to make...@googlegroups.com, br...@rumburg.org
The cooling cycle was interesting. One thing I took from Ed Nisley's stop g-code was a "G1 Z195 F2500", which sends the bed nearly to the bottom under power before cutting the motors. It is disconcerting to me to see it drop from near full height.
Toby
Feb 15, 2014, 10:33:04 AM2/15/14
to make...@googlegroups.com
Thanks for highlighting this. The prints I've been doing have mostly been low height and that free-fall at the end is disconcerting. If I'm not in the room when it finishes, I can tell its done by the "clank" I hear when the bed hits bottom. I could do without that convenience.
Jin Choi
Mar 4, 2014, 2:57:47 AM3/4/14
to make...@googlegroups.com
Brian, it occurs to me that one should quantify the x and y axes separately, as they have very different characteristics. X axis is moving a lot less mass than Y. You could probably get away with higher accelerations in X.
Brian Rumburg
Mar 4, 2014, 10:21:14 AM3/4/14
to make...@googlegroups.com
The thought had certainly occurred to me, but I haven't had any spare time lately to prove it out. It seems plausible that a higher X acceleration for this machine could be safe without inducing vibration into the build platform. If you end up experimenting with it, let us know how it goes!
On Tue, Mar 4, 2014 at 1:57 AM, Jin Choi <jins...@mac.com> wrote:
Brian, it occurs to me that one should quantify the x and y axes separately, as they have very different characteristics. X axis is moving a lot less mass than Y. You could probably get away with higher accelerations in X.

Curtis Menard
Mar 4, 2014, 11:32:44 AM3/4/14
to make...@googlegroups.com
I can verify this. It seems slowing the bed down to minimize vibration on the springs is all that's needed.
Jin Choi
Mar 4, 2014, 11:47:54 PM3/4/14
to make...@googlegroups.com
Jimc, you suggested -.02 for a restart distance a month ago, but your profiles use -.2. Which is it?
On Saturday, February 8, 2014 9:39:49 PM UTC-5, jimc wrote:
On Saturday, February 8, 2014 9:39:49 PM UTC-5, jimc wrote:
jin, the zits are all just a matter of tuning your ooze controls. first turn coasting is on .2. turn that up to 1.4 maybe for a start point. same with retraction. print it and see what happens. give it like 20 layers and see if its still doing it. if so cancel and turn the coasting up to 2mm. try again. that should help but if its still there then turn your cost back down to 1.4 and the extra restart distance to -.02.... yes thats negative. dont go beyond -.02 on that. if its still there then slowly work the coasting up .02 at a time. over extrusion can lead to excessive zits as well. if your lines are printing too wide and overlapping each other too much then your extrusion multiplier needs to come down a little. take care of the zits first and see what the ringing looks like after those tweaks. you will always get some ringing like that from resonance on the bed during a change in direction. you wont get rid of it completely.
jimc
Mar 5, 2014, 12:19:18 AM3/5/14
to make...@googlegroups.com
oh yes sorry, i just checked and its -.2
you have to watch it with that and with the coasting. you may need to make those less aggressive on a model with alot of little starts and stops. very short lines only maybe a couple mm in length might not get printed because the nozzle never builds up enough pressure. in 90% of the cases its fine but there are models i have to shut that off with. i also started experimenting with manual extrusion width. i have that set down to .4 which gives me really nice detail and so far it seems the coasting and restart isnt needed. to early to tell though.
Reply all
Reply to author
Forward
0 new messages