POST PICS OF YOUR BEST PRINTS - incl material, hardware, settings and finishing details if you have them.
1,228 views
Skip to first unread message

Tony Shulthise
Jan 20, 2014, 5:58:25 PM1/20/14
to make...@googlegroups.com
This is a thread for everyone to post pictures of your prints.
Include as much of the following as you can:
Include as much of the following as you can:
1. Material
2. Hardware
3. Slicer program
4. Slicer settings and or file
4. Slicer settings and or file
5. Finishing details
Try to keep all discussions on topic so we don't dilute the content. This should be great. I've seen some great prints from some of you guys already. I'll chum the waters with a print I made recently for a guy developing a product that needed a custom housing. I'll post more tonight when I have more time...
1. Material -1.75mm PLA
2. Hardware - MakerGear M2 with the V2 hotend
3. Slicer program - Simplify3D
4. Slicer settings and or file - Not available
5. Finishing details - None other than removing supports4. Slicer settings and or file - Not available


Dave K
Jan 20, 2014, 11:58:55 PM1/20/14
to make...@googlegroups.com
I'm new to this, so in a few months this may be embarrassing as a "best", but it's the best so far and the accuracy of the dimensions after printing it amazed me.
It's a battery tray for a Trex 600e RC helicopter. I copied the overall dimensions from a stock part using calipers and modeled it in FreeCAD.
It's a battery tray for a Trex 600e RC helicopter. I copied the overall dimensions from a stock part using calipers and modeled it in FreeCAD.
1. Material - 1.75mm PLA
2. Hardware - M2...I'm embarrassed to say I don't know what hot end I've got. It was shipped in late December last year, with whatever hot end was shipping then.
3. Slicer program - Simplify 3D
4. Slicer settings and or file - Extrusion: 0.35mm/auto, Brim: 1 layer, 4 outlines (I think), Bed: 70 deg, Extruder: 220, Garnier Fructis Style Extreme on the glass.
4. Slicer settings and or file - Extrusion: 0.35mm/auto, Brim: 1 layer, 4 outlines (I think), Bed: 70 deg, Extruder: 220, Garnier Fructis Style Extreme on the glass.
5. Finishing details - Trimmed brim off with x-Acto knife, sanded off a little bit on overhangs due to leftover plastic when I broke off the supports, and a little bit of sagging where support was missing (my bad)
The thing that really impressed me was that when I was done trimming, the part slid into the helicopter smoothly and then I heard the click as the latch mechanism caught it and locked it into the frame. It was beautiful :) I may do some destructive testing to see where its breaking point is when done in PLA before I risk flying it, but the tray is well supported in the frame and my gut feeling is that it will be plenty strong enough.
The thing that really impressed me was that when I was done trimming, the part slid into the helicopter smoothly and then I heard the click as the latch mechanism caught it and locked it into the frame. It was beautiful :) I may do some destructive testing to see where its breaking point is when done in PLA before I risk flying it, but the tray is well supported in the frame and my gut feeling is that it will be plenty strong enough.
Dave K
Jan 21, 2014, 1:47:13 PM1/21/14
to make...@googlegroups.com
It's a battery tray for a Trex 600e RC helicopter. I copied the overall dimensions from a stock part using calipers and modeled it in FreeCAD.
I was thinking about intellectual property/copyright a couple of days ago, before I posted the battery holder, but for some reason didn't even think twice about it when I read Tony's post. Now I feel like I've confessed to killing Col. Mustard in the Library with the Candlestick (made on a 3D printer). I'd been assuming that copying something for private use, not re-sale, wouldn't be covered by copyright laws, but I don't actually know. I guess if I get a nasty letter from the Align corporation, I'll know!
Tony Shulthise
Jan 22, 2014, 12:15:18 AM1/22/14
to make...@googlegroups.com
Here goes. I apologize for not posting the .fff or .stl files but if you are particularly interested in any of these, let me know which one and I'll see if I can find them and add them to the post.
1. Material - 1.75mm PLA
2. Hardware - M2. V2 hot end
3. Slicer program - Simplify 3D
4. Slicer settings and or file -
4. Slicer settings and or file -
5. Finishing details - These parts came off the machine nearly perfect. I love this little toy.


This is a cool little gear reduction I designed based on an idea from a book called "507 Mechanical Movements".
Tony Shulthise
Jan 22, 2014, 12:20:17 AM1/22/14
to make...@googlegroups.com
90 Degree Gearbox
1. Material - 1.75mm PLA
2. Hardware - CubeX Duo (one of the few halfway decent prints I ever got off of that piece of junk)
3. Slicer program - Cubify proprietary slicer program
4. Slicer settings and or file -
5. Finishing details - I think I did a little sanding on the part then I put it in a drill press to wear off the burrs. After that it worked pretty well even at 600 rpm.


Tony Shulthise
Jan 22, 2014, 12:27:56 AM1/22/14
to make...@googlegroups.com
An idea for a filter that I'm working on. The passages in this part are only about 0.015". They are so fine that they easily columnate light when you look through it as you can see in the picture with it directly above some LEDs.
1. Material - 1.75mm PLA
2. Hardware - M2. V2 hot end
3. Slicer program - Simplify 3D
4. Slicer settings and or file - I wish I could remember now. I had the nozzle dia set very low.
5. Finishing details - None


Tony Shulthise
Jan 22, 2014, 12:31:22 AM1/22/14
to make...@googlegroups.com
Key Hook
1. Material - 1.75mm ABS
2. Hardware - M2. V2 hot end
3. Slicer program - Simplify 3D
4. Slicer settings and or file -
4. Slicer settings and or file -
5. Finishing details - Vapor polished in Acetone using an insulated stainless steel can sitting on the heated bed at 100C to vaporize the Acetone. I kept it in the vapor for 15-20 seconds at a time and repeated until I got the gloss finish that I was looking for.

Tony Shulthise
Jan 22, 2014, 12:42:33 AM1/22/14
to make...@googlegroups.com
Magnetic Levitating Teeter - The top gray part was a first try which required a metal rod to be placed through it. The black ones are snap fit wedges that allow each level to pivot freely +/-30 degrees or so. The magnets are inserted north to south so they repel each other keeping the teeter stable and level until you touch it. When you touch it it oscillates back and forth until the energy is used up and it returns to level.
Video of the teeter in action HERE. I still get a kick out of playing with it on my desk at work. Its a fun conversation piece. I suppose if I shortened the arms a little I could stack them many layers taller and it would still stand up straight because the magnets would lift almost all the weight off of the pivot points.
1. Material - 1.75mm ABS
2. Hardware - M2. V2 hot end
3. Slicer program - Simplify 3D
4. Slicer settings and or file -
4. Slicer settings and or file -
5. Finishing details - Minor trimming. Install the magnets.


Tony Shulthise
Jan 22, 2014, 12:48:48 AM1/22/14
to make...@googlegroups.com
3 Arm Magnetic Levitator - Each arm is the same part but with the magnets facing north south. The arms to the right were my first try to entertain myself with 3D printed magnetic levitation. The ones on the left and in the bottom pic are my second attempt. The next post will show my third attempt. The post above this one shows where I ended up eventually about 12 hours of tinkering later.
Tony Shulthise
Jan 22, 2014, 12:54:04 AM1/22/14
to make...@googlegroups.com
Magnetic Teetor - third rev - As with the others, the top teeter is the same part as the bottom one and it just sets in mating features but doesn't physically attach. I made the arms on this one just a little bit too short so its hard to get the top one to stay on the bottom one without flying off because the magnetic repulsion force is higher than the weight of the top teeter. If I add a little weight to one or both sides its fine. I leave this one on my desk at work as a boobie trap :-) The trouble is that most of the time I'm (still) the boobie that knocks them off onto the floor.
Message has been deleted

st...@hovership.com
Jan 22, 2014, 12:33:52 PM1/22/14
to make...@googlegroups.com
- 1.75 Fine Woodfill
- M2
- Creator
- Similar to the ultimaker settings here: http://learn.colorfabb.com/how-to-print-with-woodfill/
- Stained with dark walnut wood stain


jimc
Jan 28, 2014, 11:48:20 PM1/28/14
to make...@googlegroups.com
well i wouldnt call this my best print but......
these are some gauges for older military diesel generators. i designed the housing to replicate the look of the original 30 year old gauge (right) but use up to date digital components. i have probably about 100 of these to make. i have frequency, volts and amp gauges. i had someone laser cut me out the lenses and another company make me the electronic guts. i am printing the bezels then the lenses go in then a locking ring which gets solvent bonded in place making the face in one piece. i designed the white gauge faces and had them printed in laminated vinyl. the box holds the guts and snaps onto the back plate. 2 screws through bolt everything together.
Tony Shulthise
Jan 29, 2014, 11:22:18 PM1/29/14
to make...@googlegroups.com
Those look great Jim! That's kind of practical application I see 3D printing that will eventually cause 3D printing to explode.
You should also post that print that you painted here too. Its a work of art.
Care to share the settings and any other details for the prints you posted above?
More, more! ;-)
jimc
Jan 30, 2014, 12:07:56 AM1/30/14
to make...@googlegroups.com
sure let me dig up some pics of that shower hook and my deck lights. i use abs for almost everything. never pla. i will eventually just start using pet for everything though. setting for the gauges are:
temp 245
.35 nozzle
multiplier .96
retraction 1.8 / ret speed 3000 / coast 1.6mm
40% infill
layers: bot 3, top 3, sides 2
Dave K
Jan 30, 2014, 12:11:06 AM1/30/14
to make...@googlegroups.com
This isn't pretty, but it's my best print to date as far as true utility goes.
I have a radio controlled helicopter I'm putting a scale fuselage on. There are problems with the mounts that attach the helicopter to the fuselage. They were not the right height for my helicopter, they required using small wood screws to mount the heli onto plywood platforms in the fuselage, and the rear mount was so far back in the fuselage it would be very difficult to access the screws for installation and maintenance. The printer saved my bacon. I redesigned the mounts so they were the right height and slid above and below the plywood mounting platforms, fitting snugly so there is zero slop vertically or horizontally. I'll print a clip to keep the mounts from sliding forward when installed. It took a couple of prototype prints, but the result is a rock solid mount that doesn't use wood screws and lets me install/remove the heli in 30 seconds instead of several minutes and a lot of foul language.
I do love this printer!

Dale Reed
Jan 30, 2014, 3:30:16 PM1/30/14
to make...@googlegroups.com
Dave, Tony, jimc,
I am looking into doing a setup / demo / presentation for K-12 kids in the Cleveland area. I have a self-running Powerpoint show with photos of various prints that I've collected (and obtained the owner's permission to copy and use). I would like your permission to use pictures you have posted in this topic (and, jimc, your photos of the deck lights and such -- and some of yours I've used before, I think... thanks!) in my presentation. Ideally, I'd like permission to use the photos in that presentation for future events as well, but if you only want me to use the pictures for the 12-Feb-2014 school STEM event, just let me know. Just PM me your OK (or not OK, or conditional OK) through this forum to my gMail account.
I could use a few pictures of messed-up prints too ;-) --- so the kids can see that the current state of the art takes a bit of "tinkering" to get top quality.
Thanks in advance for your kind permission and help!
Dale

Travis
Jan 30, 2014, 7:15:40 PM1/30/14
to make...@googlegroups.com
Made this as a gift for my dad (said they were thinking about a new car...har har har). It's too bad clear photographs so poorly, this came out really well for a 1st shot (I believe it was in the neighborhood of 56 hours). Obviously it would have done better had I removed the wheels and such and done them separately but I kind of wanted to see what it would do! Layer heights were .10mm I believe. These are unfortunately the best pictures I took before shipping it out but thought I'd share a little something.
http://travisbailey.smugmug.com/3D-Printing/i-knGMQ3M/0/XL/IMG_3058-XL.jpg
http://travisbailey.smugmug.com/3D-Printing/i-k7pt3jh/0/XL/IMG_3060-XL.jpg
http://travisbailey.smugmug.com/3D-Printing/i-knGMQ3M/0/XL/IMG_3058-XL.jpg
http://travisbailey.smugmug.com/3D-Printing/i-k7pt3jh/0/XL/IMG_3060-XL.jpg
jimc
Jan 30, 2014, 7:20:23 PM1/30/14
to make...@googlegroups.com
is that the Porsche model that they offered for download a while back. it had like 200million polygons or something. the file was such a crazy tolerance i tried it and it just locked up creator.
Travis Bailey
Jan 30, 2014, 7:24:49 PM1/30/14
to make...@googlegroups.com
Yep, that's the one. I've got a fairly beefy desktop, but it was still pretty difficult to work with until I could get it scaled down! That was printed at 5%, just about the full length of the bed..I'm wondering if that scan is a 1:1 full scale model!
On Thu, Jan 30, 2014 at 4:20 PM, jimc <xtremekr...@gmail.com> wrote:
is that the Porsche model that they offered for download a while back. it had like 200million polygons or something. the file was such a crazy tolerance i tried it and it just locked up creator.
--
You received this message because you are subscribed to a topic in the Google Groups "MakerGear - Make Today, Change Tomorrow" group.
To unsubscribe from this topic, visit https://groups.google.com/d/topic/makergear/-z5MEtlo5PY/unsubscribe.
To unsubscribe from this group and all its topics, send an email to makergear+...@googlegroups.com.
For more options, visit https://groups.google.com/groups/opt_out.
Tony Shulthise
Jan 30, 2014, 11:38:20 PM1/30/14
to make...@googlegroups.com
Dale,
You can use any of my pics. Nothing proprietery there. I'll even send .stl files to anyone who wants any of the items I posted. I'll start another thread for "print fails". We can probably learn more from one another's print fails than anything else anyway.
Enjoy,
Tony

Kain Kulinski
Jan 31, 2014, 8:09:01 AM1/31/14
to make...@googlegroups.com
I have a ton of things that i want to upload to this. This was one of the first big things I printed. It was a trophy for our Local R/C club. I printed it in PLA and coated it with epoxy, then painted and antiqued.
Tony Shulthise
Jan 31, 2014, 2:33:41 PM1/31/14
to make...@googlegroups.com
Loving this thread so far! Great work guys. Very inspiring.
Dave K
Jan 31, 2014, 9:21:39 PM1/31/14
to make...@googlegroups.com
Every time I post in this thread, I wonder why I'm putting my prints in the same thread as the truly amazing objects others have produced. Some of what I've seen here are practical, some art, but all of them are very impressive, and inspiring. Just bear in mind I'm a newbie at this :)
This print isn't anything impressive, but it's another one that was very useful. It's a prototype cursor control set they had modeled where I work. They knew I had just purchased the 3D printer and asked me if i'd be willing to print it so they could evaluate the size and layout using a 1:1 scale mockup. They were so impressed with the result that they've decided to purchase a 3D printer on the company dime. I'm trying to steer them to MakerGear, but in a corporate environment, a fast track purchase can still take a couple of months. In the meantime, I'm lobbying for MakerGear!
The material and set up:
1. Material - 1.75mm PLA
2. Hardware - M2
3. Slicer program - Simplify 3D
4.
Slicer settings and or file - Extrusion: 0.35mm/auto, Brim: 1 layer, 4
outlines, Bed: 70 deg, Extruder: 220, Garnier Fructis Style
Extreme on the glass.
jimc
Jan 31, 2014, 11:32:17 PM1/31/14
to make...@googlegroups.com
dave feel free to post anything.
here is another print i have been working on for awhile now. not my model of course. someone posted it up on thingiverse. they did a hell of a job on it. its a fairly big model. you can get an idea the m2 sitting behind it. it consists of 40 separate printed pieces. this is all printed in silver abs and the pieces are glued with acetone.
Kain Kulinski
Jan 31, 2014, 11:39:48 PM1/31/14
to make...@googlegroups.com
Dave K, your cursor controller is just as impressive as the others. I really enjoy seeing what everyone else is doing with their printers. This thread really speaks to the versatility of 3d printing.
I dont take to many formal pictures of the stuff I do. I usually dont have time to set it up.
Here is another one that I found of the weekly trophies at our track.
They all shared the same base that used a slot to mount the number.
I printed the originals then made molds
Then I cast them in fiberglass resin mixed with pecan shells for volume.
The class labels and track logo were printed special for each race
The bombs were printed in ABS and acetoned smooth, then painted.They were given out for fast laps.
jimc
Jan 31, 2014, 11:52:17 PM1/31/14
to make...@googlegroups.com
nice job kain


Namagasta Mail
Feb 1, 2014, 12:32:48 PM2/1/14
to make...@googlegroups.com
Hey All,
This is my best. There is a lot more to go, but this is where I am:
1. Material - Natural PLA
2. Hardware - MG Mendel,
3. Slicer program - Sli3er
4. Slicer settings and or file - 20% filled, 0.8 hotend, 0.5-0.6 layers
4. Slicer settings and or file - 20% filled, 0.8 hotend, 0.5-0.6 layers
5. Finishing details - some sanding + lot of hole-clearing w/ drill
Archive of images found here:
http://namagasta.com/baki/
http://namagasta.com/baki/
-A²
--
You received this message because you are subscribed to the Google Groups "MakerGear - Make Today, Change Tomorrow" group.
To unsubscribe from this group and stop receiving emails from it, send an email to makergear+...@googlegroups.com.
Message has been deleted
Message has been deleted

aeviaanah
Feb 4, 2014, 9:26:19 PM2/4/14
to make...@googlegroups.com
Hey man nice print and it looks functional! Can you elaborate on slicer support settings? I printed the filament extruder bracket and it was a PITA the break away the support. What did you end up doing?
Message has been deleted
Message has been deleted

Earsmith
Feb 5, 2014, 12:18:18 AM2/5/14
to make...@googlegroups.com

G-Code generated by Simplify3D(TM) Creator 1.1.5
MakergearM2 v2 hotend
Ultimachine 1.2 controller
PrintMaterial,PLA from Reprap Walmart. Thire stuff goes for about 35 buck on Ebay. Running temp 148 degrees.
Build time: 57.65 min (0.96 hr)
DefaultSpeed,1800
OutlineUnderspeed,0.7
RapidXYspeed,5800
RapidZspeed,1200
Filament length: 762.8
Message has been deleted
jimc
Feb 14, 2014, 10:08:52 AM2/14/14
to make...@googlegroups.com
here is something i did for the wife for valentines day. found these roses on thingiverse. i printed the tops in white abs and the stems in black. painted them and did some shading with the airbrush. glued them together with acetone. i printed the vase in madesolid pet+ using creators single wall spiral option. that came out super clean. its the first time i really had a use for that new feature they put in there. worked great.
Dale Reed
Feb 14, 2014, 12:17:47 PM2/14/14
to make...@googlegroups.com
I just wanted to thank those who posted here and gave me permission to use their photos. The STEM event at a local high school was very well attended (500+ students and parents, I believe), and my 3D printing setup covered two long tables. I had my .PPS with the photos running on a monitor on one table, surrounded by a number of printed samples that I borrowed from Rick (THANK YOU!!!) and a couple of mine (twisty hex, bigfoot of course, and a couple others). The gears and Luxo lamp were a hit.
On the other table, I had my PC running OpenSCAD and Creator, driving my excessively-well-lit M2 printing a calculator display stand -- which prints on its side. It was fun to tell the kids (and parents) to "put their heads on sideways" to figure out the easiest way to print something -- be creative! I also had a number of books and magazines open to show the variety of printers and other "neat stuff". Plus a finished calculator stand with my HP-15C/Limited Edition, which got a few comments on RPN.
I was so busy answering questions, even while setting up "before" the event started, I never got a free minute to take pictures to post. (Sorry!) :-(
On the other hand, I did have three high school cheerleaders help carry in all my stuff from the car. Is life with a MakerGear M2 3D printer GREAT or what! :-)
Dale
Dave K
Feb 14, 2014, 1:32:40 PM2/14/14
to make...@googlegroups.com
That's really nice, Jim! I've got a spool of Makesolid's PET+ coming in today, and I can't wait to give it a shot.
Tony Shulthise
Feb 14, 2014, 2:24:22 PM2/14/14
to make...@googlegroups.com
I wish this forum had a "like" button. Great work.

Rick Pollack
Feb 14, 2014, 2:28:47 PM2/14/14
to MakerGear
Wow Jim!
On Fri, Feb 14, 2014 at 2:24 PM, Tony Shulthise <tshul...@yahoo.com> wrote:
I wish this forum had a "like" button. Great work.
--
jimc
Feb 14, 2014, 4:05:28 PM2/14/14
to make...@googlegroups.com
thanks guys!
st...@hovership.com
Feb 15, 2014, 4:34:16 AM2/15/14
to make...@googlegroups.com
Printed this for my wife for v-day
m2 with .5mm nozzle
creator software
.225 layer height


On Monday, January 20, 2014 2:58:25 PM UTC-8, Tony Shulthise wrote:
This is a thread for everyone to post pictures of your prints.
Include as much of the following as you can:1. Material2. Hardware3. Slicer program
4. Slicer settings and or file
5. Finishing detailsTry to keep all discussions on topic so we don't dilute the content. This should be great. I've seen some great prints from some of you guys already. I'll chum the waters with a print I made recently for a guy developing a product that needed a custom housing. I'll post more tonight when I have more time...1. Material -1.75mm PLA2. Hardware - MakerGear M2 with the V2 hotend3. Slicer program - Simplify3D5. Finishing details - None other than removing supports
4. Slicer settings and or file - Not available

Bret Allen
Feb 15, 2014, 3:06:23 PM2/15/14
to make...@googlegroups.com
Here's a T-Rex skull I did a few weeks ago. It's an actual 3D model of a real skeleton. 25mb .stl file. I was pretty happy with the detail of the bones. I could print this in even finer detail too. Love this printer!!
1. Material - White PLA
1. Material - White PLA
2. Hardware- M2 V3B hotend
3. Slicer program - Creator 2.01
4. Slicer settings and or file - Around .15mm layer height, .28mm extrusion dia., manual supports/raft. 3rd pic shows table orientation and supports
4. Slicer settings and or file - Around .15mm layer height, .28mm extrusion dia., manual supports/raft. 3rd pic shows table orientation and supports
5. Finishing details -
Bret Allen
Feb 15, 2014, 3:19:32 PM2/15/14
to make...@googlegroups.com
Here's a bearing housing. A slightly more practical part I did recently for a prototype my company is working on:
1. Material - Black ABS
2. Hardware - M2 VB3 hotend
3. Slicer program - Creator 2.01
4. Slicer settings and or file - 100% infil, around .18mm layer height and .3mm extrusion dia., 4 shells, rectilinear infil
5. Finishing details - none other than pressing in the bearings w/ an arbor press
jimc
Feb 15, 2014, 3:28:25 PM2/15/14
to make...@googlegroups.com
that skull is great bret.
Bret Allen
Feb 15, 2014, 3:33:20 PM2/15/14
to make...@googlegroups.com
Oh and here's a Door Stop I put up on Thingiverse. I built this out of necessity since our bedroom door likes to close all by itself and I didn't want to bother with shimming up the hinges to fix the problem! :) New doorstop = happy wife :+)
http://www.thingiverse.com/thing:225896
http://www.thingiverse.com/thing:225896
On Monday, January 20, 2014 3:58:25 PM UTC-7, Tony Shulthise wrote:
This is a thread for everyone to post pictures of your prints.
Include as much of the following as you can:
1. Material - PLA2. Hardware _ M2 V3B Hotend
3. Slicer program - Creator 2.01
4. Slicer settings and or file - Not quite sure, but pretty course print. .25mm or so, 60% infil on the base piece, 100% on the printable pin for strength, around 30% on the stopper I think.5. Finishing details - I machined a pin for the one I used on our door so it would be easier to fit w/o any sanding work.
Bret Allen
Feb 15, 2014, 3:35:56 PM2/15/14
to make...@googlegroups.com
Thanks! I was really happy with how it turned out too. That was my first attempt with manual infil. Creator was worth every penny!
On Saturday, February 15, 2014 1:28:25 PM UTC-7, jimc wrote:
On Saturday, February 15, 2014 1:28:25 PM UTC-7, jimc wrote:
that skull is great bret.
Bret Allen
Feb 15, 2014, 3:46:09 PM2/15/14
to make...@googlegroups.com
Wow, very nice work!!

Jamil F.
Feb 15, 2014, 9:33:48 PM2/15/14
to make...@googlegroups.com
WOW you guys make me look an a loser :P
Dave K
Feb 15, 2014, 9:37:23 PM2/15/14
to make...@googlegroups.com
Hey Jamil, don't think of it that way. I did too when I saw some of the prints after posting one of my own, but everyone has to start out from scratch. We newer guys will be producing some fantastic things before long. In the meantime, I'm learning as much as I can from the more experienced printers here!
jimc
Feb 15, 2014, 9:42:18 PM2/15/14
to make...@googlegroups.com
that doorstop is a great idea too. unfortunately i dont have a bit of carpet in my house. i will be stuck with the wedge type for my hardwood floors.
Kain Kulinski
Feb 15, 2014, 10:38:38 PM2/15/14
to make...@googlegroups.com
Jamil
Don't worry. I know I have a whole barrel full of failed prints that got me to were I'm at now. I have had my printer coming up on a year now and this group has really come a long ways in that time. I know I wouldn't have been able to do half of the things without it. There is huge amount of knowledge here and some really helpful people. I think Rick's team really sets the tone for all of this with their great support and availability to answer questions. If u watch any of the other printer forums, none of the companies CEOs/Owners are answering questions directly on a daily basis.
Don't worry. I know I have a whole barrel full of failed prints that got me to were I'm at now. I have had my printer coming up on a year now and this group has really come a long ways in that time. I know I wouldn't have been able to do half of the things without it. There is huge amount of knowledge here and some really helpful people. I think Rick's team really sets the tone for all of this with their great support and availability to answer questions. If u watch any of the other printer forums, none of the companies CEOs/Owners are answering questions directly on a daily basis.
Jamil F.
Feb 16, 2014, 1:57:03 AM2/16/14
to make...@googlegroups.com
Dave and Kain, Thanks guys i will get there, i am learning alot from the forums :)
I am having a hell of a time with small detailed prints, the oozing is making it very tough, maybe i need the 0.25 nozzle, i am keeping on it though :)

Toby
Feb 18, 2014, 4:15:43 AM2/18/14
to make...@googlegroups.com
Well this isn't so much about a great print as something I wanted to try with a 3d printer.
The picture has 3 M2 prints in it. Two are the crease patterns for an origami butterfly and one is a frame. The prints have ridges in them where the creases should go in the paper and the frame holds the paper in place while I press the prints into each side. This gives me all the creases at once in exactly the right places. The butterflies in the picture are the result of folding up the creases.
It's also easy to fold by hand but this is way more fun.


Jin Choi
Feb 18, 2014, 9:11:33 AM2/18/14
to make...@googlegroups.com
Toby, what is the usable resolution using your technique? I know the "computational origami" crowd has done fantastic things, and was wondering if this technique can help with doing more complex folds than the standard cranes or boats.
Toby
Feb 18, 2014, 11:13:45 AM2/18/14
to make...@googlegroups.com
Jin, I'm slowly working my way up in complexity. Currently I'm working on the Kawasaki rose and that seems doable. The aim is more complex models, but when there are a lot of small creases it becomes difficult to get them sufficiently embedded to the point of folding up automatically. It's still helpful, but I have to do more work to figure out the limits.
There's a style of folding called "box pleating" that requires you to first fold a grid into the paper (like 32x32) and that can be very tedious. I did a test with an 8x8 grid on a 6" piece of paper and it worked well.
I've also seen some benefit in the final result from being able to fold models without the auxiliary creases needed when you do it by hand. And the paper is handled less and so gets less beat up in the process.
Jin Choi
Feb 18, 2014, 11:37:32 AM2/18/14
to make...@googlegroups.com
When you get the process worked out, I would love to see more. I've heard about people using laser cutters at low power to pre-crease their folds, but not about 3D printed creasers.

A. Elias
Feb 18, 2014, 11:43:29 AM2/18/14
to make...@googlegroups.com
You could put a small slit in the middle of the creaser and use an xacto knife to just score the paper fibers, similar to the laser cutter but probably less expensive. :-). Maybe even a space for the xacto so she doesn't go in too far.
Adam
Tony Shulthise
Feb 19, 2014, 3:01:59 AM2/19/14
to make...@googlegroups.com
Guy's... If you could start new threads for any posts other than pictures of your prints that would make this thread much more useful for the original intent. Thanks.
Toby
Feb 19, 2014, 11:00:18 AM2/19/14
to make...@googlegroups.com
Sorry, Tony. I see your point.
Jin Choi
Feb 24, 2014, 1:35:40 PM2/24/14
to make...@googlegroups.com
So, I've only been at this a few weeks myself so I don't have a whole lot of things to contribute. But I thought this print was an interesting study in finishing techniques. Model is from http://www.thingiverse.com/thing:244821, I tried to replicate the render.
1. Material - 1.75 aqua PLA from Coex3D
2. Hardware - M2 current model, v3b extruder
3. Slicer - Simplify3D
4. Settings - 0.15mm layer height, forget the rest.
5. Finishing details - High fill/sandable primer, sanding, then several layers of metallic auto body paint. "Gem" printed separately and superglued into place.
You can see the effect of the finishing by comparing the front face to some of the visible side surfaces, which I didn't bother to prepare as much.
Tony Shulthise
Feb 24, 2014, 2:24:35 PM2/24/14
to make...@googlegroups.com
I love seeing all the creative solutions everyone comes up with. Thanks for all the settings and pictures of prints so far. Keep-em coming!
jimc
Mar 2, 2014, 11:41:06 PM3/2/14
to make...@googlegroups.com
just wanted to post that the roses and vase i posted earlier in this thread for valentines day was chosen as the madesolid print of the week. kinda cool. its something i guess they started doing since i was week 1. they give you 25% off your next order if you win. nice of them to do that!
Dave K
Mar 3, 2014, 12:04:14 AM3/3/14
to make...@googlegroups.com
Congratulations, well deserved!
Toby
Mar 3, 2014, 12:14:25 AM3/3/14
to make...@googlegroups.com
Woot! Way to go!
Tony Shulthise
Mar 3, 2014, 2:50:42 PM3/3/14
to make...@googlegroups.com
They did look great. Congrats!!
On Sunday, March 2, 2014 11:41:06 PM UTC-5, jimc wrote:
Dave K
Mar 4, 2014, 7:57:54 PM3/4/14
to make...@googlegroups.com
And another MakerGear M2 right behind you for week 2, a vase I did from hakalan's design on thingiverse, using settings your fff file, Jim. All I did was push the button, but I can't argue with the 25% discount. Ironic that I just ordered 2 spools from MadeSolid, which shipped yesterday. But I'll still make good use of the discount :)
I hope people notice that MakerGear prints were featured two weeks in a row on the MadeSolid website!
I hope people notice that MakerGear prints were featured two weeks in a row on the MadeSolid website!
On Sunday, March 2, 2014 11:41:06 PM UTC-5, jimc wrote:
jimc
Mar 4, 2014, 8:08:51 PM3/4/14
to make...@googlegroups.com
haha sweet dave!! thats great. i did the same and had just ordered 3 rolls of black but ill still use the discount for sure. i am wondering about this layer adhesion thing on the black so if that happens then ill save the black for when i get a v4 extruder and order some more clear.
Dale Reed
Mar 8, 2014, 10:32:23 PM3/8/14
to make...@googlegroups.com
All,
Here (see attached photo) i's a teeny LCD bezel I made for a friend at work. Overall dimensions are 45 mm wide X 51.2 mm high X 5.0 mm tall. The cutout for the display to show through is 32 mm x 32 mm, and has a very slight bevel. It's designed for the thickness of the display unit so it can be mounted on the outside of a project enclosure, with only a non-showing hole for the flex-PCB to connect it. Four holes are provided for securing from the back of the panel with small screws.
Believe it or not, the project is a wireless model train controller (throttle, etc.). I remember when you could run a model train with 2 wires... ;-) guess that makes me a geezer!
Here are the particulars:
* M2 with V3B hot end
* MakerGear black PLA
* 220 C extruder, 65 C bed with AquaNet Extra Super Hold hairspray on the glass
* Designed with OpenSCAD, sliced with Simplify3D 2.0.1 on Linux Mint running on Dell Latitude E6500 w/ SSD and 8GB RAM
* 0.35 mm nozzle, auto extrusion width (0.48 mm), 0.94 multiplier, 0.40 mm retraction, 0.80 mm coast
* 0.20 mm layers, 3 solid top, 2 solid bottom, 2 perimeters (inside to out),
* 1 skirt layer, offset 0.40, 5 outlines (for priming and layer squish check)
* 50% infill @ 45, 135 degrees, no supports (none needed)
* Accel parameters set in starting G-code as follows:
M204 S2400.00 T2400.00
M205 S0.00 T0.00 B20000 X16.00 Z0.40 E4.50
I get just a tiny bit of "hair" where rapids occur moving from hole to hole at the four corners, but they are easily trimmed away with a razor knife.
The reduced acceleration parameters help SIGNIFICANTLY with the oscillation at the corners. I also have the bed springs nearly fully compressed, so it's pretty stiff.
Hope this helps you all improve your prints!
Dale
On Monday, January 20, 2014 5:58:25 PM UTC-5, Tony Shulthise wrote:
This is a thread for everyone to post pictures of your prints.
Include as much of the following as you can:1. Material
2. Hardware3. Slicer program
4. Slicer settings and or file
5. Finishing detailsTry to keep all discussions on topic so we don't dilute the content. This should be great. I've seen some great prints from some of you guys already. I'll chum the waters with a print I made recently for a guy developing a product that needed a custom housing. I'll post more tonight when I have more time...1. Material -1.75mm PLA2. Hardware - MakerGear M2 with the V2 hotend3. Slicer program - Simplify3D5. Finishing details - None other than removing supports
4. Slicer settings and or file - Not available
Dale Reed
Mar 23, 2014, 10:04:26 PM3/23/14
to make...@googlegroups.com
All,
Wanted to get this thread back onto the first page. I finally got a slot of time to install my 24V upgrade kit. A good excuse to clean up the work table, really get the HBP glass clean top and bottom, tune the PID parameters for the extruder, and run a sample print -- see if the ol' black PLA FFF is still good. (I tweaked the fan settings, since I'm using 24V ball bearing fans and haven't had a chance to update the firmware for the 120-ish Hz PWM tweak for fan speed control.
Now that everything is clean and shiny and the profile is good, I thought I'd post the MAKE torture test "posing" on the clean, lighted bed. (LEDs are a tad dimmer now, using a 12V regulator instead of throwing 19 volts at a 12-volt strip!)
jimc
Mar 23, 2014, 10:16:23 PM3/23/14
to make...@googlegroups.com
nice dale. thats quite the collection of trinkets around the printer lol
Dale Reed
Mar 24, 2014, 10:16:57 AM3/24/14
to make...@googlegroups.com
Need some "miscellaneous" electronic surplus stuff? Park your pickup truck in my neighbor's driveway and I'll start throwing stuff out the attic window. Then maybe I'll have room the put all the junk I have in THIS room. :-(

Bryan Boettcher
Mar 24, 2014, 10:30:40 AM3/24/14
to make...@googlegroups.com
Don't make fun of his trashy work area! Every good maker knows that projects work better when surrounded by the detritus of their fallen or otherwise inadequate counterparts. ...right?
:(
dont make me clean
--
You received this message because you are subscribed to the Google Groups "MakerGear - Make Today, Change Tomorrow" group.
To unsubscribe from this group and stop receiving emails from it, send an email to makergear+...@googlegroups.com.
For more options, visit https://groups.google.com/d/optout.
jimc
Mar 24, 2014, 11:25:49 AM3/24/14
to make...@googlegroups.com
lol...true

DIY3D
Mar 24, 2014, 4:20:52 PM3/24/14
to make...@googlegroups.com
Hi All,
I've printed these amazing cute Elephants thing:257911
They're all sliced in Cura. The blue Elephants were printed with a V3b hot end at 200 C end 65 C HBP.
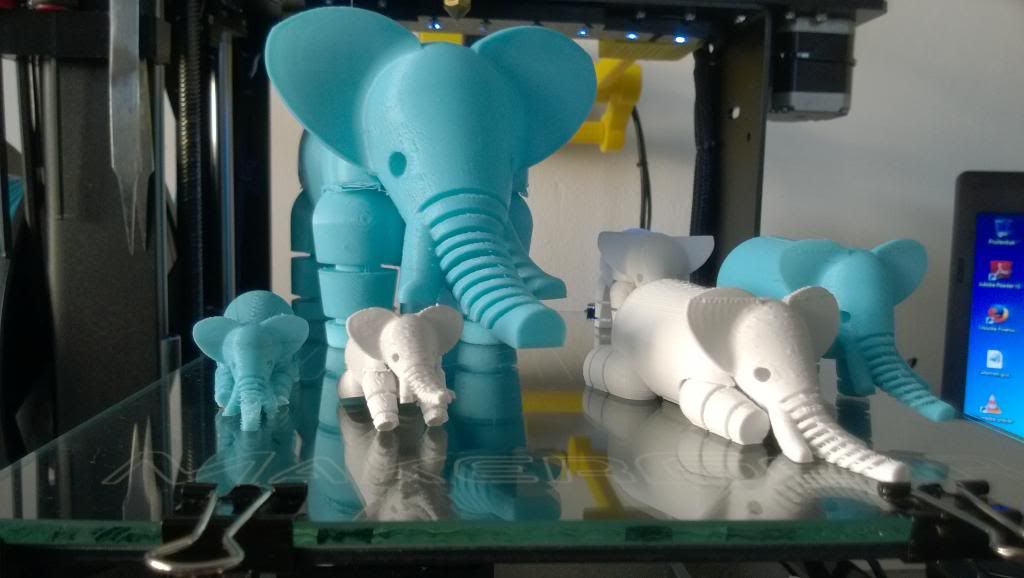
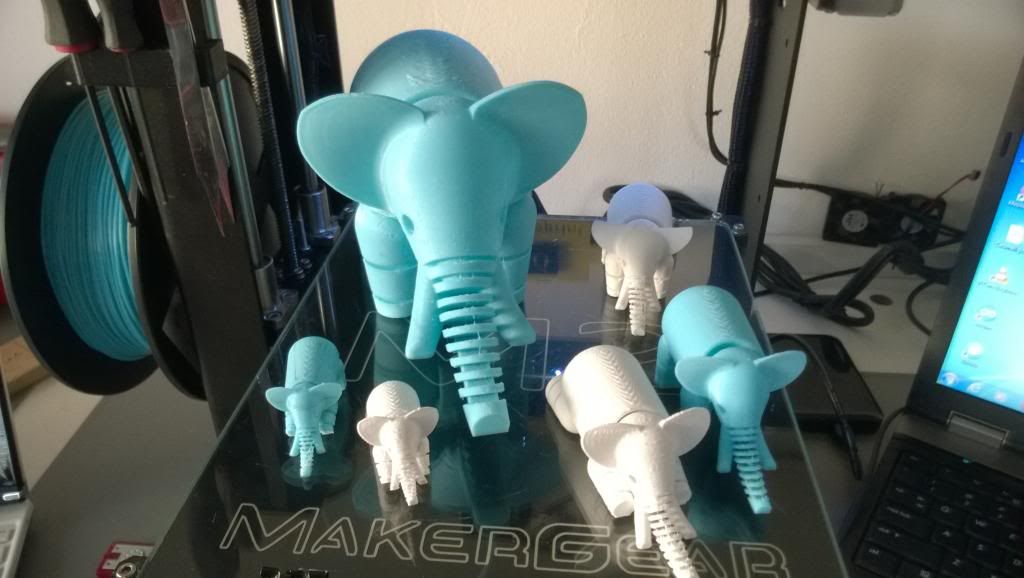
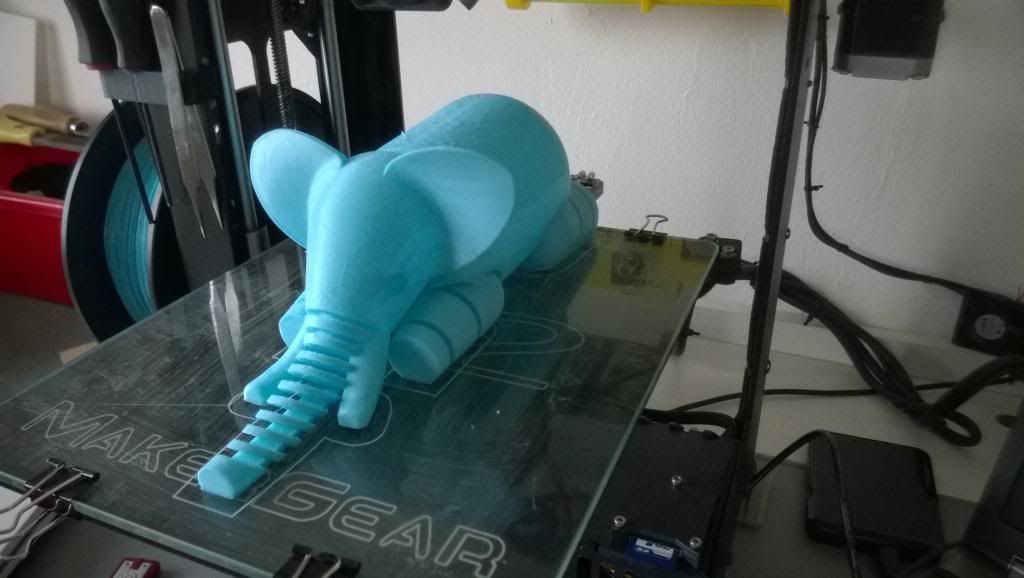
... Print time of this one took over 13 hours...
Filament: PLA
Layer high: 0.2mm
Shell Thickness: 1mm
Bottom/top: 1mm
Fill Density: 0
Print Speed: 60 mm/sec
Support: None
Nozzle: 0.35
Retraction speed: 35
Retraction distance: 3.5mm
Initial layer thickness0.25
Travel speed: 150mm/s
Bottom layerspeed: 40mm/s
Infill speed: 60.0mm/s
Outer/inner shell speed: 60mm/s
M201 X1500 Y1500
M204 S2500 T2500 ; Acceleration: S=acceleration, T=retract acceleration
M205 X10 ; X=maximum xY jerk (mm/s)
Happy printing !!
Marco
jimc
Apr 1, 2014, 10:15:28 PM4/1/14
to make...@googlegroups.com
ill try and keep this thread rolling here. i was fishing through thingiverse and saw something like this so modeled one for myself that i like a little better. this whole thing was done in the black madesolid pet+. i lightly sanded it and gave it a mild cast iron faux finish. the banana swivels and you just hook the bunch of bananas over the top stem.
Toby
Apr 1, 2014, 10:31:45 PM4/1/14
to make...@googlegroups.com
That finish is fantastic. I can't stop looking at trying to figure out "where the plastic went". Goes really well with the ceramic tile in back, too. Nice job.
jimc
Apr 1, 2014, 10:41:59 PM4/1/14
to make...@googlegroups.com
thanks! i sent it over to brian at madesolid and he thought i was playing an april fools joke on him haha. actually the pet sands really nice. it doesnt get fuzzy like alot of plastics.
Dave K
Apr 1, 2014, 10:52:57 PM4/1/14
to make...@googlegroups.com
Nice!
I wonder if you'll be the first two-fer at MadeSolid...two prints of the week, maybe? Your post-print work is really good, Jim.
I wonder if you'll be the first two-fer at MadeSolid...two prints of the week, maybe? Your post-print work is really good, Jim.
jimc
Apr 1, 2014, 11:02:41 PM4/1/14
to make...@googlegroups.com
i dont know dave. we will see. i do custom finishes for a living. paint alot of motorcycles, airbrushing, graphics etc. i spent about 15 min sanding it and i did that finish on it in no more than 5 min. i do that finish on alot of old antique stuff i restore.
Tony Shulthise
Apr 2, 2014, 2:34:01 PM4/2/14
to make...@googlegroups.com
Jim... very nice work, as always! Very inspiring.
Was that printed in one piece or two? Did you use the S3D file that you posted a while back or does it have tweaks for this print? Posting settings for these really nice prints would be very helpful to many of us.
Thanks!
T
jimc
Apr 2, 2014, 9:32:59 PM4/2/14
to make...@googlegroups.com
thanks tony, it was printed in two pieces. it can be found here...http://www.thingiverse.com/thing:287243
the banana part was printed up on edge with 90% support as its shown in the link. it barely made it from corner to corner on the m2 build platform. the fff is basically the same. i have two for the pet. one for clear and one for opaque colors. here is the one used. just dont forget to change that M108 in the beginning script to S255 and the support to 80-100%.
Reply all
Reply to author
Forward
0 new messages