Installing Sailfish firmware instructions- The easy and correct way

Jetguy
Some warnings….do not ram your nozzles into the bed. Be careful.
If you use an 1/8th inch glass plate you need to install this to trip the z-switch early so the nozzles don’t ram into the bed. 1.8inch is about 3.2mm and this shim is exactly that…. http://www.thingiverse.com/thing:207077/#files
1) Carefully unbox your printer using the directions. Install the extruders. Do an overall nuts and bolt tightening check on your new bot.
2) Download 32bit version 2.2.1 of PyPy here http://pypy.org/download.html. Just download and extract it into a folder and remember where it is, that’s it for now.
3) Download 32bit version 2.7.6 of Python here http://www.python.org Download and extract into its own folder and remember where it is, that’s it for now. Do NOT use a 64bit version.
4) Download Makerware and install here http://www.makerbot.com/makerware/
4.5) Download and install proftweak here https://github.com/nothinglabs/proftweak
You MUST use Sailfish version of Replicator-G to update and configure Sailfish firmware.
5) Download the LATEST version of RepG here http://www.thingiverse.com/thing:32084/#files
6) Unzip the Replicator-G file to a folder. Leave all the RepG files in their own folder, don’t move them around (don't move the EXE). Open RepG ( click on the ReplicatorG.exe)
7) Make sure your bot is NOT plugged into the computer via USB yet.
8) Open RepG Preferences> Advanced....point the python and pypy interpreters to the correct file location. (See attached PDF for details).
9) From the RepG menu, select "Preferences". Click the "Advanced" button. Change the "Firmware update URL" field from: http://firmware.makerbot.com/firmware.xml
To
http://jettyfirmware.yolasite.com/resources/release/firmware.xml
Then click "Close". Wait until the RepG is done doing its thing! You should see some stuff happening.
10) Connect your bot’s USB cable to both the bot and the computer you will be performing the upgrade from. Next, power your bot on. But DO NOT connect from RepG to the bot. Check the "Connection (Serial Port)" sub-menu of ReplicatorG’s "Machine" menu. Make sure that you see the USB port for your bot listed. If it does not appear, then select the "Rescan serial ports" item of that sub-menu. You cannot proceed until your bot’s serial port appears(ie. COM 1). Again, DO NOT actually connect from RepG to the bot: the firmware upload process itself will automatically perform that step.
11) From ReplicatorG select the "Upload New Firmware" sub-menu of the "Machine" menu. SELECT your correct machine type!!!! For example, loading Replicator 2 firmware on an original Replicator 1 bot results in nothing on the LCD!!!
12) Select the latest firmware to install (note that versions ending in "b" means for broken SD card hardware=AKA cannot detect card insertion), select the COM port, click Next, then Upload
15) Once you are done shut the printer down and shut down RepG. Do not connect the USB to the bot yet….
16) Open RepG make sure this is selected …..click Machine > Machine Type > The Replicator "whatever version you have" (Sailfish)" . Be sure to select the names ending in Sailfish to connect to Sailfish firmware.
17) Make sure the usb is plugged into the computer and the Printer and turn it back on, open up RepG. If it does not connect then click the connect button and get a connection
18) On RepG click Machine > Onboard Preferences. In the lower left hand corner of the window is a button to "reset motherboard to factory settings". Do that now!
19) Give the machine a little time to do the above step, then shut down the bot and repg and then load them both back up and connect them.
20) On RepG click Machine > Onboard Preferences. Click on the "Homing/VREFs". Ensure that the X and Y Home Offsets are somewhat near 151.998 and or 74.998. Also validate that the toolhead offsets (different than homing offsets) are either values less than 1.0mm (AKA 0.85 or something) or is a value less than 33.0mm (For Replicator Duals) and 35mm for Replicator 2X! In other words, if it's over 34mm( and we are taking an original wooden Replicator, or Greater than 35mm on a 2X) you are going to have a problem. Reset to 0 if the number is too large. Again, valid values are less than 1mm (0.88), less than 34mm (33.35) or (32.87). The real nozzle spacing is (33mm for Replicator Duals and 35mm for Replicator 2X) and the offset is the adjustment from that value. In the case of then entire measured number being given, it just uses that. Note that sometimes after an update, it is not uncommon to see the Tollhead offset be 10 times too large. In other words, over 300mm. Nothing on the bot is 300mm of travel so an offset of greater than 35mm on any bot is a sure sign you need to reset Toohead offsets to 0mm and commit.
21) On RepG click Machine > Onboard Preferences. Click Acceleration(Misc) and set right and left deprime values to 0.
You should be good now. You need to carefully level your build plate(a learned skill, may take you hours at first) and make sure you don’t slam your nozzles into the plate.
Now you should run the calibration script for the D4 in the file > scripts > Calibration -> Replicator 1 dual nozzle calibration. That will bring up gcode then you need to build that gcode for the sd card. Then put that x3g file on the sdcard and print it. Then put the correct lines into the bots consule as you see here: http://www.makerbot.com/support/replicator/troubleshooting/nozzle-align/

Ryan Carlyle
Jetguy

tunell

Joseph Chiu
why pypy?
--
You received this message because you are subscribed to the Google Groups "MakerBot Operators" group.
To unsubscribe from this group and stop receiving emails from it, send an email to makerbot+u...@googlegroups.com.
For more options, visit https://groups.google.com/d/optout.

Scott D
On Sunday, June 8, 2014 12:48:45 AM UTC-4, Ryan Carlyle wrote:

Tom Chang

WifiGuru10
Jetguy

Dan Newman
> Hey Jetguy, i'm playing with S3D and sailfish and it says "Your firmware
> does not support real-time extrusion multiplier changes." when i try to do
> some real-time extrusion mods. Do you have this on the roadmap or am I
> doing something wrong(quite possibly)?
implemented by inferrence. (On some bots which have had it in the past,
it's either been removed or carefully hidden deep down in LCD menus because
it's generally useless and real easy to ruin your print with. Tiny, tiny
changes cause over/under extrusion which ruins your print 2 hours later;
to stop it from ruining it at 90 minutes, you then have to make a BIG
change which then swings the pendulum violently the other way, now
ruining your print differently in 10 minutes. Etc.)
Dan
WifiGuru10
On Saturday, June 7, 2014 10:35:04 PM UTC-4, Jetguy wrote:
Jetguy
Jetguy
TO DOWNLOAD THE HEX FILE:
1. Connect the AVR ISP MKII compatible programmer to the 8U2 6 pin programming header
2. Ensure the Board is Powered
3. navigate to the directory containing the .hex file in the terminal
4. Execute the following avrdude command: avrdude -p at90usb82 -F -P usb -c avrispmkii -U flash:w:Makerbot-usbserial.hex -U lfuse:w:0xFF:m -U hfuse:w:0xD9:m -U efuse:w:0xF4:m -U lock:w:0x0F:m
Dan Newman
> Hey Jetguy, trying to load 7.7 this morning but my mightyboard isn't
> loading the firmware via the USB. Had this issue when i bought it from
> MBOT, i think they might of disabled loading via USB. Had to reflash it
> with my AVRISPmkII.
standard 2560 bootloader on it and that will not work. MBI designed
the board to require a bootloader which operates at a different baud
rate. So, you need to put the correct bootloader on. Jetguy included
it in his posting. You can also find it at,
https://github.com/dcnewman/MightyBoardFirmware-2560-bootloader
Jake Bordens actually is the one who did the research and work for that.
Dan
WifiGuru10
WifiGuru10
Dan Newman
> There's got to be something wrong. Flash the 8u2 chip with the
> makerbot-usb-serial with all the right flags. The port is showing up as
> Com5 on my windows 7 laptop. Flashed the 2560 chip side with the
> stk500boot, and i can't flash via USB.
You may need to include the chip erase switch, -e. However, that
does wipe your EEPROM. (Sailfish will re-init it for you when
it starts running.)
> New sympton, Now i also have the overheat red LED on. Popped up after i
> flashed the board with the bootloader. Anyone know what this means?
> Going to flash with the sailfish firmware directly, hopefully that'll fix
> it.
Here's the little script I use,
#/bin/sh
AVRDUDE=/Users/dnewman/Desktop/ReplicatorG.app/Contents/Resources/tools/avrdude
AVRCONF=/Users/dnewman/Desktop/ReplicatorG.app/Contents/Resources/tools/avrdude.conf
ARCH=m2560
SRC=/Users/dnewman/git/MightyBoardFirmware-2560-bootloader/goodHexFiles/stk500boot_v2_mega2560.hex
#SPEED=57600
SPEED=115200
#PROG=stk500v2
PROG=usbtiny
#PORT=/dev/tty.usbmodem1451
PORT=usb
#FLAGS=-D
FLAGS=
set -x
$AVRDUDE -C $AVRCONF -c $PROG -P $PORT -p $ARCH -b $SPEED $FLAGS \
-Uflash:w:$SRC:i -v -v -v -v
Dan
Dan Newman
> makerbot-usb-serial with all the right flags. The port is showing up as
> Com5 on my windows 7 laptop. Flashed the 2560 chip side with the
> stk500boot, and i can't flash via USB. Same issue I had before, replicatorG
> locks up and I keep getting "avrdude: stk500_getsync(): not in sync:
> resp=0x0" from the CLI.
>
> New sympton, Now i also have the overheat red LED on. Popped up after i
> flashed the board with the bootloader. Anyone know what this means?
>
> Going to flash with the sailfish firmware directly, hopefully that'll fix
> it.
(e.g., boot flash section not set to 8K -- "4096 words"). However,
playing with fuse bits is a good way to accidentally brick your AVR.
(Requires a "high voltage" programmer to undo some fuse bit settings.)
Dan
WifiGuru10
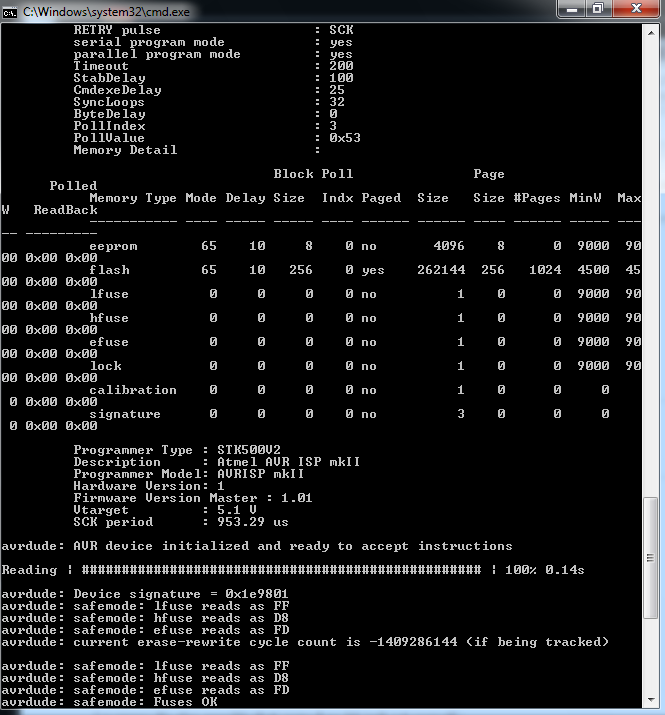
Is there any commands i can run to check my fuses on the chips and make sure they're set correctly?
On Saturday, June 14, 2014 9:16:06 AM UTC-4, Jetguy wrote:

Rich Webb
Two hours for it to load the application is way too long.
Dan Newman
> So Jetguy,
>
> Tried running through this process last weekend, and got stuck after
> loading the stk500boot_v2 firmware. I flash the 8u2 chip, done, pretty
> quick. Then i flash the 2560 chip with the stk500, which takes....FOREVER.
read. That's using a USB based ISP programmer doing just the 2560. I don't
bother with the 8u2 unless I determine it needs changing.
> Ran through attempting to flash the bot a few times and then just gave
> up and loaded sailfish 7.7 directly via the programmer.
> So that's why i
> purchased a programmer to try and remove what i thought to be a locked
> bootloader or something from Mbot3D.
the standard 2560 bootloader which will not work with RepG and USB
downloads (baud rate mismatch).
> So, what are some next steps?
> Should i try erasing the chip completely and starting again?
> What "should" happen after i get the bootloader loaded, should i see
> something on the screen, or is that just to allow me to load the sailfish
> via USB?
https://github.com/dcnewman/MightyBoardFirmware-2560-bootloader/tree/master/goodHexFiles
and correct firmware in the 8u2, you should then be able to load firmware
via the USB connection on the bot with RepG. If you also have C20 installed,
then you should not even need to press the reset button. HOWEVER, it's
my understanding that the MBot3D boards already have C20 installed. As
such, you shouldn't have to install C20 yourself.
> Is there any commands i can run to check my fuses on the chips and make
> sure they're set correctly?
see what they are set to.
Dan
WifiGuru10
WifiGuru10
WifiGuru10
Jetguy
Dan Newman
> Should i unplug all the stepper motors / LCD or something when i program it?
only gets power from the programmer, then programming likely will not work.
Dan
Dan Newman
> Just checked on the C20, not installed, can i use one of these? Also how
> can you tell the anode from the cathode? or does polarity not matter on the
> small ones?
>
> http://www.ebay.com/itm/30-x-0-1uF-50V-Ceramic-Disc-Capacitors-Free-Shipping-/250857558916?pt=LH_DefaultDomain_0&hash=item3a68469384
which are spaced maybe 2 mm apart? Maybe it's 3 mm, I don't recall.
Some caps are polarized (e.g., electrolytics and tants), and some aren't.
The ones you show are not polarized. And you do not need a polarized
cap for this application. So they will work.
Dan

Gian Pablo
Dan Newman
> Disregard, just to confirm i've got a ceramic disc cap labeled "104" in my
> spare parts bin. That's a 0.1uF, should be fine correct? It's red and looks
> like the ones below. No idea how to tell it's voltage capability.
>
> http://www.ebay.com/itm/100pcs-0-1uf-50V-104-100nf-DIP-Ceramic-Capacitor-Disc-/171331635535?pt=LH_DefaultDomain_0&hash=item27e429494f
AND something bad might happen spilling 24V on to the 5V rail. Hence the
soft requirement to use a cap rated for at least 24V + 20%. You must not
use a cap rated 6V or less.
Dan
Dan Newman
> Ok, here's a dump of the fuses on the 2560 chip.
>
> Anything jump out at anyone?
a mistake and your AVR is bricked. Put differently, either understand
fuse bits and don't need advice from others, or you don't and thus
shouldn't be changing them.
That said, your values look correct.
Dan
Rich Webb
WifiGuru10
WifiGuru10
Dan Newman
> Sounds promising, any way i can change that?
is another friend. Likely -B.
Dan
Dan Newman
a decision about using slicer retraction vs. firmware retraction.
Dan
WifiGuru10
Dan Newman
> I wish i could buy you all beers right now. That literally took less than a
> minute to write the bootloader, now to install the C20 and try for USB
> install ;P
inspect your soldering when you are done with a magnifying glass
and decent lighting. It's easy to have a solder bridge there.
Dan
WifiGuru10
Dan Newman
> Thanks for heads up, got me a 20x loop to validate. and checked continuity
> between the two pads. Everything seems groovy. Booted up and no magic
> smoke.
>
> So, flashed the bootloader (which now takes like a minute, which is epic)
> and then gave ReplicatorG a shot and uploading the firmware.....
>
> guess what!? "Firmware Update Succeeded!!!" All without the
> carpal-tunnel-inducing reset button. Soooo happy right now, two gremlins in
> the machine tuned out in one day!
Well, it's a tad less frustrating at least. (I sometimes do
more than 20 firmware downloads to a single bot in a single
day. Probably even more than that back two years ago when we
were first experimenting with the acceleration code.)
Dan