RAW-like highlight recovery in movie mode
1,843 views
Skip to first unread message

Alex
Feb 13, 2012, 4:58:38 PM2/13/12
to Magic Lantern firmware development
If you've been following the twitter discussions, you've probably noticed that I've been working on something with great potential.
As you know, some color channels are more sensitive than others, and this depends greatly on white balance. Almost always, one of channels will clip earlier than the others. But, after the overexposure point (100% white), there is still valid luminance data in the other (non-clipped) channels.
Example with pictures:
http://people.zoy.org/~cyril/dcraw_lchblend/highlight_recovery_dcraw_lch_patch.html
http://www.guillermoluijk.com/tutorial/dcraw/index_en.htm
When recording movies or shooting JPEG, the camera discards the extra data above the clipping point (called "saturation level" in dcraw). On the other hand, good RAW software will use this extra data to recover quite a bit of more detail in highlights.
This update brings the ability to record extra highlight data, just like with "dcraw -H1" (see first link). I didn't do any serious testing, but I think you can get around 1 stop of extra highlight detail.
So.. that's effectively recording 8-bit RAW, in terms of highlight headroom :)
Where's the catch?
- The extra highlight data will contain distorted colors (usually pink highlight). You will need to fix in post, which is not easy.
- The image is darkened a bit. You may have to bring shadow detail back.
The good news is that noise is NOT increased. This actually works by altering digital ISO component. So, when you enable this, ML will display the resulting equivalent ISO (which will be lower). Also, ISO 160, 200 and 250 will be identical (because digital component is overriden).
This trick also brings ISO 80, which should work just like ISO 160, 320 and so on. Maybe a bit cleaner.
Another nice goodie: white balance using RGB multipliers, like in dcraw.
I've only tried it on 550D, 60D and 5D Mark II. I'll leave the fun part (testing, comparisons etc) up to you :)

daniel thissen
Feb 13, 2012, 5:12:47 PM2/13/12
to ml-d...@googlegroups.com
thank you very much!
Testing .
> http://magiclantern.wikia.com/
>
> To post to this group, send email to ml-d...@googlegroups.com
> To unsubscribe from this group, send email to ml-devel+u...@googlegroups.com
> For more options, visit this group at http://groups.google.com/group/ml-devel?hl=en

Ivo Silva
Feb 14, 2012, 6:09:42 AM2/14/12
to ml-d...@googlegroups.com
Wow! This is great!

Jan Larmann
Feb 14, 2012, 7:06:08 AM2/14/12
to ml-d...@googlegroups.com
does it work in movie mode? I assume not because ofthe file name. Is it possible to get something like this in movie mode?

Malcolm Debono
Feb 14, 2012, 7:11:08 AM2/14/12
to ml-d...@googlegroups.com
Read the topic title ;-)
Can't wait to try this out!

TOM_M
Feb 14, 2012, 7:23:19 AM2/14/12
to Magic Lantern firmware development
After a bit of playing around with it, the real task is to fix the
pink tint in post without destroying the extra data. If anyone can
suggest the best way to do this, please do!
Ive tried with curves or levels, but this just gives me an image
identical to the Highlight++ mode off, but without the pink - which of
course defeats the point.
Great work Alex
pink tint in post without destroying the extra data. If anyone can
suggest the best way to do this, please do!
Ive tried with curves or levels, but this just gives me an image
identical to the Highlight++ mode off, but without the pink - which of
course defeats the point.
Great work Alex
Alex
Feb 14, 2012, 8:12:52 AM2/14/12
to Magic Lantern firmware development
The simplest method is desaturating the data above white level. Of
course, you probably don't want grayscale highlights, but in certain
cases (clouds, white clothes) it may work quite well.
Raw converters discard color information from overexposed pixels
(whatever is above white levels) and interpolate color data from
nearby pixels (which are not overexposed). Luma data is kept from the
"pink" version.
If you use levels to clip the pink areas, you will get results
identical to normal mode (with a bit of banding maybe).
Check the links from the first posts for hints.
I'll try to write an avisynth script to implement something similar to
algorithms used by RAW convertors.

Simon Larcher
Feb 14, 2012, 8:48:35 AM2/14/12
to ml-d...@googlegroups.com
Right now I'm experimenting with nodes in Blender, I try to find the easiest way to matte out the pink/headroom data with keys.
Correct the extracted areas and mix back with the initial footage.
Not easy, indeed.
Why is it pink ? Is that related to the fact that it is encoded in YCbCr, eg no green channel so the pink is the result of Cb+Cr ?
In that case, wouldn't it be smarter to work on the footage before the conversion to RGB components ?
The green channel indeed shows less details.
Once again, thanks for the constant research and improvements on Magic Lantern, this is not only about shooting video, I am also learning a lot of things.
Simon
2012/2/14 Alex <broscu...@gmail.com>
Alex
Feb 14, 2012, 9:31:14 AM2/14/12
to ml-d...@googlegroups.com
Since the green channel usually clips first, the remaining data contains higher values for red and blue. And that's... pink.
Jan Larmann
Feb 14, 2012, 3:22:32 PM2/14/12
to ml-d...@googlegroups.com
screen cut it of lol
On Tue, Feb 14, 2012 at 7:11 AM, Malcolm Debono <mdeb...@gmail.com> wrote:
Read the topic title ;-)Can't wait to try this out!
--

3pointedit
Feb 15, 2012, 1:28:12 AM2/15/12
to Magic Lantern firmware development
Hey Simon, check out my BA thread of my test nodes.
http://blenderartists.org/forum/showthread.php?244118-Cool-nodes-I-didn-t-know-about
One of them, further down, was highlight recovery, perhaps we could re-
purpose it to color correct that channel?
http://blenderartists.org/forum/showthread.php?244118-Cool-nodes-I-didn-t-know-about
One of them, further down, was highlight recovery, perhaps we could re-
purpose it to color correct that channel?

01101011
Feb 15, 2012, 7:10:25 PM2/15/12
to Magic Lantern firmware development
i am not sure if this is correct and i havent tested much but it seems
this technique produces less DR
http://dl.dropbox.com/u/25456/1.jpg
http://dl.dropbox.com/u/25456/2.jpg
image 1 was shot at 400iso and image 2 was shot with highlight++ 2ev
at 1600 iso
this technique produces less DR
http://dl.dropbox.com/u/25456/1.jpg
http://dl.dropbox.com/u/25456/2.jpg
image 1 was shot at 400iso and image 2 was shot with highlight++ 2ev
at 1600 iso

James Donnelly
Feb 15, 2012, 8:01:06 PM2/15/12
to ml-d...@googlegroups.com
Sorry if I mis-understand you, but the sensor has less DR the higher the ISO, so I don't know if what you're seeing has anything to do with this feature.
01101011
Feb 15, 2012, 8:32:36 PM2/15/12
to Magic Lantern firmware development
wow! i didnt know that. thanks.
anyway, so i tested again leaving the iso at 400 and just changing the
aperture.
the results are similar.
http://dl.dropbox.com/u/25456/1b.jpg
http://dl.dropbox.com/u/25456/2b.jpg
maybe i get this wrong, but isnt this feature supposed to produce
slightly less lost highlights?
anyway, so i tested again leaving the iso at 400 and just changing the
aperture.
the results are similar.
http://dl.dropbox.com/u/25456/1b.jpg
http://dl.dropbox.com/u/25456/2b.jpg
maybe i get this wrong, but isnt this feature supposed to produce
slightly less lost highlights?
Alex
Feb 16, 2012, 12:56:44 AM2/16/12
to ml-d...@googlegroups.com
You can't get less DR, because you are not changing the ISO. You are
recording data which normally gets clipped - if you can turn it into
useful detail, that's more DR. If you discard that extra data, that's
exactly the same DR as with this feature disabled.
Compare the shots at the same ISO, shutter and aperture (only change highlight++ setting). The midtones and shadows are only darkened (to make space for extra highlight data), so you will have to brighten the image in post. Brightening will NOT introduce more noise than in the original shot (with highlight++ disabled) - and THAT's the point. If you would underexpose in order to get more highlight detail, you would get more noise in shadows.
So, for testing:
- Make sure you have fully manual settings. No ALO, HTP, peripheral lens correction, auto WB or other things like that.
- Take a picture which is slightly overexposed (for example, set zebras at 99%, increase exposure until they start to appear, then overexpose by 1 stop)
- Record this image with highlight++ disabled, then at 1EV, then at 2EV. Don't change other settings.
- Brighten the darker images (use the Levels tool to clip R, G and B channels at the same point - just before green starts clipping) -> with this you should get the original image (well... almost, since the response curve is not quite linear; a flat picture style may help).
- See how much detail can be recovered.
Now I'm thinking to reverse engineer the response curve and get the RGB data back to linear if possible. This would make postprocessing a lot easier (or at least the research part).
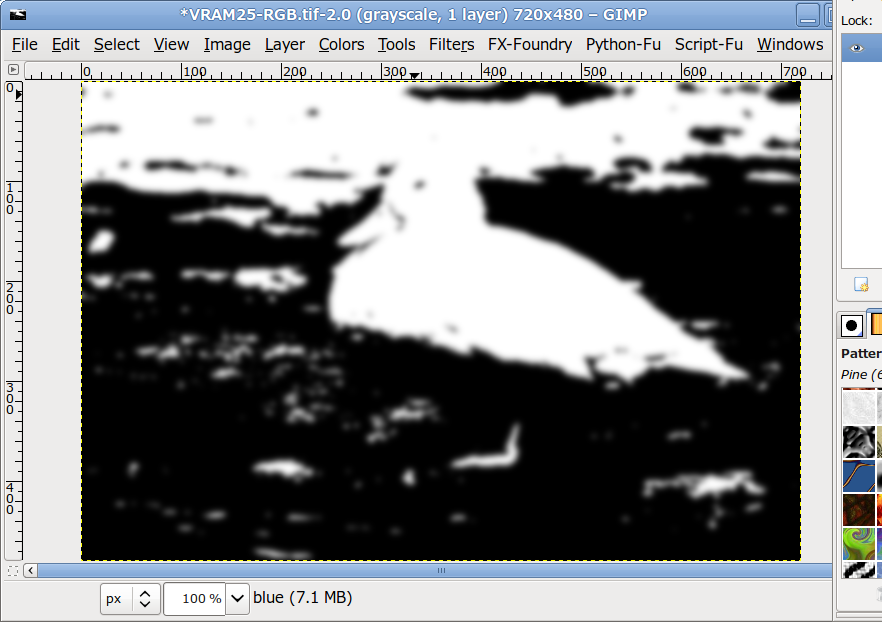
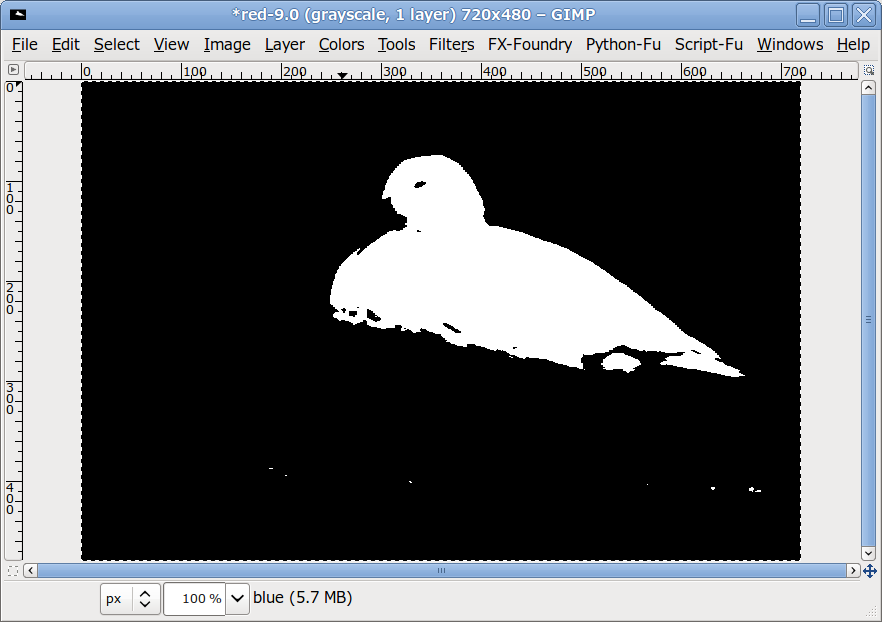
Here's a small howto for obtaining a mask for overexposed highlights in Gimp:
- Decompose the image to RGB (Colors -> Components -> Decompose)
- Look at the histogram on the green channel (or the channel that clips first) and see where it clips (it will be under 255, obviously). That's the white point.
- Threshold R, G and B channels at the level you have just found. Combine the results with "Lighten only". That's a black and white image - black where color data is accurate, white where it's not. Blur it a bit.
- Optional: use Curves (or Levels) to clip R, G and B channels at the white point. You should get roughly how the shot would look without this feature. Recompose them to get a preview, and compare it to the overexpoesed original shot (taken without highlight++). Discard this image, it's just for your info.
Now, you need to guess the color in the areas where the image is overexposed. Use your skills for this :)
And, finally, blend the two layers (the original one and the one with guessed colors) using the mask. I have attached the result of blind desaturation in the overexposed area => where the subject was already white, it's fine; where it wasn't... it's not that fine :)
Compare the shots at the same ISO, shutter and aperture (only change highlight++ setting). The midtones and shadows are only darkened (to make space for extra highlight data), so you will have to brighten the image in post. Brightening will NOT introduce more noise than in the original shot (with highlight++ disabled) - and THAT's the point. If you would underexpose in order to get more highlight detail, you would get more noise in shadows.
So, for testing:
- Make sure you have fully manual settings. No ALO, HTP, peripheral lens correction, auto WB or other things like that.
- Take a picture which is slightly overexposed (for example, set zebras at 99%, increase exposure until they start to appear, then overexpose by 1 stop)
- Record this image with highlight++ disabled, then at 1EV, then at 2EV. Don't change other settings.
- Brighten the darker images (use the Levels tool to clip R, G and B channels at the same point - just before green starts clipping) -> with this you should get the original image (well... almost, since the response curve is not quite linear; a flat picture style may help).
- See how much detail can be recovered.
Now I'm thinking to reverse engineer the response curve and get the RGB data back to linear if possible. This would make postprocessing a lot easier (or at least the research part).
Here's a small howto for obtaining a mask for overexposed highlights in Gimp:
- Decompose the image to RGB (Colors -> Components -> Decompose)
- Look at the histogram on the green channel (or the channel that clips first) and see where it clips (it will be under 255, obviously). That's the white point.
- Threshold R, G and B channels at the level you have just found. Combine the results with "Lighten only". That's a black and white image - black where color data is accurate, white where it's not. Blur it a bit.
- Optional: use Curves (or Levels) to clip R, G and B channels at the white point. You should get roughly how the shot would look without this feature. Recompose them to get a preview, and compare it to the overexpoesed original shot (taken without highlight++). Discard this image, it's just for your info.
Now, you need to guess the color in the areas where the image is overexposed. Use your skills for this :)
And, finally, blend the two layers (the original one and the one with guessed colors) using the mask. I have attached the result of blind desaturation in the overexposed area => where the subject was already white, it's fine; where it wasn't... it's not that fine :)

Weldroid
Feb 15, 2012, 2:19:50 PM2/15/12
to Magic Lantern firmware development
Tried it on my 600D and it works nicely, thanks for your great work!

pavelpp
Feb 15, 2012, 5:22:28 AM2/15/12
to Magic Lantern firmware development
If only someone could come up with a simple workflow using free
software.. that would be priceless!
software.. that would be priceless!

Redkite Bart
Feb 16, 2012, 3:52:39 AM2/16/12
to Magic Lantern firmware development
Hi A1ex, What happend to the orange bill?
In photoshop you can select image/adjust/replace color. Put the
eyedropper on the pink area and select the proper area through set
fuzziness. In replacement, drag saturation to the left and done. This
replace color is also available in adobe premiere for video.
I dont think the selected color produces false colors because this
color only exists in the beyond clipping part of Red and Blue.
> VRAM25.tif
> 488KWeergevenDownloaden
>
> VRAM25-mask.png
> 182KWeergevenDownloaden
>
> VRAM25-desat.tif
> 499KWeergevenDownloaden
In photoshop you can select image/adjust/replace color. Put the
eyedropper on the pink area and select the proper area through set
fuzziness. In replacement, drag saturation to the left and done. This
replace color is also available in adobe premiere for video.
I dont think the selected color produces false colors because this
color only exists in the beyond clipping part of Red and Blue.
> 488KWeergevenDownloaden
>
> VRAM25-mask.png
> 182KWeergevenDownloaden
>
> VRAM25-desat.tif
> 499KWeergevenDownloaden
pavelpp
Feb 16, 2012, 4:05:49 AM2/16/12
to Magic Lantern firmware development
In Gimp you can also do "Select by color" and then desaturate
pavelpp
Feb 16, 2012, 4:15:29 AM2/16/12
to Magic Lantern firmware development
Here's the same picture processed in Gimp.
Select by color, Threshold at 53, then desaturate.
https://docs.google.com/open?id=0B8UAyrVXGUcxZDYyYWZiYzEtYzU5My00ZmYwLWEyN2QtZmUxMWJjZGJiM2M0
Select by color, Threshold at 53, then desaturate.
https://docs.google.com/open?id=0B8UAyrVXGUcxZDYyYWZiYzEtYzU5My00ZmYwLWEyN2QtZmUxMWJjZGJiM2M0
Alex
Feb 16, 2012, 4:30:17 AM2/16/12
to ml-d...@googlegroups.com
Yes, in this particular case it gives a very nice result. But I'm looking for something that can be automated, and gives a nice result only by knowing the white level. That's why I'm using thresholding - to select which part of the image should be corrected.
For white objects, red and blue will contain useful data, and blue would be clipped. So, a mask can be obtained by thresholding R and B and combining them with "darken only".
This can be scripted pretty easily in avisynth, and will desaturate all objects that normally would have been completely white (overexposed).
Jan Larmann
Feb 16, 2012, 7:08:47 AM2/16/12
to ml-d...@googlegroups.com
another blender head :)
01101011
Feb 16, 2012, 5:47:48 PM2/16/12
to Magic Lantern firmware development
ok, now i got it.
so there are three things i tried:
1.exposed for the dark areas(or whatever) and ignored the highlights,
that resulted to lost highlights.
http://dl.dropbox.com/u/25456/1c.jpg
3.using highlight++ (with same exposure settings)and then brought the
shadows up and that resulted to banding and some protected
highlights(not all).
http://dl.dropbox.com/u/25456/2c.jpg
2.underexposed (using aperture, not iso) to protect the highlights and
then brought the shadows up, and that resulted to noise in the
shadows.
http://dl.dropbox.com/u/25456/3c.jpg
what confuses me about highlight++ is that i dont know what to expose
for.
maybe underexposing (not too much, to avoid heavy banding during the
upbringing of the blacks) till just one or two channels clip?
to desaturate the highlights, in premiere, color replace works fine as
Redkite Bart said.
another way to do this is by using the three way color corrector,
setting master channel saturation to 0 and defining the luma threshold
and softness in the secondary color correction.
Redkite Bart
Feb 17, 2012, 3:51:31 AM2/17/12
to Magic Lantern firmware development
I would use highlight++ for filming birds or brides outside. Because
sometimes they turn around and the sun falls slightly different and
highlights clip. I had that with a bird with white cheeks. I tried to
expose to the right and leave a bit of headroom for when he turns his
head. But after turning the head the cheek is in full sunlight and
blowed beyond clipping point. hard to predict situations. Only one
chance and you need to make decisions fast. This extra highlight
headroom would have saved my shot. Bird gone and good shots up till
the head turning (5sec). If you look at the duck it looks very pink,
but the endresult is acceptable and doesn't appear clipped even with
so little extra detail. Some would say spot on exposure. Remember the
pink area represents the zebra areas you would have had without
higlight++.

uvasonar
Feb 17, 2012, 3:53:00 AM2/17/12
to Magic Lantern firmware development
The problem with color replace is, that midtones and shadows can be
affected, too.
In Vegas Pro "Saturation Adjust" allows you to desaturate just the
highlights with definable threshold and filter steepness. Works fine
and in a GPU powered VPro 11 doesn't eat up much system power.
I made a FX preset with this plugin that seems to work fine for almost
everything. Add it - done.
Roman
Alex
Feb 17, 2012, 5:06:04 AM2/17/12
to Magic Lantern firmware development
01101011 got it just right.
How to expose:
- As Bart said, expose to the right (without highlight++), then enable
highlight++ and use it as a backup (for hard to predict situations).
You'll get the same image as without highlight++, darkened a bit, and
with some extra headroom. In post, you may then choose either to use
the extra data (recover highlights) or discard it (and brighten the
image).
- If you really want to push it to the limit, enable highlight++ and
the banding detection tool (under False Color). If you see a large
patch of uniform color, that's probably completely overexposed in all
channels.
- Or, expose to the right (without highlight++), then enable highlight+
+, then dial the exposure to the right by 1 stop or so.
For post: to find the white level, look where the RGB histogram clips
(usually on G channel) and use that value as threshold.
To bring out the blacks, a flat picture style may help.
Experiment and see what works best for you.
Message has been deleted
Message has been deleted
Alex
Feb 17, 2012, 3:21:34 PM2/17/12
to ml-d...@googlegroups.com
http://freshmeat.net/articles/how-to-report-bugs-effectively
;)
;)
On Fri, Feb 17, 2012 at 10:13 PM, Danne <dud...@gmail.com> wrote:
Hi! Can,t get this to work with my 5d mark 2. Tried the auto.exe
containing recovery highlights etc but whenevr I start filming the
camera dissobey the magic lantern settings and starts recording within
the original camera firmware? I then switch back to the january 24
version and everything works fine again???
Anybody got this to work on their 5d mark 2 or is this a problem on my
camera only?
//Daniel

Danne
Feb 18, 2012, 6:57:25 AM2/18/12
to Magic Lantern firmware development
Hi Alex! Sorry my confusing bug reports :). Still I tried and tried
and really like to get this to work on my camera. I have no Idea why
It,s not working, maybe just wait for the next build then.
Thanks!
//D
and really like to get this to work on my camera. I have no Idea why
It,s not working, maybe just wait for the next build then.
Thanks!
//D
Alex
Feb 18, 2012, 4:37:50 PM2/18/12
to ml-d...@googlegroups.com
Looks like last update had some problems with Highlight++ and HDR movie on some cameras (5D, 600D, 500D, maybe 50D too). Should be OK now.
Also, some 5D, 500D and 50D users reported shutdown problems. My guess is that it may be related with the new features that work by changing DIGIC registers, so I've added some troubleshooting code. If any of those features would cause a lockup, the card LED will remain lit, and you'll know that you have to take the battery out and report the issue.
Full changelog: https://bitbucket.org/hudson/magic-lantern/changesets (it contains quite a few bugfixes).
------------------
Speaking of DIGIC - I've found a few image filters in Canon's image processing pipeline; these can be enabled or disabled very easily. You can find 3 of them under Movie menu (those are grayscale recording, negative image, and something that looks like purple fringing).
These functions which use DIGIC registers are found usually by trial and error (changing the values in these registers blindly and writing down what they do). There are thousands of registers (many of them unused), so analyzing all of them by brute force is a huge task. If you would like to help with this, let me know and I'll prepare a special autoexec.bin (you don't have to write any code, but you shouldn't be afraid of lockups, ERR70's and other similar things).
The following functions were implemented by changing DIGIC registers: FPS override, Highlight++, display saturation, display position adjustment, custom color palettes, and today, image filters. Other possible functionality: clean HDMI out, moving the recorded box around in crop mode, custom curves applied to image, anamorphic preview... etc. The good news is that DIGIC commands are the same on all cameras.
This can unlock many things that previously were thought to be impossible or very hard.
Danne
Feb 18, 2012, 5:29:42 PM2/18/12
to Magic Lantern firmware development
Hi Alex!
Did some fast testing since my camera was one of the ones not working
before with highlight recovery. This build works exactly as it,s
supposed to! Amazing! I can,t wait to try out the highlight recovery
with the hdr movie mode.
Splendid work!
//D
> autoexec.bin
> 1842KVisaHämta
Did some fast testing since my camera was one of the ones not working
before with highlight recovery. This build works exactly as it,s
supposed to! Amazing! I can,t wait to try out the highlight recovery
with the hdr movie mode.
Splendid work!
//D
> 1842KVisaHämta
TOM_M
Feb 18, 2012, 5:44:16 PM2/18/12
to Magic Lantern firmware development
Id like to try some of these out - as long as its unlikely to cook my
camera ;-)
> autoexec.bin
> 1842KViewDownload
camera ;-)
> 1842KViewDownload
01101011
Feb 18, 2012, 6:03:37 PM2/18/12
to Magic Lantern firmware development
i am in too.
where do i register for helping with the registers?:P
where do i register for helping with the registers?:P
Danne
Feb 19, 2012, 1:46:03 AM2/19/12
to Magic Lantern firmware development
Hi Alex!
I could help you out with the registers as I got a 550d which I don,t
have to be afraid of testing and fooling around with. Since the
register protocol seems to be the same the results can be implemented
ta all the cameras anyway, right?
Please contact me when you have a auto.exe ready.
//Daniel
> autoexec.bin
> 1842KVisaHämta
I could help you out with the registers as I got a 550d which I don,t
have to be afraid of testing and fooling around with. Since the
register protocol seems to be the same the results can be implemented
ta all the cameras anyway, right?
Please contact me when you have a auto.exe ready.
//Daniel
> 1842KVisaHämta
pavelpp
Feb 19, 2012, 3:33:33 AM2/19/12
to Magic Lantern firmware development
Alex, is it known that auto adjustment of white balance in Kelvin is
broken in this build? At least on my 550d. Also why is it not
adjustable during Live View? This makes it very difficult to use, as I
want to be able to see the image while I adjust the K temperature. I
movie mode there is a workaround, by holding a Flash button, but in M
mode this is not possible.
broken in this build? At least on my 550d. Also why is it not
adjustable during Live View? This makes it very difficult to use, as I
want to be able to see the image while I adjust the K temperature. I
movie mode there is a workaround, by holding a Flash button, but in M
mode this is not possible.
Alex
Feb 19, 2012, 3:38:23 AM2/19/12
to ml-d...@googlegroups.com
Auto WB adjustment from ML (Kelvin+green/magenta)? Just tested on 5D and it's working.
Make sure you don't have the image completely overexposed, otherwise you may get false readings.
For your other questions, check the help menu.
Make sure you don't have the image completely overexposed, otherwise you may get false readings.
For your other questions, check the help menu.
pavelpp
Feb 19, 2012, 4:41:14 AM2/19/12
to Magic Lantern firmware development
Yes, help says press WB in live view, but that only moves focus
rectangle up on my camera. pressing Q in LV simply opens native quick
menu.
rectangle up on my camera. pressing Q in LV simply opens native quick
menu.
Alex
Feb 19, 2012, 5:36:25 AM2/19/12
to ml-d...@googlegroups.com
Help says to press "Zoom In" and "Q" (in ML menu, of course).
I guess I should write this with blinking fonts, or maybe a quiz at startup...
I guess I should write this with blinking fonts, or maybe a quiz at startup...
pavelpp
Feb 19, 2012, 5:51:09 AM2/19/12
to Magic Lantern firmware development
Sorry, but http://magiclantern.wikia.com/wiki/Unified/UserGuide#kelvin-white-balance
says nothing about Zoom In button. Same with in camera manual. Or
maybe I shoot look for instructions elsewhere?
says nothing about Zoom In button. Same with in camera manual. Or
maybe I shoot look for instructions elsewhere?
Alex
Feb 19, 2012, 5:52:37 AM2/19/12
to ml-d...@googlegroups.com
In ML menu, last tab.
It's not specific to white balance; most settings can be previewed in this way.
It's not specific to white balance; most settings can be previewed in this way.
Alex
Feb 19, 2012, 4:14:54 PM2/19/12
to Magic Lantern firmware development
For DIGIC registers, see this thread:
https://groups.google.com/group/ml-devel/browse_thread/thread/bc87f877c0e5f8aa
https://groups.google.com/group/ml-devel/browse_thread/thread/bc87f877c0e5f8aa

Lionel Davey
Feb 19, 2012, 8:12:20 PM2/19/12
to ml-d...@googlegroups.com
Hi Alex.
I can't get auto WB to work either.
It used to be a case of pressing Q in ML menu would switch to live view and auto adjust.
Now pressing Q will bring up the submenu.
If I then press zoom in, I get live view with preview of manual WB adjustment (very nice too, didn't know about this feature).
However, pressing Q simply returns back to the WB submenu. It does not auto adjust WB.
Hope I am not missing something simple.
Regards,
Audionut.

Chucho Saldana
Feb 19, 2012, 10:06:35 PM2/19/12
to Magic Lantern firmware development
In post if you have access to any software that can adjust lift gamma
and gain, to remove the magenta just pull back on the saturation in
gain.
and gain, to remove the magenta just pull back on the saturation in
gain.
Chucho Saldana
Feb 19, 2012, 10:13:13 PM2/19/12
to Magic Lantern firmware development
Sorry I forgot to add Hue, pull back on saturation and hue in Gain
Lionel Davey
Feb 20, 2012, 12:29:48 AM2/20/12
to ml-d...@googlegroups.com
Oh my. And here all this time I thought I could read.
Excuse me while I go and hide.
Excuse me while I go and hide.
pavelpp
Feb 20, 2012, 2:00:27 AM2/20/12
to Magic Lantern firmware development
It's not your reading problem. If two people get it wrong, it means
something. it used to be more straightforward.
something. it used to be more straightforward.
Alex
Feb 20, 2012, 3:00:17 AM2/20/12
to ml-d...@googlegroups.com
... two people out of 70000? :)
Rather than complaining that it was better before, can you post some useful suggestion? I guess you don't want me to disable submenus just for this.
When started for the first time, ML displays the help screen, with big fonts (and you didn't read it). Should this screen be displayed every time you start ML?
pavelpp
Feb 20, 2012, 3:56:59 AM2/20/12
to Magic Lantern firmware development
I don't want to argue or prove anything. Just saying it was better
before. I did not see any help screen on first start up (million ways
to explain how this could happen). Anyways, my 1st suggestion is to go
to LV as soon as any of the values is changed in sub menu. My second
suggestion is that Display sensor shortcuts should be programmable to
choose what function I actually want to assign to arrow keys
(personally I would assign Kelvin +/- to up/down arrows).
Lionel Davey
Feb 20, 2012, 4:15:04 AM2/20/12
to ml-d...@googlegroups.com
Actually, I think it is just a problem with my reading. I guess I was maybe a little confused with the functionality being changed.
It's clearly shown at the bottom of the submenu. I know I even looked at it a couple of times, it just never clicked to hit this stupid.
Probably the only suggestion I have is change the (Push-button WB), to (Push here stupid), or more appropriately, (Push set).
It's clearly shown at the bottom of the submenu. I know I even looked at it a couple of times, it just never clicked to hit this stupid.
Probably the only suggestion I have is change the (Push-button WB), to (Push here stupid), or more appropriately, (Push set).

Marcin Mielnik
Feb 20, 2012, 3:44:29 PM2/20/12
to Magic Lantern firmware development
how to make 5d boot this file?
>
> autoexec.bin
> 1842KZobaczPobierz
>
> autoexec.bin
> 1842KZobaczPobierz

eggnot
Feb 25, 2012, 3:56:48 AM2/25/12
to ml-d...@googlegroups.com
strange. in 720p mode it's flickering with variable widht of the stride. bottom part is hightlight++, top stride represent image with no hightlight++ ajustment.

Giovanni Di Cello
Feb 25, 2012, 8:13:47 AM2/25/12
to Magic Lantern firmware development
Same happened to me yesterday with my 50D.
There was a "nonhighlited" stripe of image, i don't know why.
There was a "nonhighlited" stripe of image, i don't know why.

Huey Lee
Mar 4, 2012, 3:14:44 AM3/4/12
to Magic Lantern firmware development
I assume this feature is not yet implemented in 5D2 beta version?
Danne
Mar 4, 2012, 10:40:37 AM3/4/12
to Magic Lantern firmware development
It,s implemented and working in 5d mark.
//D
//D

Arthur_Dn
Mar 6, 2012, 6:12:38 PM3/6/12
to Magic Lantern firmware development
Alex, i had the christmas build installed on my camera, and i replaced
the bin file with this highlight++ build but when i enable the
highlight++ or/and image effects, the live view gets a waving
overexposed stripe on the top. when recording, the stripes gets bigger
and acctually splits the screen in half most of the time, and still
waving up and down.
i'm recording in 720p
Arthur_Dn
Mar 6, 2012, 6:20:28 PM3/6/12
to Magic Lantern firmware development
it seems it has trouble with 60fps.
when overriding the fps of 720p down to about 40fps, the waving issue
complete disappears
when overriding the fps of 720p down to about 40fps, the waving issue
complete disappears
Arthur_Dn
Mar 6, 2012, 6:52:53 PM3/6/12
to Magic Lantern firmware development
alex, while in manual mode the LCD shortcuts are Volume and LCD
brightness. it has no sense a volume control in M mode.
i used to love the kelvin control on LCD shortcut. with the RGB
histogram i was easy to set the right WB. i know the auto WB function
works great, but... a kelvin control is still more usefull than volume
control.
it could have diferent shortcuts between still and movie modes or even
a selectable shortcuts on tweak menu. people could choose what the
vertical and horizontal axis arrows do.
the new ISO system is a control freak. i loved it, but professionally
talking, it became slower to set certain fractions of ISO on the
equivalent section. you could keep this new system, but without
removing the old sequences. 3200 is jumping to 6400. to set 4000 or
5000 you need more clicks now and its bad when in field because almost
always we need to do fine adjustments as fast as possible.
Reply all
Reply to author
Forward
0 new messages